Creating Revit families with discipline is the bedrock of a predictable, high-performing BIM workflow. When your Revit family library is in good shape, it’s filled with modular, reusable, and lightweight components. These assets balance flexibility with performance, directly protecting your project margins and ensuring your team works consistently from start to finish.
This isn’t about textbook definitions. It’s about building a system that delivers clarity, speed, and operational consistency.
The True Cost of a Disorganized Revit Library
A messy Revit library isn't just a minor headache—it's a direct threat to your project's performance and profitability. When the digital DNA of your production is inconsistent, bloated, or mismanaged, the negative impacts ripple through every single phase, from early design to permitting prep. This is the daily reality for firms struggling with an undisciplined approach to content creation.
The problems show up in ways that hit your bottom line hard. Sluggish models waste billable hours as teams wait for views to regenerate or files to sync. We’ve seen model sizes drop dramatically when families were refactored with the right detail level, proving that disciplined Revit family management is one of the most powerful levers you can pull for performance.
The Downstream Effects of Poor Library Hygiene
When a library lacks standards, every project kicks off on shaky ground. The issues compound fast, leading to predictable failures that erode both confidence and profitability.
You know you have a disorganized library when you see symptoms like these:
- Duplicate and Inconsistent Content: Teams waste time digging for the "right" door family, often grabbing the first one they find. This is a recipe for scheduling errors and a flood of RFIs from confused contractors.
- Overly Detailed Geometry: Families downloaded from manufacturer websites or built with excessive detail cripple model performance. A hyper-realistic door handle has no business in a 1/8" scale floor plan, but it still chews up valuable system resources and can lead to model bloat.
- Chaotic Naming Conventions: A library without an enforced naming standard is a nightmare to navigate. When
Door-Ext-Single-Flush-36x84.rfaexists next to3070_Exterior_Door.rfa, the library becomes a minefield of uncertainty that slows everyone down.
A well-structured library is not a 'nice-to-have'—it is a critical asset for protecting margins. It transforms BIM workflows from reactive and chaotic to predictable and scalable.
This lack of operational consistency makes it impossible to form scalable delivery pods. Each project team is forced to reinvent the wheel, deciding on their own which families to use. The debate over building new components versus buying pre-made ones becomes a constant project-level distraction instead of a firm-level strategy. To get a better handle on this, our guide on whether you should build or buy Revit families offers a clear framework for that decision.
Ultimately, a disorganized library fosters a culture of reactive problem-solving. BIM managers spend their days firefighting model performance issues and resolving RFI conflicts instead of focusing on process improvement and production maturity.
Laying the Foundation for a Lightweight Library
Before you draw a line or flex a parameter, the most important work happens. Building a high-performance Revit family library isn’t about fancy geometry; it starts with a solid strategy designed to prevent future headaches and protect your project margins. This is the discipline that separates a smooth, predictable production environment from a chaotic one.
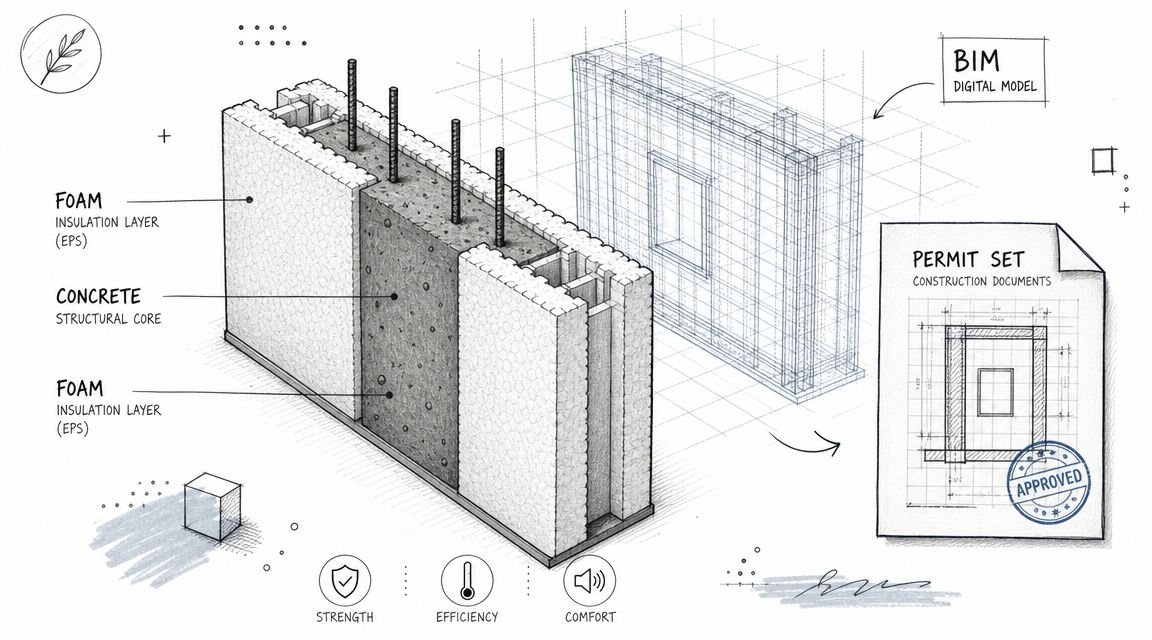
The first few decisions are practically permanent. Choosing the right family template—wall-based, face-based, or standalone—has huge downstream consequences for usability and performance. A face-based light fixture offers placement flexibility, but a ceiling-hosted one enforces design intent and simplifies placement for junior staff. There’s no single right answer, only the right answer for your workflow.
Establishing the Rules of Engagement
Consistency doesn't happen by accident—it must be engineered through template discipline. Just as a solid structure is crucial for a compelling presentation, laying the foundation for a lightweight Revit library requires careful structural planning. For more on that topic, check out this great resource on How to Structure a Presentation That Actually Wins. The main goal is to build a system that eliminates ambiguity and guesswork for your entire team.
This system needs two non-negotiable parts:
- A Logical Naming Convention: Think of this as your library’s Dewey Decimal System. A strict, logical naming convention is the fastest way to kill the duplicate content that plagues so many firms. A standardized format like
Discipline-Category-Type-Subtype-Dimensions.rfamakes everything predictable. - A Defined Level of Development (LOD) Strategy: This is your number one defense to avoid model bloat. Your library standards must be crystal clear about how much detail is needed at each project stage. Families should have just enough detail for their intended use—and not a single polygon more.
We’ve seen model sizes drop dramatically when families were refactored with the right detail level. A simple rule we follow is to build the simplest family that will do the job.
This groundwork has a direct impact on your firm's operational consistency. When a manufacturer provides their own families, it can be a huge time-saver, but you have to vet them against your standards first. This is becoming more common, as studies show that over 75% of AEC professionals are more likely to specify products available in a Revit format. You can find more insights on this trend in Revit family creation for product manufacturers.
The Template as a Decision Checkpoint
Your choice of a family template is the first major decision checkpoint. This isn't just a technical pick; it’s a commitment to a specific BIM workflow.
Think about these common scenarios:
| Family Type | Best Use Case | Impact on Workflow |
|---|---|---|
| Wall-Based | Doors, Windows, Wall Fixtures | Automatically cuts openings and gets deleted if the host wall is removed, enforcing relationships. |
| Face-Based | Surface-mounted lights, Signage | Can be hosted on any surface (walls, ceilings, floors), offering maximum flexibility but requiring more user discipline. |
| Standalone | Furniture, Casework, Equipment | Isn't dependent on a host, allowing it to be placed freely anywhere in the model. |
Each choice forces a certain user behavior. By thinking through these implications before creating geometry, you embed logic and predictability into your library from day one. This foresight is what stops RFIs before they happen and ensures your production teams can scale without constant hand-holding.
Mastering Geometry and Parameters to Avoid Bloat
This is where the real craft of creating Revit families comes into play. A well-built family feels right—it's intuitive, performs smoothly, and has just enough intelligence to do its job without dragging down the model. This is a mix of disciplined geometry creation and a smart approach to parameters. These two things are your biggest weapons in the fight to avoid model bloat.
Keep Your Geometry Lean and Clean
The first rule of lean geometry is simple: avoid imported CAD at all costs. It might seem like a fast shortcut, but importing a DWG file into a family is like inviting a trojan horse into your model. It brings in unnecessary layers, bizarre line styles, and dirty data that will slowly corrupt your project's health. This is a classic CAD-to-BIM evolution mistake.
Instead, build your geometry natively in Revit. Stick to clean extrusions, sweeps, and revolves.
Another classic mistake is over-modeling. We've all seen models where every screw head on a piece of equipment is modeled as a tiny void. This level of detail is almost never needed and adds thousands of polygons that bog down every view. If you want to see how bad it can get, it's worth understanding the common pitfalls of hidden geometry errors that can break Revit models. A disciplined approach here is a true sign of production maturity.
This decision-making flow shows the foundational checkpoints for creating a robust and efficient Revit family, starting with the template and moving through naming conventions and Level of Detail (LOD) strategy.
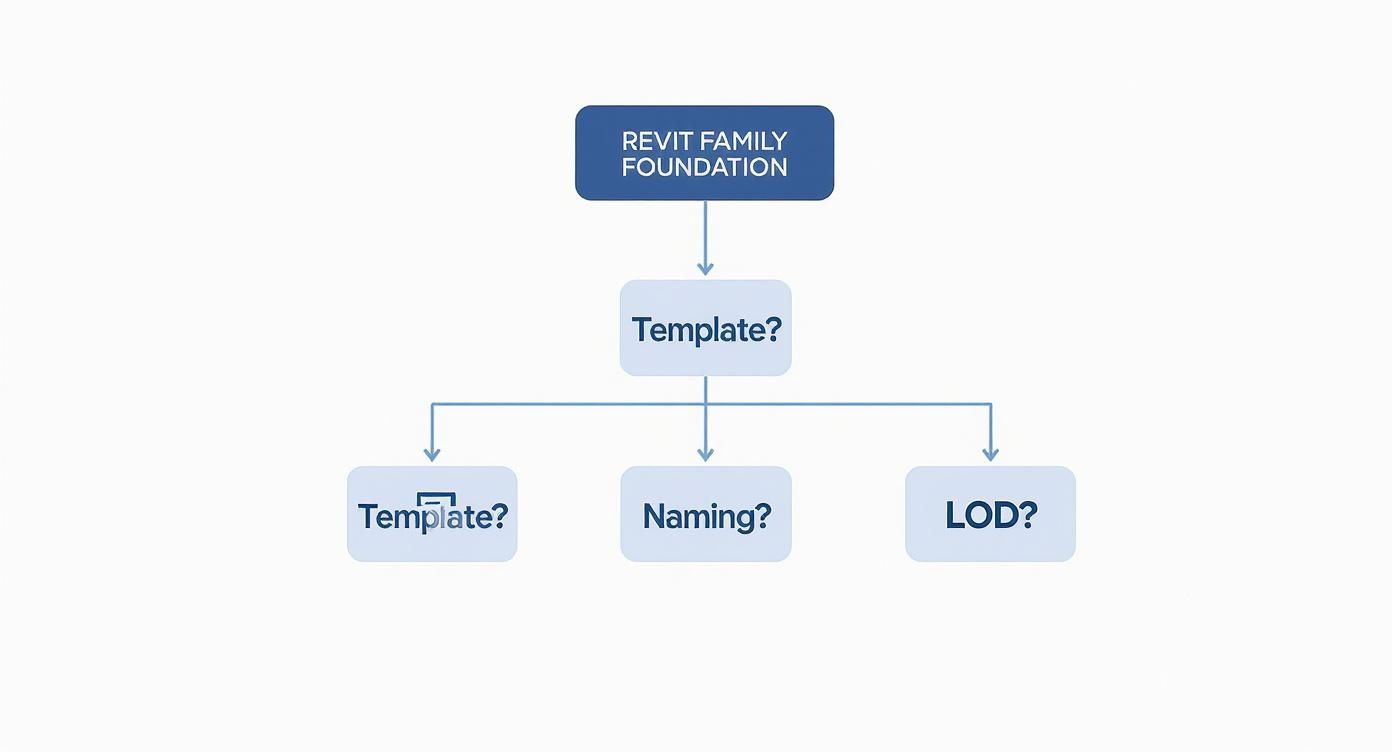
Following a structured path like this ensures every family is built on a solid, consistent base, which is crucial for preventing downstream issues like model bloat and team confusion.
Making Smart Parameter Choices
If geometry is the family's skeleton, parameters are its brain. How you build that brain determines whether your family is a flexible asset or a confusing liability. The most fundamental decision is choosing between Type and Instance parameters.
- Type Parameters: Use these for attributes that are consistent across all instances of a specific type. Think manufacturer, model number, or a standard material finish. This keeps things consistent and makes global changes easy.
- Instance Parameters: Reserve these for properties that need to vary from one instance to another. A door’s swing direction, a piece of equipment’s mark number, or a window's sill height are perfect examples. They provide flexibility exactly where it’s needed.
Getting this balance right is everything. Too many instance parameters can lead to chaos in a project, as team members freely change properties that should be standardized.
The table below offers a quick guide to help you decide which parameter is the right tool for the job.
Type vs Instance Parameter Decision Guide
A quick reference to help you decide which parameter type is right for different family attributes, balancing flexibility with library consistency.
| Attribute Type | Use Type Parameter When… | Use Instance Parameter When… | Example |
|---|---|---|---|
| Identity/Catalog Data | The value is defined by the manufacturer and is the same for all items of that model. | The value is unique to each placed element, like an ID tag. | Model Number (Type) vs. Mark Number (Instance) |
| Dimensions | The size is a standard, catalog option (e.g., 36" wide door). | The dimension needs to be adjusted in the project (e.g., a custom-length counter). | Standard Window Width (Type) vs. Sill Height (Instance) |
| Material/Finish | The material is a standard finish option for that product line. | You need to override the finish for specific elements in the project. | Standard Wood Finish (Type) vs. Accent Wall Paint Color (Instance) |
| Operational Controls | The setting is inherent to the product's design. | The setting reflects its specific use or placement in the model. | Fire Rating (Type) vs. Door Swing Direction (Instance) |
Ultimately, your goal is to lock down what should be consistent (Type) while allowing for necessary, on-the-fly adjustments (Instance).
The Power—and Peril—of Shared Parameters
Shared Parameters are the connective tissue of a data-rich Revit family library. They allow you to create custom parameters that can be scheduled and tagged across multiple families and projects. This is how you ensure your door schedule can pull the correct hardware set information from every single door family.
But they must be managed with extreme care. A poorly managed Shared Parameter file can quickly become a tangled mess.
The key is a single, centrally managed Shared Parameter file for the entire firm. This is your "single source of truth" for custom data. When a new parameter is needed, it should be formally requested, approved by the BIM manager, and added to the master file. This discipline prevents the RFI-generating chaos of having multiple parameters like Hardware_Set and HW Set all trying to do the same thing.
Once you’ve got a handle on clean geometry and disciplined parameters, you’re ready for the techniques that really separate a basic family library from a high-performance production toolkit.
Smartly using nested families and visibility controls is how you build modular, intelligent assets that boost productivity and keep models lightweight.
Assembling Components with Nested Families
A nested family is just a Revit family loaded into another one. Think of them as LEGO bricks. Instead of creating one giant, monolithic door family, you build its components separately—a door panel family, a frame family, and a door handle family. You then assemble these simpler parts inside a "host" door family.

This modular approach is a game-changer for Revit family management. If a project needs a different door handle, you just swap out the nested handle family for another one. This makes reusing components a breeze and simplifies maintenance.
Building Intelligence with Visibility Parameters
Visibility controls are your first line of defense against model bloat. They let a single family serve multiple purposes by controlling which pieces of geometry show up in different detail levels (Coarse, Medium, and Fine). This is essential for creating a lean but flexible Revit family library.
Instead of making three separate families for different levels of detail, you build one and assign its geometry to the right setting. A typical setup might look like this:
- Coarse: A simple 2D symbolic line showing the door swing. This keeps your floor plans fast.
- Medium: A basic 3D extrusion of the door panel and frame, perfect for most elevations and sections.
- Fine: All the detailed geometry, including the door handle and vision lite, for close-up views.
We’ve seen model sizes drop dramatically when families were refactored with the right detail level settings. A single, well-controlled family is always better for performance than three separate, unmanaged ones.
This discipline directly prevents the performance drag that happens when a project gets loaded with needlessly complex geometry. It’s a core tenet of production maturity and a simple way to prevent RFIs caused by inconsistent graphics. For a deeper dive, check out our guide on the impact of visibility settings on Revit family performance.
The Power of Nesting Shared Components
The real power move is combining nested families with visibility controls. By nesting shared and interchangeable components—like that door handle—you can tie their visibility to a simple Yes/No parameter in the parent family.
Imagine a single air handling unit (AHU) family with multiple, nested coil options. Instead of three separate AHU families, you build one and add parameters like "Show Chilled Water Coil" and "Show Hot Water Coil." This lets engineers configure the exact unit they need from a single, intelligent family, which keeps data consistent and makes library maintenance far easier.
When you build families this way, you create a system that supports scalable delivery pods. Junior staff can feel confident they are using the right components, and BIM managers can maintain a smaller, more agile library. This is how you move from just creating Revit families to engineering a reliable and predictable production workflow.
Nailing Your QA and Deployment Workflow
A family isn't finished just because the geometry looks right. An untested family is a liability—a ticking time bomb that could corrupt a project model or grind production to a halt. A disciplined Quality Assurance (QA) workflow is the final gatekeeper of your firm's operational consistency.
This isn’t about adding red tape; it's about protecting your margins and ensuring predictability. Every single family, whether built in-house or downloaded, has to pass through a rigorous, standardized checkpoint before it ever touches a live project. This is a non-negotiable step for any team serious about Revit family management.
The QA Checklist Every BIM Manager Needs
Testing has to be systematic. The goal is to try and break the family in a safe, controlled environment so it doesn’t break in a live one. My go-to method is to use a clean, empty Revit project file as a testing ground. This isolates the family, making it easy to spot performance issues.
Your QA process needs a solid checklist that validates both geometry and data. Here are the core tests every family must pass:
- Parameter Flexing: Methodically change every single parameter, especially dimensions. Push them to their absolute minimum and maximum logical values. Does the geometry break?
- Host Behavior: If the family is hosted (wall, ceiling, face-based), test its behavior. Move the host, change its thickness, and see how the family responds. Does it maintain its position correctly?
- Visibility Control Verification: Cycle through all detail levels (Coarse, Medium, Fine) in multiple view types (plan, elevation, section, 3D). Does the geometry display exactly as intended?
- Data and Connector Integrity: For MEP families, this is absolutely critical. Confirm that all connectors are correctly oriented, assigned to the right system, and carry the correct data.
A family that hasn't been properly flexed and tested is just a guess. A robust QA process transforms that guess into a reliable production asset, preventing downstream errors that lead directly to RFIs and rework.
Deploying Your Library as a Single Source of Truth
Once a family passes QA, the next challenge is getting it to your teams. How you manage and distribute your approved Revit family library is just as important as how you build it. The goal is simple: establish a single source of truth that prevents teams from using outdated, unapproved, or rogue content.
A chaotic library stored on a messy server is a recipe for inconsistency. A clear deployment strategy is essential. While there are plenty of third-party content management platforms, a well-organized network drive can work perfectly well if managed with discipline.
The core principles are straightforward:
- Centralized Location: All approved families live in one, and only one, place.
- Read-Only Access: General users should have read-only permissions to the library. This prevents accidental modifications or someone adding their unvetted content.
- Clear Versioning: When you update a family, have a clear process for archiving the old version and rolling out the new one.
This structured approach to creating Revit families and managing their lifecycle is fundamental to building scalable delivery pods. It ensures every team member, from a senior architect to a junior technician, is building with the same reliable, high-performance components.
Putting It All Together: Your Next Steps
We’ve covered the core principles for building a lean, high-performance Revit family library. A smart library isn't just a nice-to-have; it's the bedrock of efficient production and directly impacts your speed, clarity, and consistency on every project. It’s what separates a workflow that scales from one that constantly breaks under pressure.
We know that building these standards from scratch feels like a massive undertaking. It demands a disciplined approach to creating Revit families, a rock-solid QA process, and a clear plan for deployment. This isn't just about software—it's about engineering a reliable system that your people can trust.
From Theory to Practice
Moving from a plan on paper to a working system is always the hardest part. The ideas behind lightweight geometry, smart parameters, and rigorous QA processes make sense, but implementing them across a firm takes dedicated effort. The key is to start small and build momentum.
Don't try to boil the ocean. Begin by picking a few of your most-used, most problematic families—doors and windows are common culprits. Apply the strategies we've talked about:
- Audit them: Hunt down and destroy any imported CAD geometry and strip out unnecessary detail.
- Standardize parameters: Make a clear, firm-wide decision on what should be a Type vs. an Instance parameter.
- Test them: Run each family through a formal QA checklist in a clean, empty project file before releasing it.
This focused effort will create immediate, tangible improvements in model performance and usability. More importantly, it demonstrates the value of this new approach to your entire team.
Shifting from Chaos to a Managed System
The ultimate goal is to move away from an environment where anyone can create or download a family into a managed system with a single source of truth. That shift is crucial for achieving the operational consistency that protects your project margins and prevents costly RFIs. A well-managed Revit family library is a direct contributor to your firm's bottom line.
A library isn't a destination; it's a living asset that requires ongoing care and feeding. The discipline you establish today pays dividends in predictability and performance for years to come.
Tools can certainly help streamline the process. Plugins like DiRoots’ ParaManager can be a lifesaver for bulk-adding shared parameters to families, saving countless hours of manual work. If you're looking for more, the experts at BIM Pure have curated a great list of helpful plugins that can support your workflow.
But remember, tools support a system—they don't replace the need for clear standards. A well-defined framework is what ensures your library remains a powerful asset rather than a digital junkyard.
Hopefully, this guide has given you a clear path for building a better system for creating Revit families. To help you take that first practical step, we've put together a Family Creation Standards Template. This resource provides a framework for defining your naming conventions, parameter requirements, and QA checklists. It’s a starting point for building the kind of library that leads to reliable delivery. When you’re ready for deeper help, you’ll know you’re talking to a partner who understands production systems, not just software. Learn more at https://www.bimheroes.com.