Installing a window in a log wall is a movement management problem, not a standard framing detail. If you treat a log wall like a conventional stud wall, you are making a fundamental mistake that guarantees failure. It's the single most common source of field fixes in log home construction, and it comes from a deep misunderstanding of how these structures behave.
A log wall is a dynamic system. It breathes, it moves, and most importantly, it settles.
Why Standard Framing Is a Recipe for Disaster in Log Walls
Every log wall will shrink and compress over time. This movement, known as vertical settlement, is totally unavoidable. It's driven by two things: moisture loss as the logs cure and the immense weight of the structure compressing the wood fibers.
Depending on the log species, initial moisture content, and the height of the wall, you could see several inches of settlement over the first few years. The Log & Timber Homes Council is clear: planning for this movement isn't just a good idea; it's a basic requirement for structural integrity.
When you install a window using standard framing methods—fastening it directly to the log ends—you create a rigid, unmoving point in a wall that is actively trying to move. The results are predictable, expensive, and a nightmare to fix.
The Crushing Consequences of Ignoring Settlement
Ignoring settlement doesn't just create minor issues; it leads to systemic failures that destroy project margins and your reputation. Most field fixes, warranty claims, and RFIs for inoperable windows can be traced right back to drawings that overlooked the correct log home window framing details.
Here’s the real production pain caused when logs settle onto a fixed window:
- Binding Sashes: The immense downward pressure literally crushes the window frame. Sashes jam shut, becoming impossible to operate after the first season.
- Cracked Glass: All that stress gets transferred to the glass, which is the most brittle part of the assembly. It’s not uncommon for the glass to crack spontaneously under the load.
- Distorted Frames and Broken Seals: Vinyl, wood, or fiberglass frames weren't designed to be structural members. They warp under the load, breaking the insulated glass unit's seal and leading to condensation between the panes.
- Water and Air Leaks: Once the frame is distorted and the seals are broken, you've created massive pathways for water infiltration and air leakage, compromising the entire building envelope and triggering callbacks.
- Destroyed Trim: Any trim fastened to both the window and the logs will be torn apart, split, or buckled as the wall moves down around it.
The core principle is simple: The window must be completely isolated from the vertical load path of the logs. It has to "float" within the opening, allowing the wall to settle around it without transferring any crushing force to the window unit itself.
This is a movement management problem, not a simple framing task. Every detail in your drawings—from the rough opening size to the flashing sequence—must respect this reality. A successful window installation in log walls starts by acknowledging that the wall will move and then detailing a system that accommodates it. Get this right on paper, and you’ll prevent RFIs, eliminate costly field fixes, and deliver a building that performs for the long haul. For a deeper dive into these concepts, our guide to enclosure detailing provides additional context.
The Physics of Log Wall Settlement
Installing a window in a log wall requires thinking less like a carpenter and more like a production manager managing a living system. This isn't just theory—it's the on-the-ground reality that dictates every detail. Get it wrong, and you're guaranteed a crushed, inoperable window and a costly callback that erodes your margins.
Log walls settle. That's the one thing you can always count on. The movement comes from moisture loss as the logs dry out over time, and the sheer compressive force from the weight of the structure bearing down on the wood fibers.
This combined effect creates significant vertical shrinkage. How much? That depends on key variables your design and production teams must account for in their BIM models and drawing sets.
Quantifying the Movement
You need to know just how much a wall is going to move to detail an opening that can handle it. We’re not talking fractions of an inch here; we’re talking about managing inches of settlement.
- Log Species and Cut: Different woods compress at different rates. Softwoods like pine and cedar behave differently than hardwoods.
- Initial Moisture Content: This is the big one. Green logs can shrink dramatically, often settling between ½ to ¾ of an inch for every vertical foot of wall height.
- Kiln-Dried Logs: They're more stable, but they aren't immune to movement. Kiln-dried logs still compress under load and react to seasonal humidity shifts, typically settling at about half the rate of green logs.
For a typical one-story log wall, that could mean 2-3 inches of total settlement below a window. On a two-story home, you could easily see double that. This is the movement your window detail has to accommodate without failure.
A window frame cannot be a structural support. Drawings must clearly communicate that the window's role is purely as an enclosure component, completely isolated from the vertical load path of the settling log wall. Failure to detail this separation guarantees a crushed, inoperable window and an RFI from the field.
The System for Managing Settlement
To isolate the window from these powerful forces, we rely on a specific system of components that must work together perfectly. If one part fails, the whole assembly is compromised. Mastering these log wall settlement details is what separates mature production teams from those who improvise.
The system is built around four key elements:
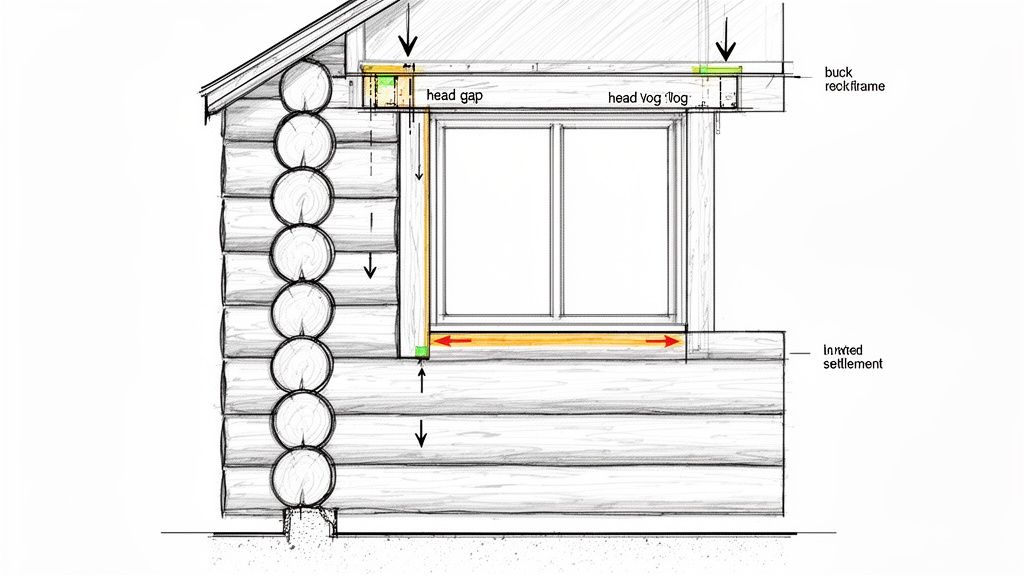
- The Sized Rough Opening: Unlike stick-framing, the rough opening in a log wall must be cut significantly taller than the window itself to accommodate the settlement gap.
- The Independent Buck Frame: This is a three-sided wood frame, usually made from 2x lumber, that fits inside the log opening. It creates a stable, plumb, and square surface to mount the window, totally independent of the logs.
- The Critical Settling Space: This is the calculated gap left open between the top of the buck frame and the bottom of the log course above it. This empty space is the most crucial element, as it gives the logs room to settle downwards without touching the window assembly.
- Vertical Slip Joints: These are channels or splines cut into the log ends of the rough opening. The buck frame is fastened into these joints, anchoring it side-to-side while allowing the log wall to slide freely downwards as it settles.
The demand for these homes is growing, underscoring the need for this kind of technical precision. With over 26,000 log and timber homes built annually in a market that hit $940 million in 2017, the ability to deliver reliable, high-performance enclosures is a huge competitive advantage. Nailing these details isn't just good practice; it's how you protect margins and ensure operational consistency.
Ultimately, these components create a static "window box" that floats within the dynamic log wall. This turns a complex movement problem into a predictable, manageable system—one that protects your projects and builds your reputation for quality. A solid grasp of log home design fundamentals is essential before you dive into these specific details.
Detailing the Buck Frame and Slip Joints
Now that we understand the physics of log settlement, we can detail the solution: the buck frame and its slip joints. This is where the success of a window installation in log walls is decided. It’s a system designed to let the log wall move while the window stays perfectly still.
This isn’t a place to improvise on site. A poorly detailed buck frame is a guaranteed callback, leading to stuck sashes, water infiltration, and costly repairs that eat into your profits. The whole point is to build a stable, independent frame inside the rough opening that essentially "floats," completely disconnected from the vertical loads of the logs above.
This diagram shows how wall load translates directly into settlement, which is why the window frame needs to be engineered to handle that downward movement.
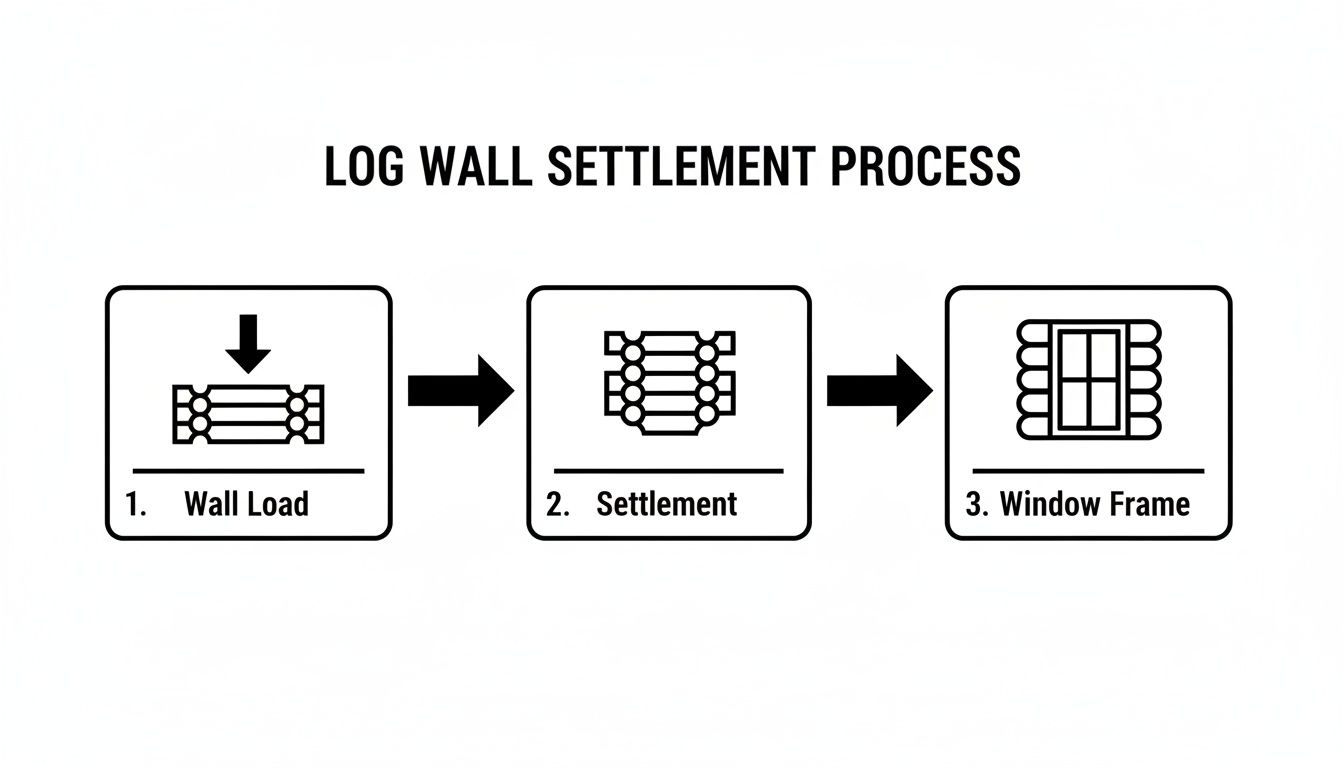
The key thing to remember is that the window frame has to be structurally independent. If it’s not, the downward force from the settling logs will eventually crush or bind it.
Sizing and Constructing the Window Buck
The buck frame, usually built from standard 2x lumber, has one main job: to create a perfectly flat, plumb, and square surface for mounting the window. Since log ends are never perfectly uniform, the buck acts as a precision adapter. It's a three-sided box—two vertical jambs and a horizontal sill—that fits snugly inside the log rough opening.
Getting the buck's dimensions right is critical. The inside of the buck needs to match the window manufacturer’s specs, while the outside needs to fit the log opening and leave room for the slip joints. Mess this up, and you’ll be fighting it all the way through flashing and trim.
Here's the absolute rule: the window unit is fastened only to the buck frame. Never should a screw or nail go from the window, through the buck, and into a log. That mistake is called "pinning," and it mechanically locks the window to the settling wall, completely defeating the purpose of the system and guaranteeing failure.
The Critical Role of Vertical Slip Joints
While the buck creates a stable mounting point, the slip joints are what make the system work. These are vertical channels that anchor the buck frame horizontally but allow the log wall to slide down freely around it. This is the core principle of proper log home window framing.
There are a few tried-and-true methods for creating slip joints:
- Dadoed Log Ends: A vertical channel, or dado, is cut directly into the log ends framing the rough opening. The 2x buck jambs then slide right into these channels.
- Keyed Splines: A vertical slot is cut into the log ends. A matching wooden "key" or spline is attached to the back of the buck jambs, and this key fits into the slot.
- T-Splines: A T-shaped spline, either wood or metal, is inserted into slots in the log ends. The buck frame is then fastened to the part of the "T" that sticks out.
No matter which method you use, the idea is the same. The buck is secured through the sides of the splines or into the keys, which stops it from moving in or out. But since no fasteners go directly from the buck into the log ends, there’s nothing to stop that smooth vertical movement. For anyone managing complex framing jobs, these principles can be applied in other areas; our guide on BIM for wood framing construction has more on that.
Calculating the Head Gap for Settlement
The slip joints handle the movement, but the settlement gap is what gives the logs room to move. This calculated empty space between the top of the buck frame and the log header above is the single most important dimension in the whole setup. If this gap is too small, it might as well not be there at all.
Figuring out the right size for the gap is straightforward and based on a few key variables:
- Measure the height of the log wall from the foundation up to the bottom of the window's rough opening.
- Get the settlement rate from the log supplier. For example, green logs might settle ½ inch per vertical foot.
- Multiply the wall height by the settlement rate to find the total potential settlement. It's always a good idea to add a small safety margin.
This number becomes the minimum required head gap. This space gets loosely filled with something compressible, like low-density fiberglass or open-cell foam, to create a thermal break without adding any structural resistance as the gap closes over time. This kind of methodical log home construction detailing ensures everything performs as expected. The window installation industry, a market that hit an estimated $6.7 billion, depends on this level of precision, especially in niche areas like log homes where these complex assemblies are best detailed using BIM. You can discover more insights on the window installation market from IBISWorld.
Below is a simple table to help visualize how to calculate this gap.
Calculating Minimum Head Gap for Settlement
A simplified guide for architects and builders to estimate the required settlement space above a window buck based on wall height and log moisture content. Note: Always consult a structural engineer and log supplier for specific project requirements.
| Wall Height Below Window (Feet) | Green/High Moisture Content (Typical Gap) | Kiln-Dried/Low Moisture Content (Typical Gap) |
|---|---|---|
| 8 | 4.0 inches (8 ft x 0.5"/ft) | 2.0 inches (8 ft x 0.25"/ft) |
| 10 | 5.0 inches (10 ft x 0.5"/ft) | 2.5 inches (10 ft x 0.25"/ft) |
| 12 | 6.0 inches (12 ft x 0.5"/ft) | 3.0 inches (12 ft x 0.25"/ft) |
| 14 | 7.0 inches (14 ft x 0.5"/ft) | 3.5 inches (14 ft x 0.25"/ft) |
As you can see, the higher the wall and the "greener" the logs, the more space you need to leave. This isn't a "one-size-fits-all" number—it's a critical calculation that protects the window from years of predictable building movement.
Creating a Weather-Tight Seal That Lasts
You can have the most perfectly engineered settlement system in the world, but it means nothing if the windows leak. Getting the flashing and sealing right for a window installation in log walls is a major production challenge. Why? Because the materials have to maintain a continuous barrier while bridging a joint that is constantly, subtly moving.
This isn't just about shedding water. It's about creating a durable, flexible seal that won't tear, stretch, or fail as the logs inevitably settle.
The whole process kicks off by properly integrating the water-resistive barrier (WRB) from the buck frame to the surrounding logs. Every single seam and transition is a potential leak waiting to happen, and your drawings have to spell out exactly how to handle them. If you leave it to field improvisation, you’re asking for trouble. The goal is a seamless, shingle-lapped system that directs every drop of moisture out and away from the opening, no matter how much the wall moves.
Flashing Details That Accommodate Movement
Standard flashing techniques just don't cut it here. The movement at the head and jambs of the window opening demands materials and methods specifically designed for flexibility. I've seen countless RFIs and field fixes on this exact issue when the details weren't explicitly called out in the construction documents.
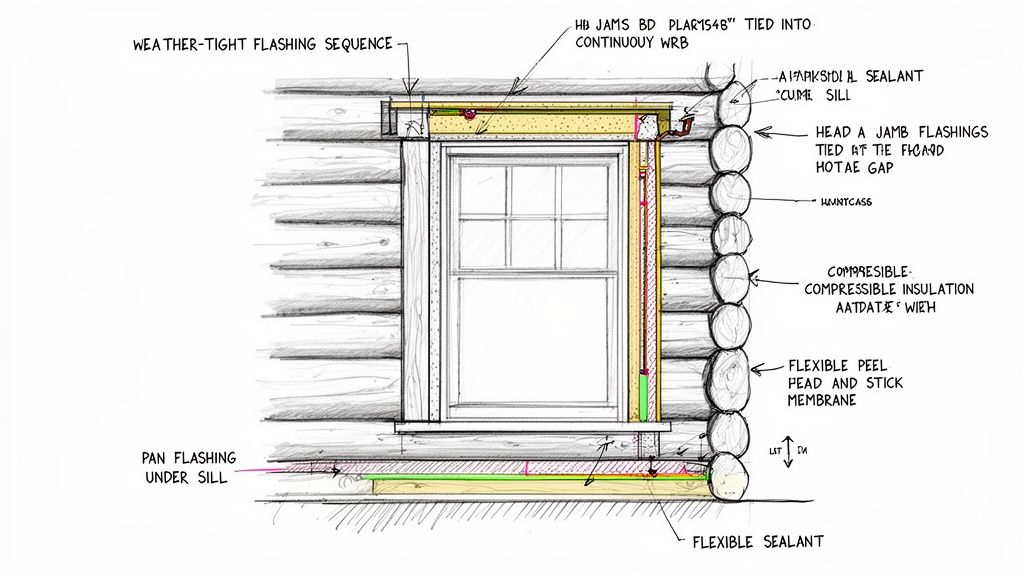
The sequence should always follow the simple logic of gravity:
- Sill Pan Flashing: Before the window even gets near the opening, a robust sill pan is mandatory. Use a flexible, self-adhered membrane that runs up the inside face of the buck, stretches over the sill, and laps onto the face of the log or WRB below. Think of this pan as your last line of defense—it’s there to catch any water that gets past the primary seals and direct it safely outside.
- Jamb Flashing: Once the window is in and fastened only to the buck, it's time for flexible flashing tape over the jamb flanges. This tape is critical; it has to bridge from the window flange, across the buck, and onto the log wall itself to maintain a continuous, unbroken seal.
- Head Flashing: The head is where things get tricky. A rigid metal drip cap should be installed over the window's top trim. Here’s the key detail: this drip cap gets fastened only to the log wall above the window, not to the buck or the trim below it. A flexible membrane then goes over the drip cap's top leg and is lapped under the WRB above, completing the weather-tight plane.
This method is crucial because it allows the log wall to settle down behind the head flashing without ripping the seal apart. If that drip cap is fastened to the trim, it will get dragged down with the settling logs, opening up a massive gap for water to pour in.
Air Sealing for Long-Term Performance
A good water seal is only half the battle. Air leakage around windows in log walls is a huge energy drain and a prime source of frustrating callbacks. Your air barrier has to be continuous—from the window frame to the buck, and from the buck to the log wall's primary air barrier.
Low-expansion spray foam or a high-quality sealant is perfect for filling the gap between the window unit and the buck frame. At the perimeter of the buck, where it meets the logs, you’ll need a flexible sealant or gasket system. This joint has to compress and expand without losing its seal, which makes material selection incredibly important.
Many of the same principles of movement and sealing apply in other high-performance envelopes. You can learn more in our guide to rainscreen cladding systems.
Understanding common issues like what causes windows to fog up really brings home the importance of a top-notch, weather-tight installation from day one. In a log wall environment, a small seal failure can have compounding effects. Protecting against these problems starts with clear, buildable details that anticipate movement and specify materials designed to last.
Documenting Window Details for Flawless Execution
A perfectly designed system is only as good as the drawings that communicate it. For production teams, the goal is to have construction documents that prevent errors, protect margins, and stop the constant stream of RFIs. When it comes to window installation in log walls, this means you must go beyond standard elevations and deliver details that tell the full story of movement and settlement.
Ambiguity in your drawings is a direct threat to buildability. If a builder has to guess how the slip joints, buck frame, and flashing all come together, you’ve already lost control of the outcome. A complete, crystal-clear drawing set is your best tool for ensuring quality, predictability, and operational consistency.
Moving Beyond Standard Elevations
Plans and elevations are great for showing where a window goes, but they completely fail to show the complex, three-dimensional relationships required for log home window framing. These assemblies demand a much higher level of documentation if you want them built correctly the first time.
Your drawing set needs to show the entire system in detail. That means providing:
- Large-Scale Wall Sections: Cut a section right through the window opening. Clearly show the head gap, the buck frame, flashing continuity, and your fastening strategy.
- Isometric or Axonometric Details: A 3D view is invaluable here. It can show how the vertical slip joints, flashing layers, and air seals integrate in a way that flat, 2D drawings just can't capture.
- Clear Annotations: Don't just label parts; explain the intent. Use notes like "Fasten window to buck frame ONLY" or "Compressible insulation to fill settlement gap—DO NOT PACK TIGHTLY." This gives the field team the "why" behind the "what," which is a core principle of mature QA processes.
The goal is to produce drawings so clear that they answer the builder's questions before they're even asked. A detail that needs an RFI to clarify is a detail that needs to be improved. You can measure your team's production maturity by the silence from the field.
Leveraging BIM for Production Consistency
This is where a disciplined BIM workflow becomes a massive competitive advantage. When you model the entire window assembly—including the buck, the settlement gap, and the slip joints—you get absolute consistency across every single view. Model it correctly once, and it's correct everywhere.
This automated consistency is crucial. It prevents that nightmare scenario where a wall section shows a 4-inch settlement gap, but a note on the elevation calls for 3 inches. Conflicts like that create confusion, stop progress, and erode trust. BIM turns the creation of these critical log wall settlement details into a scalable, repeatable process.
For firms dealing with complex retrofits or as-built conditions, these digital models are even more critical. Our work with scan-to-BIM services shows how capturing precise field data from the very beginning can inform these intricate details and prevent costly surprises.
This level of precision also supports other project goals, like energy performance. The thermal mass of log walls already provides a huge advantage. In fact, studies have shown that solid log walls can achieve an average R-value of R-9.84 with high heat capacity, often meeting energy codes without needing premium windows. Explore the energy performance data on log homes to see just how much detailing impacts efficiency. By using BIM to model precise fenestration, you ensure airtight seals are actually achieved, maximizing both structural integrity and the inherent thermal benefits of the log system.
Ultimately, flawless execution starts long before anyone steps on site. It begins with a commitment to creating unambiguous, comprehensive log home construction detailing that makes building it right the only possible option.
Common Questions on Log Wall Window Installation
Even with a solid plan, questions always pop up in the field or during a design review. When you're dealing with the quirks of window installation in log walls, getting clear, field-tested answers is the only way to prevent costly mistakes down the road.
Here are the most common questions our production teams get, along with the straight answers we give them.
How Much Settlement Should I Actually Plan For?
This is the most critical calculation you'll make. The amount of settlement boils down to the log species, its initial moisture content (green vs. kiln-dried), and the total height of the log wall sitting below the window.
A common rule of thumb is to allow for 1/2 to 3/4 inch of settlement per vertical foot of log wall for green logs. For kiln-dried logs, you can usually plan for about half that.
But remember, that's just a guideline. You should always get a specific settlement calculation from the log manufacturer or a structural engineer. This will tell you the precise head gap your project requires. It's not a number you ever want to guess.
Can I Fasten Exterior Trim to Both the Window and the Logs?
Absolutely not. This is a fundamental mistake that guarantees failure.
When you fasten trim to both the stationary window unit (which is attached to the buck) and the moving log wall, you're "pinning" the wall. As the logs settle, the trim will crack, warp, or get ripped apart. The entire settlement system is defeated.
All trim has to be fastened to either the buck frame or the logs—but never to both. A good technique is to fasten the trim to the buck and leave a small, sealed slip joint between the trim and the logs. This lets everything move independently.
What Happens If the Settlement Gap Is Missing or Too Small?
If there's no settlement gap, the full weight of the logs above the window will come crashing down on the window frame. This immense pressure will bind the sash, distort the frame, crack the glass, and break the seals, leading to major leaks and a window that won't operate.
It also causes logs to "hang up" on the window, which can create ugly gaps between log courses somewhere else in the wall.
An undersized gap just delays the inevitable. Once the space closes up, you get the same destructive outcome. Fixing this after construction is incredibly expensive and usually requires a complete tear-out. Proper log wall settlement details on the drawings are the only way to prevent it from happening in the first place.
Why Do I Need a Buck Frame Instead of Attaching to the Logs?
The buck frame does two essential jobs that the raw log ends simply can't handle.
First, it creates a perfectly plumb, level, and square surface for mounting the window. You'll never achieve that kind of precision with the natural variance of log ends.
Second, and more importantly, the buck frame is the key component that isolates the window from the log wall's movement. By using vertical slip joints, the buck is anchored horizontally but allows the logs to slide vertically as they settle. Without the buck, you have no reliable system for managing settlement in log home construction detailing. For a deeper dive into framing systems, our insights on shop drawings can provide some helpful context.
At BIM Heroes, we know that buildable details are the foundation of profitable projects. If your team is struggling to produce clear, consistent, and error-free construction documents for complex systems like log walls, we can help.
Download our Log Wall Window Settlement Detailing Checklist to ensure your drawings prevent field errors and protect your margins. https://www.bimheroes.com