It’s a scene every BIM manager knows all too well. It’s 11 PM, the coordination deadline is tomorrow morning, and your Revit-to-IFC export just failed for the third time. The error message is cryptic, your coordination partners are waiting, and the pressure is on.
This guide gets right to the heart of that shared pain. This isn’t a theoretical discussion of openBIM philosophy. It’s a troubleshooting manual born from real project failures, focused on the specific, practical problems that occur when exporting IFC from Revit—and the exact settings, workarounds, and fixes that resolve them.
The truth is, IFC export from Revit fails not because the software is flawed, but because the translation from a proprietary system to an open standard requires specific model preparation and settings that most users are never taught.

This experience is frustratingly common because default settings rarely produce usable files. Problems often don’t surface until a coordination partner tries to open the file—by which time deadlines are looming. Your team recognizes the pain:
- IFC files that take hours to export, then crash Navisworks.
- Geometry that looks correct in Revit but appears shattered or missing in an IFC viewer.
- Custom families that disappear entirely.
- Property data that doesn’t transfer, leaving models information-poor.
- Partners complaining that “your IFC doesn’t work.”
We’ve debugged hundreds of failed IFC exports—and 80% trace back to five specific issues that take minutes to fix once you know where to look. The solution isn’t avoiding IFC; it’s configuring exports correctly and auditing models before you click “Export.”
This guide will show you how to move from unpredictable failures to a state of production maturity where IFC delivery is a predictable, reliable process that protects your margins and solidifies your reputation.
Why Revit-to-IFC Export Is So Challenging
Getting a clean IFC file from Revit isn’t as simple as saving to a different format. It’s a translation from a proprietary, architectural authoring environment to a neutral, open data standard. A lot can get lost in that translation if you’re not careful.
Revit thinks in terms of parametric families and proprietary logic. IFC thinks in standardized, universal definitions. The export process has to convert Revit’s flexible rules into IFC’s strict structure.
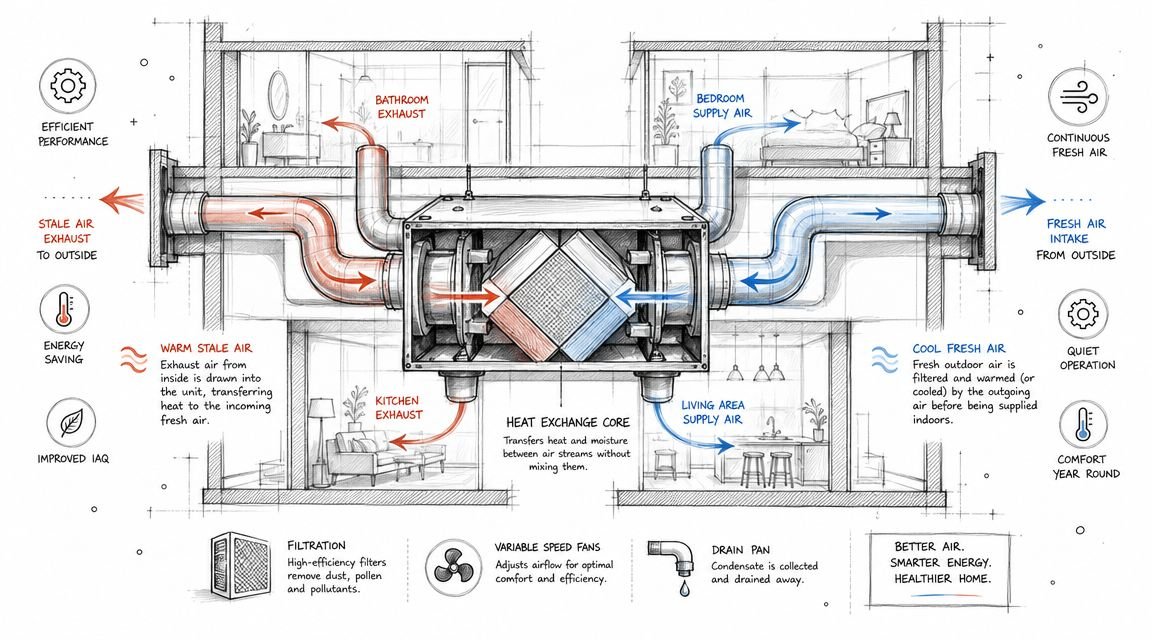
Understanding What Happens During IFC Export
One of the biggest mistakes in any BIM workflow is assuming a model that looks perfect in Revit will export a perfect IFC file. What you see on your screen is not what your structural engineer or MEP consultant will see.
During the export, three critical translations happen:
- Proprietary to Open Format: Revit’s internal data structure is converted to the open IFC schema. This is where Revit’s category for a “wall” must become a universally understood
IfcWall. - Geometry Conversion: Revit’s dynamic, parametric elements are converted into fixed shapes or meshes. This process, called tessellation, can butcher complex geometry, turning smooth curves into jagged edges or causing custom families to fall apart.
- Property Mapping: All that rich data in your Revit parameters—like fire ratings, materials, and acoustic properties—has to be mapped to standard IFC property sets (P-sets). If this mapping fails, a wall shows up as a shape but is stripped of all its critical data.
This is why “it looks fine in Revit” doesn’t mean the IFC will work. Your partners are looking at the translated file, not your original model. Pre-export checks aren’t just good practice; they’re essential for operational consistency.
IFC Export Settings That Actually Matter
Most failed exports can be traced back to the IFC Export settings dialog. To get there, go to File menu → Export → IFC → Modify Setup. This is where you take control of the translation process.
Think of this dialog box as the control panel for your IFC delivery workflow. The goal is to stop guessing and start configuring with intent. Once you find a setup that works, save it as a template. This ensures predictable outcomes and scalable delivery across your projects.
IFC Version and Model View Definition (MVD) Selection
Your first choice—IFC Version and Model View Definition (MVD)—is critical. It sets the rules for the export.
- IFC2x3 Coordination View 2.0: This is the industry workhorse. It offers the highest level of compatibility with tools like Navisworks, Solibri, and Tekla. For most coordination workflows, this is the safest and most reliable choice.
- IFC4 Reference View: A more modern standard for viewing and referencing models without modification. Only use it if all project stakeholders have confirmed their software fully supports it.
- IFC4 Design Transfer View: A highly specialized view for transferring parametric intelligence between platforms. It is not intended for standard coordination and often introduces errors.
Unless you have a specific, documented reason from a project BIM Execution Plan, stick with IFC2x3 Coordination View 2.0.
Key Settings on the General Tab
- File Type: You’ll see
.ifc,.ifczip, and.ifcxml. For almost every situation,.ifcis the one you want. - Phase to Export: Never leave this on the default. Select the specific phase you intend to share (e.g., “New Construction”) to prevent exporting demolished elements or future work.
- Space Boundaries: This setting exports room and space volumes. The default “First Level” can cause crashes or produce bloated files. For architectural coordination, setting this to “None” improves stability and shrinks file size.
- Coordinate Base: Ensure this is set to “Shared Coordinates” to align with project partners.
Additional Content and Property Sets
- Level of Detail: Found on the “Additional Content” tab, this setting is your primary lever for controlling file size. A “Low” or “Medium” setting produces a smaller file with simplified geometry, perfect for most coordination tasks.
- Property Sets Tab: This is where you ensure your data transfers. You must check “Export Revit property sets” and “Export user defined property sets” to map your custom Revit parameters into the IFC file.
Problem #1: Export Crashes or Hangs Indefinitely
- Symptom: You click “Export,” and Revit either freezes, hangs for hours, or crashes with a vague error message.
- Cause: This almost always points to one corrupt element, a massive in-place family, or a circular reference that the exporter can’t process.
- Solution:
- Isolate the Problem: Don’t export the whole model. Create a new 3D view and use a section box to isolate a small portion.
- Export by Category: If a small section works, try exporting one category at a time (e.g., only walls). If “Walls” exports but “Curtain Panels” crashes, you’ve narrowed the search.
- Divide and Conquer: If a category fails, select half the elements in that category and export. Keep splitting the selection until you pinpoint the single element causing the crash.
- Prevention: The fastest fix is often to delete the corrupt element and remodel it cleanly. Regular model audits can catch these issues early.
Problem #2: Geometry Appears Broken or Missing
- Symptom: The export finishes, but in an IFC viewer, elements are fragmented, have missing faces, or are gone entirely. In-place families, complex railings, and curtain walls are common culprits.
- Cause: This is a classic geometry translation failure (tessellation). Revit is trying to convert its parametric solids into a simplified mesh and botches complex shapes in the process.
- Solution:
- In-Place Families: Avoid them. They are notorious for fragmenting into a mess of disconnected triangles. Build a standard, loadable component family instead. It’s a core tenet of template discipline.
- Complex Curtain Walls, Railings, and Stairs: These system families are complex. If they fail, try simplifying their detail level in a dedicated 3D export view.
- Imported CAD/DWG Geometry: Imported CAD is poison for IFC exports. Always Link CAD instead of importing, and never explode it inside Revit.
Problem #3: Elements Export as the Wrong IFC Class
- Symptom: Your walls show up as
IfcBuildingElementProxyinstead ofIfcWall. The model looks right, but it’s semantically useless because nothing is properly categorized. - Cause: This is an IFC class mapping failure. Revit doesn’t know what to call the element. This is common with Generic Model families.
- Solution:
- Check Family Category: In the Family Editor, ensure the family is assigned the correct category (e.g., a desk should be “Furniture,” not “Generic Models”).
- Manual Override with IFC Parameters: For a quick fix, add the
IfcExportAsandIfcExportTypeshared parameters to the family. You can manually setIfcExportAsto “IfcWall” to force the correct classification. - Use an IFC Mapping Table: In the “Modify Setup” dialog, you can point to a custom text file that defines exactly how each Revit category maps to an IFC class. This is a best practice for production maturity.
Problem #4: Properties and Data Don’t Transfer
- Symptom: The geometry looks perfect, but all the important data is gone. Fire ratings, acoustic properties, and other parameters you carefully added in Revit have vanished.
- Cause: You didn’t tell the exporter to include them. By default, Revit only exports a basic set of properties.
- Solution:
- Go to the Property Sets tab in the IFC export setup.
- You must check the boxes for “Export Revit property sets” and “Export user defined property sets.”
- For full control, create a custom property set mapping file. This simple text file tells Revit exactly which shared parameters to grab and what to call them in the IFC file, ensuring your COBie data or other custom information transfers reliably.
Problem #5: File Size Is Unreasonably Large
- Symptom: Your 300 MB Revit model balloons into a 2 GB IFC file that crashes every viewer.
- Cause: This is almost always caused by excessive tessellation—the exporter is generating a ridiculously dense mesh for curved surfaces.
- Solution:
- Adjust ‘Level of detail’: In the export settings (“Additional Content” tab), lower the “Level of detail for some element geometry.” A “Low” setting is often fine for coordination and dramatically shrinks file size.
- Turn Off ‘Space Boundaries’: As mentioned, exporting 3D room geometry adds weight. In the “General” tab, set Space Boundaries to “None.”
- Simplify Problem Elements: One over-detailed family, like an ornate light fixture, can bloat the entire model. Find it, simplify it with a coarse detail level, or remove it from the export view.
Problem #6: Linked Models Cause Conflicts
- Symptom: You exported with links included, and now the federated model has coordinate misalignments or duplicate elements.
- Cause: Bundling links into a single export is a common mistake that relinquishes control over the coordination process.
- Solution:
- Do not use the “Export linked files as separate IFCs” checkbox. This feature is unreliable.
- The best practice for federated models is to export each model separately from its native file. The architect, structural engineer, and MEP engineer should each produce their own clean IFC. These are then federated in a coordination tool.
- Prevention: This approach simplifies versioning, troubleshooting, and accountability, making it a cornerstone of a scalable delivery pod.

Problem #7: Rooms and Spaces Export Incorrectly
- Symptom: Room volumes are missing, or the export crashes when trying to process space boundaries.
- Cause: Room bounding issues in the Revit model or incorrect export settings for space boundaries can easily break the export.
- Solution:
- First, ensure all rooms in your Revit model are properly enclosed and that “Room Bounding” is checked for relevant elements like walls and floors.
- In the IFC export settings (“General” tab), set Space Boundaries to “None” for most 3D coordination models. This is the most common fix for export crashes related to rooms.
- Only export 1st or 2nd level space boundaries if a downstream workflow like energy analysis specifically requires them, and you’ve confirmed the model is clean enough to handle it.
Problem #8: Design Options and Phases Cause Failures
- Symptom: Demolished elements are appearing in the IFC, or elements from a secondary design option are included incorrectly.
- Cause: The exporter is not configured to handle the specific phase or design option you intend to share.
- Solution:
- Phases: On the “General” tab of the export settings, explicitly set the “Phase to export.” This ensures only elements from that phase (e.g., “New Construction”) are included.
- Design Options: The IFC exporter will only export the primary design option for any given set. Before exporting, ensure the view you are exporting from has the correct design option visible and set as primary.
Pre-Export Checklist: Your QA Process for IFC Delivery
Most IFC export failures are preventable. They are born from messy, un-audited models. Running a quick QA check before you export is the single most effective way to guarantee a clean file. This isn’t busywork; it’s production discipline.

- Run Purge Unused: Go to Manage > Purge Unused three times to clear out accumulated junk.
- Resolve Warnings: Go to Manage > Warnings and fix all critical errors. An export from a warning-filled model is a gamble.
- Audit In-Place Families: Review every single in-place family. Replace them with standard components wherever possible.
- Check for Corrupt Elements: If you suspect a problem, use the “divide and conquer” method to find and rebuild the broken element.
- Verify Linked Files: Ensure all links use Shared Coordinates and unload any links not essential for the export.
- Verify Export Settings: Double-check that you are using your firm’s standard, saved IFC export setup, not the Revit default.
- Test Export a Subset: Before exporting the full model, use a section box to export a small, complex area as a quick test.
For more on how modeling mistakes can affect your exports, you can check out our guide on preventing common Revit errors.
Validating Your IFC File Before Delivery
Exporting the file is not the last step. You must validate it. Finding a mistake yourself is a quick fix; a partner finding it is an RFI that erodes trust and project margins.
Free Tools for Checking IFC File Quality
You don’t need a pricey license for a basic quality check. Use a free IFC viewer to see exactly what your partners will see.
- BIMvision: A powerful and popular free viewer.
- FZKViewer: A lightweight and reliable option from the Karlsruhe Institute of Technology.
- xBIM Xplorer: An open-source tool for navigating model geometry and properties.
What to Check in the Exported File
- Geometry Spot-Check: Zoom into complex areas—curtain walls, railings, stairs. Did they hold their shape?
- Property Verification: Click on a few key elements (e.g., a fire-rated wall). Is the fire rating data present in the properties panel? If not, your property set mapping failed.
- File Size and Performance: Does the file open reasonably quickly? A bloated file is a red flag for excessive tessellation.
This ten-minute validation step is a critical decision checkpoint that prevents downstream issues. For a deeper dive, read about IFC validation tools for BIM projects.
Creating Reusable Export Templates
The key to scalable delivery is to stop troubleshooting every export from scratch. Once you have a configuration that works, save it.
- In the IFC Export dialog, after configuring your settings, click … next to the “Setup” dropdown.
- Choose Save As… and give your setup a clear name (e.g., “ARCH-Coordination-IFC2x3.json”).
- Store this file on a network location and make it part of your firm’s standard BIM templates.
This builds operational consistency and ensures every team member exports files the same way, every time.
If your team is tired of fighting with IFC exports and wants to build a reliable, scalable delivery system, we can help. We don’t sell hours; we sell clarity, systems, and predictable outcomes.
Download our Pre-Export Model Audit Checklist to start building a more predictable IFC workflow today.