Meta description: A practical guide to using Revit Design Options for permit alternates without breaking model stability, sheets, rooms, or team coordination.
Category: BIM Technology & Workflows
A project has two foundation approaches on the table. Or the permit package needs to show an optional mezzanine without turning the base set into a mess. Or the owner wants two cladding schemes documented in one model so the jurisdiction can review the alternate along with the primary submission.
That's when the familiar debate starts. One person says to use Design Options in Revit. Another says design options always break rooms, schedules, and sheet coordination.
Both reactions come from experience. The feature can solve a real permit problem, but it only works when the alternate is tightly contained and the team treats it like a controlled decision workflow, not a convenience feature. Autodesk's own training frames it as a practical workflow and a short 5-minute process, ending with Accept Primary, which keeps the chosen option and removes the others, not as a way to maintain parallel models forever (Autodesk's design options tutorial).
Introduction
The usual trigger for design options Revit work isn't theory. It's a live documentation problem. The structural concept is settled above grade, but the team still needs to permit a slab-on-grade and a crawl space. Or the shell is fixed, but the owner wants an alternate mezzanine shown as an optional scope item. Or the façade backup stays the same while the exterior finish package changes.
The temptation is to keep everything in one project file and let Revit sort it out. Revit will help, but only if the model is set up with discipline from day one. If it isn't, alternates start bleeding into primary sheets, rooms stop enclosing, and someone eventually discovers that the wrong option printed on a permit sheet.
Used correctly, design options Revit can protect production time and reduce redraw effort. Used casually, they create hidden coordination debt. The difference comes down to one question. Is the alternate a contained variation, or is it a different project condition that needs another workflow?
What Revit Design Options Are Really For
Design options Revit are built around an Option Set with multiple alternatives inside it, and one of those is designated as the Primary option. That structure matters. It tells you the feature is meant to hold a decision in suspension for a while, then resolve it cleanly.
Where the tool fits
This is the right tool when a defined portion of the model needs more than one documented solution. Think of a contained scope difference that can live inside one project file without changing the logic of the whole building. Permit alternates often fit that pattern.
Examples that usually work well:
- Localized assembly changes where the surrounding building stays the same
- Interior layout alternates inside a fixed shell
- Selective façade changes where the backup wall, openings, and major coordination points remain stable
- Option-specific permit sheets that need to compare alternatives clearly
Independent training material also reflects this standard pattern. Teams create an option set, assign model elements to that set, and then switch what a view shows through Visibility/Graphic Overrides or view controls. One common presentation method is to show the selected option darker while everything else is grayed out, which helps with side-by-side review and client communication (MGFX on Revit design options workflow).
Where it doesn't fit
Design options get a bad reputation when teams ask them to solve the wrong problem.
Practical rule: If the alternate changes the grid, the footprint, or the building logic, stop calling it an option. It's a different model strategy.
They're a poor fit for:
- Whole-building alternates
- Existing, demo, and new work, which belong in phasing
- Major linked-model dependencies, where structural or MEP coordination must react to the alternate
- Long-term parallel schemes that the team intends to carry indefinitely
The biggest production mistake isn't using design options. It's using them for something that isn't an option.
Ideal Use Cases for Permit Alternates
Permit alternates work best in design options Revit when the alternate is real, but contained. The base building should still behave like a single coordinated model. If the alternate starts pulling major structure, grids, or linked consultants in different directions, the workflow stops being efficient.
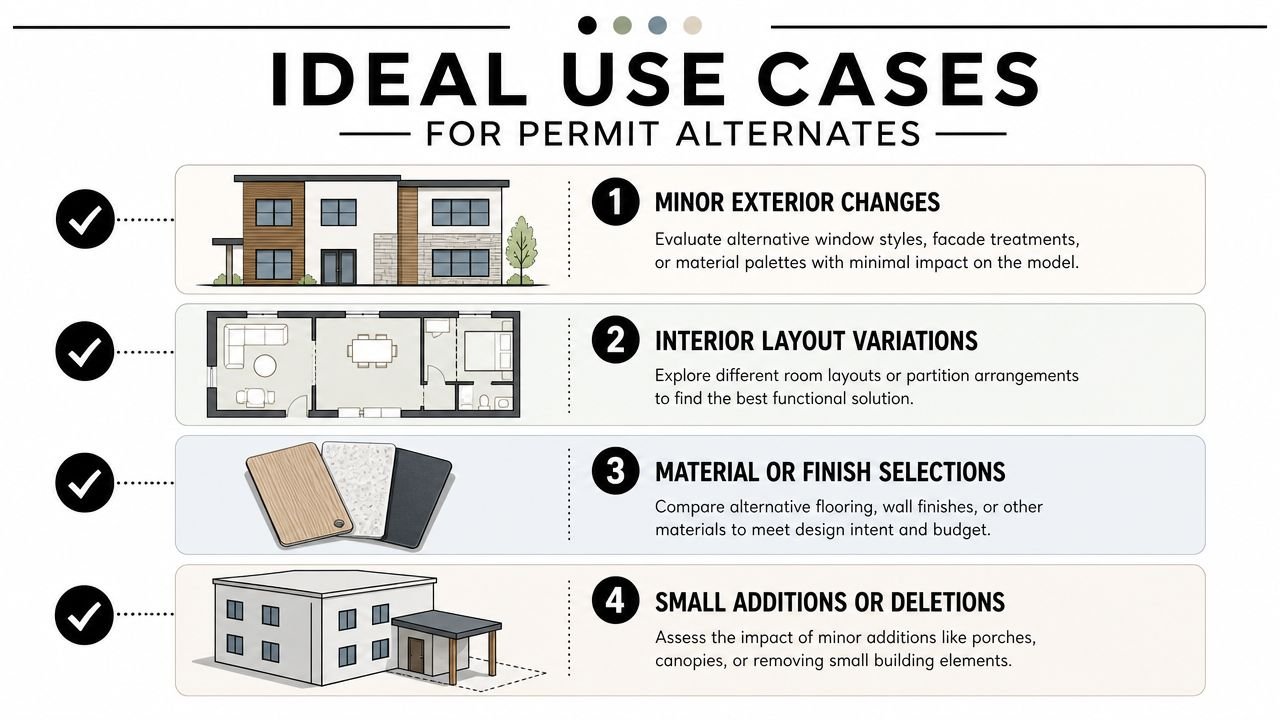
Foundation alternates
This is one of the strongest use cases. A slab-on-grade versus crawl space alternate can work cleanly if the building above remains largely unchanged. The alternate lives near the ground floor assembly, not in the entire project logic.
Exterior skin alternates
Two façade finish approaches can also work well. If window locations, framing logic, and backup wall conditions remain stable, the alternate is mostly a surface and detailing issue. That makes it manageable in one model and documentable on parallel permit sheets.
Optional program insertions
A mezzanine can be a valid permit alternate if it's properly contained. The shell, circulation concept, and primary coordination framework need to remain intact. If the mezzanine triggers broad structural or MEP redesign, it usually stops being a good design option candidate.
Interior fit-out variations
Shell and core projects often need alternate tenant planning studies. If the base building is fixed and the scope difference is mainly partitions, doors, and room configuration, design options Revit can hold both schemes without fragmenting the file.
A quick filter helps:
| Scenario | Good fit for design options | Better handled another way |
|---|---|---|
| Alternate floor assembly | Yes | No |
| Optional mezzanine in fixed shell | Usually | Sometimes |
| Cladding finish alternate | Yes | No |
| Different building footprint | No | Separate model |
| Existing vs new work | No | Phasing |
A Stable Setup for Revit Design Options
Most design option failures start before anyone places a wall. The problem isn't the feature. It's the order of operations.
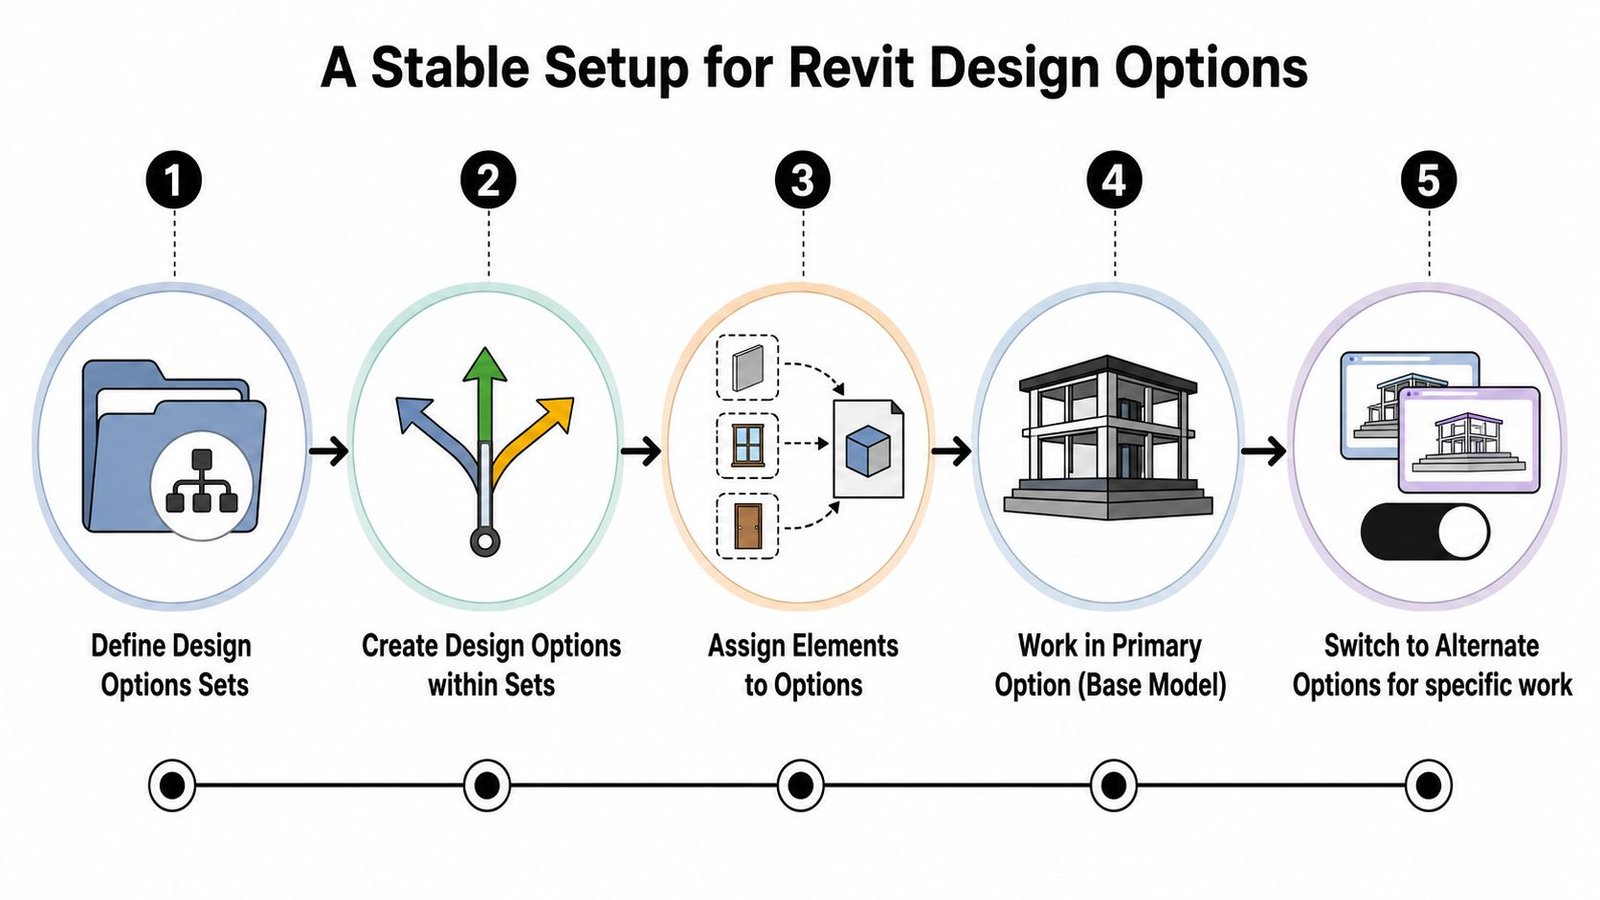
A reliable workflow starts by keeping invariant elements in the main model, then creating an option set from the Manage tab or status bar, adding alternate elements with Add to Set, and controlling view display through Visibility/Graphics so each sheet is locked to a single option (Seiler design options basics).
Set up the structure before modeling the alternate
Create the Option Set first. Name it for the decision, not for a vague phase of work. “Foundation System” is useful. “Option Set 1” is not.
Then rename each option with permit logic in mind. Use names people can understand on sheets and in review meetings, such as:
- Base Permit, Slab on Grade
- Alternate Permit, Crawl Space
That naming discipline should line up with your broader architectural drawing standards, because bad names in the model always show up later as bad sheet titles, bad browser organization, and bad QA outcomes.
Keep the option set lean
Only the elements that differ should live in the option. Failing to observe this often causes many teams to over-model the alternate and create downstream confusion.
Keep these in the Main Model whenever they are common to all schemes:
- Shared structural framework
- Core walls and vertical circulation
- Shell elements that don't change
- Reference geometry and base coordination elements
Put only true alternates into the option set. If a wall, slab edge, or enclosure exists in every scheme, it doesn't belong inside one option.
If shared elements drift into an option, the alternate stops being localized. That's when views start lying to the team.
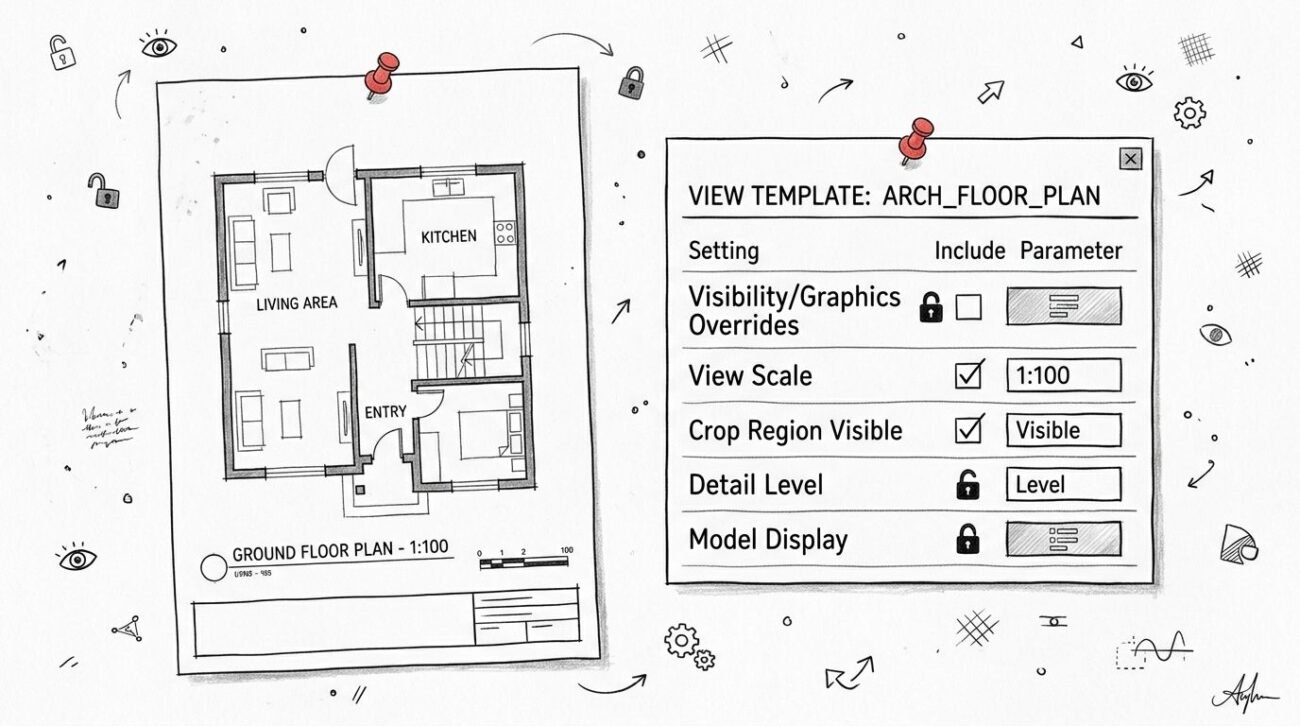
Lock views to specific options
Automatic view behavior is fine for most production views because it follows the Primary option. It is not enough for permit alternate sheets.
Every alternate sheet should use a dedicated view, and that view should be explicitly assigned to the correct option in Visibility/Graphics. That protects the sheet from accidental primary-option display when someone duplicates a view or changes browser organization late in the set.
A practical setup looks like this:
- Duplicate the required plan, section, or elevation.
- Rename it with the option in the title.
- Assign the specific design option in the view.
- Place that view only on the alternate sheet.
- Audit before issue.
Documenting and Sheeting Design Options
The permit set usually falls apart at sheet level, not in the option set itself. I have seen models with clean option logic still issue the wrong alternate because a view stayed tied to the Primary option, the annotations lived in the wrong place, or the sheet naming never made the distinction clear to the reviewer.
Treat permit alternates as a documentation workflow with its own controls. If the alternate may be reviewed, priced, or approved separately, it needs its own views, its own sheet numbers, and its own QA check before issue.
Build sheet identities that survive review
A permit reviewer should be able to tell what is base work and what is alternate work without reading internal notes or decoding browser names. The sheet set has to make that distinction obvious.
A reliable setup usually includes:
- Base sheets for the permitted condition
- Alternate sheets for each permit alternate
- Sheet titles that name the alternate plainly
- Sheet index grouping that separates alternates from the base permit set
That structure protects more than presentation. It reduces pricing confusion, helps the team track what was submitted, and gives CA staff a clearer record of what was approved.
Control graphics with fixed standards
Alternate sheets drift fast if every user manages graphics by hand. One person turns on halftone comparison graphics for review. Another duplicates the view and forgets to remove them. A week later, the printed sheet looks like a coordination study instead of a permit document.
Set alternate views up with dedicated templates and keep the graphic standard tight. Use standardized Revit view templates so lineweights, visibility settings, filters, and annotation categories do not change from sheet to sheet. For permit output, comparison graphics are usually less useful than plain, readable views that show one condition clearly.
Keep annotation with the condition it describes
Annotation ownership is where teams get burned.
Dimensions, tags, notes, keynotes, detail callouts, and references need to live in the view that shows the actual condition. If the alternate includes a different stair, roof edge, or mezzanine layout, the related annotation belongs in the alternate view, not a shared parent view that may be placed on multiple sheets.
Use this rule:
- Shared annotation stays with shared conditions
- Alternate-specific annotation stays in alternate-specific views
That keeps tags from disappearing on issue day and stops dimensions from pointing at geometry that is hidden in the printed option.
A short pre-issue check catches most failures:
| Check | Why it matters |
|---|---|
| Alternate view assigned explicitly | Prevents the wrong option from printing |
| Sheet title names the alternate | Reduces reviewer and contractor confusion |
| Tags, dimensions, and notes exist in the alternate view | Avoids incomplete permit documentation |
| Base sheets show only the permitted condition | Keeps the primary set authoritative |
Run that check every issue. Design Options can support permit alternates well, but only if the sheets are managed with the same discipline as the model.
When to Avoid Design Options Entirely
Sometimes the best Revit design options permit alternates workflow is not using design options at all.
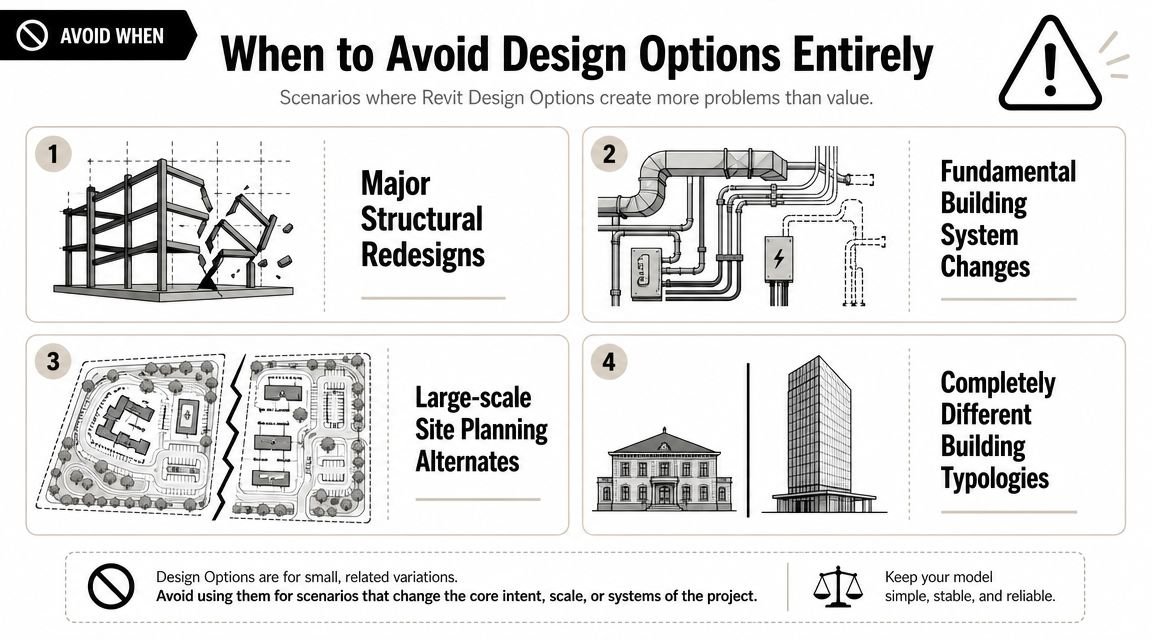
Whole-building differences
If the alternate changes floor count, building footprint, primary structure, or major circulation logic, put it in a separate model. Trying to force major divergence into one design options structure makes every downstream task harder. View creation, coordination, annotations, and consultant exchange all become fragile.
Phasing problems disguised as options
Existing, demolition, and new work belong in a phasing workflow. Using design options to represent time-based construction conditions creates wrong graphics and broken expectations across views.
If the team is mixing up these two ideas, the fix is usually to stop and reframe the model strategy around Revit phasing workflows.
Linked-model coordination risk
Production teams get burned when an architectural alternate might be perfectly visible inside the host model, while a consultant coordination process ignores it.
A Speckle community discussion notes that some model exchange workflows treat non-primary design options as invalid parts of the project and therefore exclude them from an “everything” stream (Speckle discussion on non-primary option handling). That means your alternate may not survive exchange the way your team expects.
Non-primary options are not just a visibility problem. They're a model-sharing risk.
Large-team complexity
Design options demand shared discipline. On larger teams, people edit in the wrong option, leave stray elements in the main model, or create views that look correct on screen but don't hold up in issue sets. If BIM management isn't active, the feature multiplies confusion instead of reducing it.
Managing Design Options Through CDs
The model usually breaks down during CDs, not during setup. A permit alternate that looked organized in SD can still bleed into plan views, schedules, and issue sheets once multiple people are editing under deadline.
That is why CD-phase option management needs rules, not just a clean option set.
Enforce naming that survives production
Option names need to read like decisions the team can verify at sheet level. If someone has to open the Design Options dialog to figure out what "Option 2" means, the naming already failed.
Use names that answer the production questions fast:
- What is changing
- Which option is primary
- Which option is issued as an alternate
- Which views and sheets are supposed to show it
Apply the same standard to views. "Level 1 Plan copy 3" creates checking work. "Level 1 Permit Alt B" gives the reviewer a usable instruction.
I have seen teams keep sloppy names because everyone "knows what they mean." That only holds until staffing changes, sheet creation gets delegated, or a late bulletin pulls someone into the file who was not part of the original setup.
Add option control to every pre-issue check
Permit alternates fail in small ways first. A view gets left on Automatic. A dependent view inherits the wrong setting. A room stops enclosing. Then the set goes out and the team spends two days figuring out why the printed sheets do not match the decision log.
Build option checks into the same pre-issue review used for sheets, tags, and dimensions. Do not treat them as a separate BIM-only task.
A useful CD-phase check looks like this:
- Confirm the correct option is marked as Primary in each active set.
- Confirm every alternate view uses an explicit option override, not Automatic.
- Confirm issue sheets for the base permit set show only the approved primary condition.
- Confirm sheet names, view names, and browser organization use the same alternate naming.
- Confirm rooms, areas, dimensions, and tags still resolve correctly in the views being issued.
- Confirm details, callouts, and dependent views are pulling from the intended parent condition.
The last item gets missed often. A plan may be set correctly while a callout or enlarged plan still points to the wrong condition. That is the kind of error that makes the set look coordinated until someone reads it closely.
Close decisions before the file turns against you
Open options past their useful life create model risk. They invite accidental edits, confuse sheet setup, and keep rejected geometry close enough to look active.
Once the team makes a decision, clean the file to match the record. Keep the approved condition. Remove rejected alternates. Rename or delete views that only existed to support the comparison. Check sheets again after cleanup.
Do not carry dead options through CDs because someone might need them later. If the team wants an archive, keep that in a dated backup or milestone model. The live production file should reflect the current project decision, not every branch the design team considered.
Common Mistakes with Revit Design Options
Teams often don't fail because they misunderstood the feature completely. They fail because a few small errors stay invisible until issue day.

The mistakes that show up most often
Alternate elements modeled in the Main Model
This usually happens when someone starts drafting before activating the correct option. Fix it with Add to Set, then recheck view behavior.Shared elements placed inside an option
If a wall is common to every scheme, it should not belong to one option. Move it back to the main model before that mistake spreads into dimensions, tags, and room boundaries.Alternate views left on Automatic
Automatic follows the Primary option. That's fine until a permit alternate sheet prints the wrong scheme because nobody explicitly assigned the view.Unnamed or poorly named option sets
Generic naming always creates sheet and QA confusion later.
The issue many tutorials skip
A frequent pain point is how design options affect rooms, boundaries, and schedule integrity. Changes in option geometry can cause rooms to report “not enclosed” or break area calculations, and many basic tutorials don't address that production issue (discussion of room and schedule edge cases).
Field lesson: If a room boundary changes in an option, test the room and the schedule immediately. Don't assume enclosure will survive the alternate.
A quick QA checklist for design options Revit best practices:
| QA item | What to verify |
|---|---|
| Main model audit | No alternate-only elements left outside option sets |
| Shared element audit | Common walls and slabs remain in Main Model |
| View audit | Alternate views are explicitly assigned |
| Annotation audit | Alternate sheets contain complete notes, dims, and tags |
| Room audit | Rooms still enclose and schedule correctly |
Conclusion From Options to Clarity
Design options Revit are useful when the team treats them as a decision-management workflow. They are not a shortcut for every type of alternate, and they are not forgiving when the model setup is loose.
For permit alternates, the winning pattern is straightforward. Keep the alternate contained. Keep shared elements in the main model. Create dedicated views and sheets. Audit option assignments before every issue. Then close decisions instead of carrying alternates longer than the project needs.
That discipline protects more than model cleanliness. It protects permit clarity, consultant coordination, and the hours your team would otherwise spend chasing avoidable errors. The feature works. What usually fails is the process around it.
If your team is tightening Revit design options workflow and wants a stronger production checklist around permit alternates, sheet QA, and model health, outside support can help standardize that faster.
If you need help building a repeatable Revit production workflow for permit alternates, view standards, and model QA, BIM Heroes can support your team with architectural production systems and hands-on Revit delivery. A good place to start is their architectural production support page for firms that need cleaner documentation and more predictable output.