Meta description: Revit view templates keep CD sets consistent, but only if you lock the right parameters and leave the right ones open. Learn a practical QA-driven approach for managing templates across large Revit projects.
The permit set goes out, and three floor plan sheets show the same wall type with different line weights. One section reads darker than the rest because somebody changed Visibility/Graphics on that single view two months ago and nobody caught it before issue. The model technically has templates, but that doesn't mean the set is controlled. On a lot of projects, the templates exist in the browser, sit unused, or were assigned once and later detached when someone wanted a quick fix.
That's how drawing standards fail in real production. Not because the office lacks standards, but because the standards aren't enforced where the views are built.
Revit View Templates matter most when a project hits CD pressure. They decide whether your set behaves like a system or like a pile of edited exceptions. The core question isn't whether to use them. It's which settings to lock so they can't drift view by view, which settings to leave open because they legitimately vary, and how to manage the template library across a large permit or bid set without creating a bigger mess than the one you started with.
The Core Mechanics of Revit View Templates
A view template is a saved collection of view properties. That includes things like Visibility/Graphics, view range, detail level, scale, discipline, filters, and other display settings. In Revit, the template becomes useful only when it controls a view in a disciplined way.
The first place teams go wrong is confusing applying a template with assigning one. Those are not the same production decision.
Assigned templates stay linked
When a template is assigned to a view, the view remains linked to that template. If the BIM manager updates the template, every assigned view updates with it. That's the behavior you want in a CD set because it keeps repeated views aligned without manual cleanup.
Revit lets you assign the template from the Properties palette under Identity Data, and you can also assign it by right-clicking a view in the Project Browser, as outlined in MGFX's guide to applying Revit view templates. On large teams, that matters because repetitive manual adjustment is where inconsistency starts.
Practical rule: If the view will appear in a deliverable, the template should stay assigned, not merely copied onto the view once.
One-time application is a setup tool, not a CD control method
Revit also lets you apply template settings as a one-time action. The values are pushed into the view at that moment, then the connection is gone. That can help when you're setting up early study views, cleaning a consultant background, or building a temporary view for coordination.
It is not the right method for production sheets that must remain consistent through design development, permit, pricing, and addenda. If the team edits the template later, those one-time views won't update. They drift unnoticed, then show up at issue time as “mystery differences.”
Why this distinction matters
On a live project, view templates are less about software convenience and more about control. Assigned templates create a maintainable system. One-time application creates isolated snapshots. If your staff doesn't understand that distinction, the office will think it has standards while the sheets tell a different story.
Parameters to Lock for Production Consistency
Revit view template best practices stop being theoretical at this point. If a parameter affects how the drawing communicates, and changing it view by view creates risk, lock it.

A controlled templating approach has been observed in practice to reduce post-issue QA items related to view formatting by 30 to 50% on medium to large US architectural projects when compared with ad hoc per-view adjustments, according to VDCI's discussion of creating and applying view templates in Revit. That lines up with what most BIM managers see in the field. Lock the wrong things and the team gets stuck. Lock the right things and the set stops drifting.
Lock Visibility and Graphics
If one plan shows walls, doors, and windows with a different graphic hierarchy than the others, the set looks unmanaged. Worse, reviewers start wondering whether graphic differences mean design differences.
Lock these in the template:
- Category visibility: What is on and off in that view type.
- Line weights and patterns: So architectural plans don't print with mixed graphic standards.
- Color and override behavior: Especially in coordination or review views where consistency matters.
- Filters and graphic intent: If your office uses filters to signal demolition, fire-rated partitions, or review status, those need control.
If your team struggles with cut plane problems, a separate review of Revit view range setup often exposes why similar plans are showing different content.
Lock view range, detail level, and discipline
These three settings cause some of the worst CD noise when left loose.
| Parameter | Why it should be locked | What failure it prevents |
|---|---|---|
| View Range | Similar plans should cut the model the same way | One floor appears to show elements another floor does not |
| Detail Level | Plans and sections need a consistent graphic read | Fine detail shows in one view while another stays coarse or medium |
| Discipline | Revit changes object display behavior based on discipline | Architectural views start behaving like coordination or engineering views |
View range is a frequent offender. A single override can make one plan show overhead or below-cut content differently from the rest. In a permit review, that reads like a coordination mistake even when the model itself is fine.
Detail level belongs under template control for the same reason. A permit set shouldn't bounce between medium and fine just because one drafter wanted more visible family geometry in one view.
What locked means in practice
Revit view template locked parameters should cover the settings that define the office's graphic standard. The test is simple. If a user changing that setting in one view creates confusion, rework, or review comments, lock it. Don't ask the team to remember what should match. Build the matching behavior into the template.
View Settings to Keep Unlocked for Flexibility
Over-locking creates a different kind of production problem. The model becomes rigid, the team starts duplicating templates for small exceptions, and your library balloons into something nobody trusts. Mature template discipline means knowing where not to enforce.

Leave scale open
Scale is one of the most commonly mishandled Revit view template settings. Teams lock it because they want consistency, then realize they've forced themselves into unnecessary duplicate templates.
A floor plan template might support an overall plan and a tighter plan at a different sheet scale. An enlarged plan template may carry a different typical use, but within a view family you still need some flexibility. Locking scale too aggressively turns one template into several near-identical ones.
Keep crop controls view-specific
Crop region and annotation crop should stay open in most production templates. Those settings belong to the sheet composition of a specific view, not the universal graphic language of that view type.
If you lock crop boundaries, you end up creating templates to match every plan extents variation, every partial area plan, every shifted section window. That's not standardization. That's bureaucracy.
The template should control how the drawing looks, not where that particular drawing is framed on the building.
Leave phase and phase filter available when the project needs it
On renovation, phased build-outs, and occupied campus work, phase and phase filter often vary legitimately across views that otherwise belong to the same production family. A plan may need to show existing to remain, demolition, or new work depending on sheet purpose.
If those are locked inside the base template, one architectural plan template becomes a long list of phase combinations. That usually leads to misuse, wrong assignment, or duplicated templates with barely distinguishable names.
A better approach is to keep the main graphic standard in the template and let phase-related decisions remain editable at the view level when the project setup requires it.
One more setting many teams should leave open
Section cut material or similar material-specific cut graphic control sometimes needs project-level judgment in a single view. A wall section, callout, or permit clarification detail may need a local adjustment to communicate cleanly. If the office locks every material cut behavior into one broad template, staff lose a legitimate production tool.
That balance is what separates controlled templates from overbuilt ones:
- Lock drawing-style settings that should never vary casually.
- Leave framing and context settings open when they are view-specific.
- Avoid making a new template just to accommodate one sheet condition.
When teams get this balance right, Revit CD set view consistency improves without turning the model into a compliance exercise.
Building Your Standard CD Set View Template Library
A strong CD set doesn't run on one master template. It runs on a lean, deliberate library. The right library is small enough that the team can understand it and specific enough that each common view type starts from the correct graphic behavior.
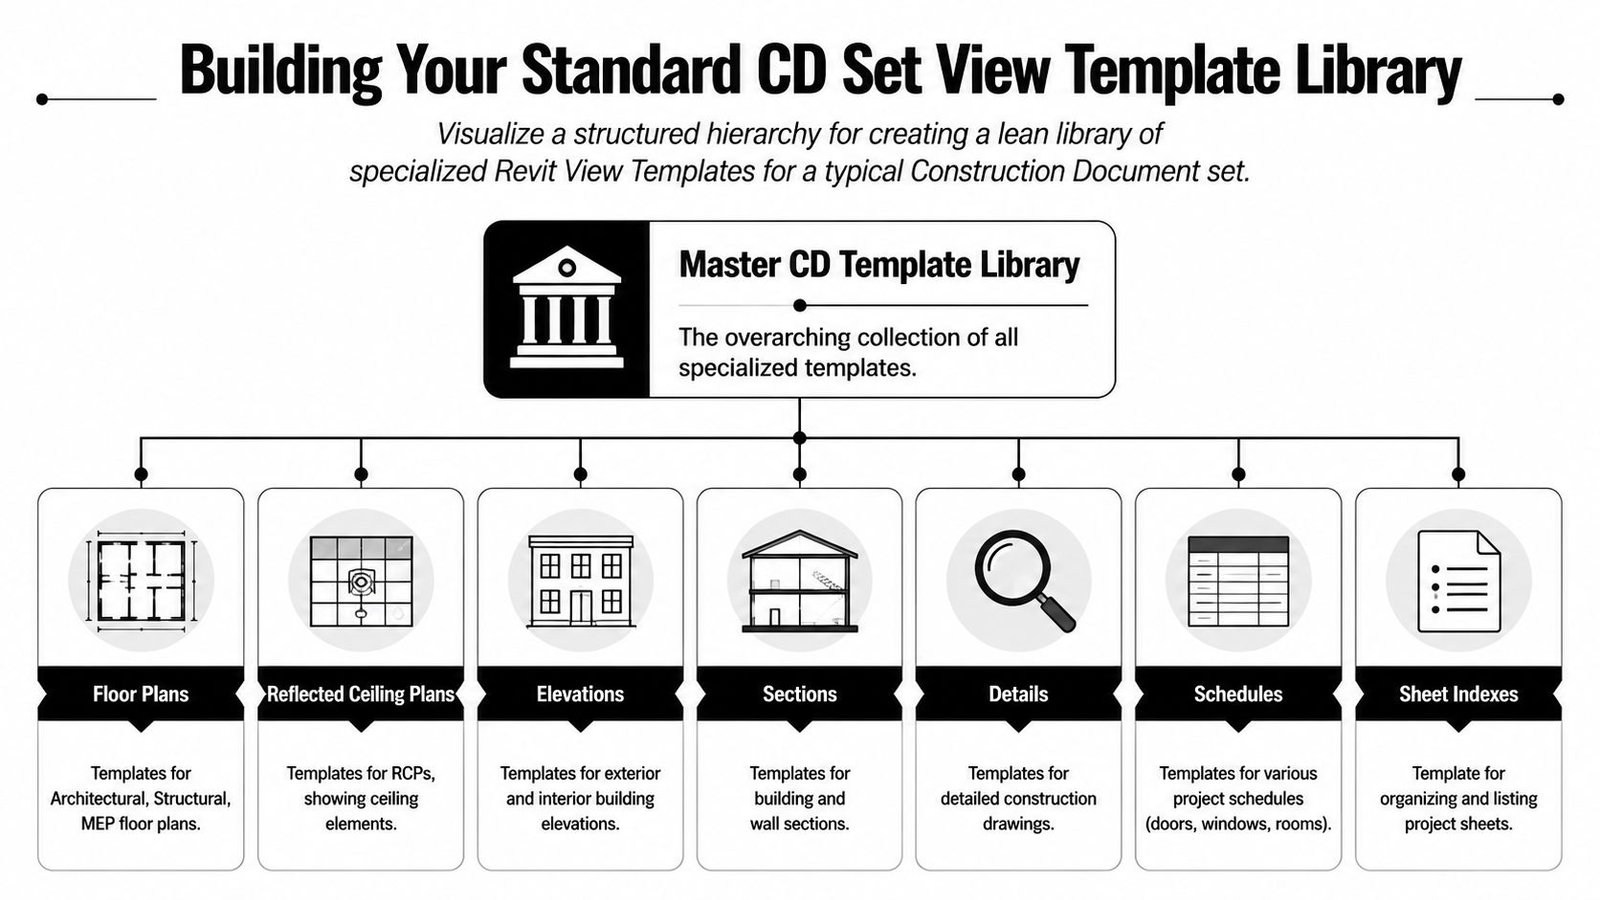
A widely adopted practice is to create separate templates for primary view types such as floor plans, ceiling plans, sections, elevations, and 3D views, then assign a default template to each view family. That approach has been shown to cut template-application errors by 60 to 80% in firms training new hires, as noted by Zentek Consultants on standardization using view templates in Autodesk Revit.
The core set most CD projects need
A practical library for architectural documentation usually includes these starting points:
CD Floor Plan
Built for standard permit or construction plans. Lock Visibility/Graphics, view range, detail level, and discipline. Leave scale and crop region open.CD Enlarged Plan
Use for toilet rooms, stair cores, equipment rooms, and other focused conditions. It may inherit most plan controls from the floor plan template but should support a different use pattern.CD Reflected Ceiling Plan
This should manage ceiling grid visibility and the categories relevant to overhead coordination. Keep it distinct from floor plans so the team doesn't fight category behavior every time an RCP is created.CD Building Section
Intended for broad cuts through the building. Lock the graphic standard, but keep section depth available when the project needs unique extents.CD Wall Section
Separate this from building sections. Large-scale envelope and assembly views need different content emphasis and often different annotation behavior.CD Detail
This one typically carries more flexibility because details vary more than plans and sections do. Even then, don't leave it completely loose.
Keep the library lean
The right question is not “Can we make a template for this?” It's “Will this repeat enough to deserve one?” If the answer is no, solve it at the view level within your controlled framework.
A lot of firms also benefit from documenting how template drift is reviewed over time. This becomes especially important when standards get reused from project to project. A practical reference point is template drift in Revit workflows, because template quality usually degrades through unmanaged exceptions, not through one big failure.
A naming pattern that works
Use names that identify purpose, discipline, and deliverable state. For example:
| Weak name | Better name |
|---|---|
| Plan Template 1 | CD Floor Plan Architectural |
| Section Temp New | CD Building Section Architectural |
| Enlarged Plan John | CD Enlarged Plan Architectural |
That naming discipline helps project architects and production staff choose correctly without asking a BIM lead every time they create a view.
How to Manage Templates on Large Revit Projects
Creating templates is easy. Keeping them clean through months of production is the actual work.

Many firms embed view templates into office or project templates so every new project inherits predefined drawing standards from day one, helping teams build production maturity and maintain consistency through CAD-to-BIM transitions, as described in BIM Pure's guidance on creating a Revit template. That gives you a starting system. It does not replace project governance.
Control naming and creation rights
Template names should be obvious to anyone on the team. If a name doesn't tell a project architect what the template is for, it's already failing.
Then restrict creation. Not every drafter should be free to make a new template because one view needed special cleanup. On a large project, new templates should require BIM manager or project lead approval.
Audit before every issue
This is a QA checkpoint, not an optional housekeeping task. Before permit, pricing, or issue for construction, verify:
- Assigned views only: Views on sheets should have the correct template assigned, not merely applied once.
- No detached exceptions: Check for views that were unlinked to solve a temporary problem.
- Correct family fit: Plans should use plan templates, sections should use section templates, and so on.
- Recent template edits reviewed: A change to a template can ripple across many views.
Your worksharing setup also affects how standards hold under team pressure. If model ownership and view responsibility are fuzzy, inconsistencies spread faster. That's one reason many teams pair template discipline with clear Revit workset practices.
Field note: A pre-issue template audit usually takes less effort than answering comments about inconsistent graphics after the set is already out.
Don't let the library sprawl
If the project has an expanding list of “special” templates, that's usually a symptom of weak governance, not complex design. Keep the active library small, review unused templates, and remove what the team no longer needs. Clutter makes wrong assignment more likely.
Troubleshooting Common View Template Failures
Most template failures don't happen because Revit lacks capability. They happen because somebody made a local exception and the project never recovered from it. Independent industry commentary has noted that without regular audits and QA checks, view templates can drift over time, leading to inconsistent graphics and the familiar problems of template proliferation and orphaned templates, as discussed in this Autodesk forum thread on views with the same template showing differently.
Failure pattern and fix
Here's the practical triage approach.
Template exists but isn't controlling anything
Cause: The office built templates into the project, but nobody assigned them to active views.
Fix: Audit every sheeted view and assign the correct linked template.View looks wrong even though the team says it uses the standard
Cause: The template may have been applied once, then detached, or the wrong template was assigned.
Fix: Reassign the proper template as a live link, then review the view for local overrides left behind.Views using the same template still don't match
Cause: One or more important parameters were left editable, or a local override survived from previous editing.
Fix: Review the view's overrides, filters, phase settings, crop behavior, and any exclusions built into the template.
Two failures that waste the most time
Scale locked by mistake is a classic problem. A team tries to enforce consistency, then discovers they need multiple scales within the same view family. The fix is simple. Remove scale from the locked parameters and let the view use the template for graphic control, not sheet-specific sizing.
Template changes don't show in production views usually points to the wrong use mode. The view was stamped with template settings once, not assigned to the template as a controlled view. Go back into Properties and assign it properly.
If a project keeps producing “one strange view,” assume a broken control link before you assume a graphics bug.
What mature teams do differently
They don't treat view templates like a startup task done on day one. They treat them like a live production system with checkpoints, ownership, and cleanup rules. That's why the question of what to lock versus what to leave open matters so much. It's not a software preference. It's a risk decision.
If your team is cleaning up detached views, inconsistent sheet graphics, or a bloated template library, BIM Heroes can help with Revit production support through its architectural production services. If it would help, ask for a practical template audit checklist or a framework for deciding which parameters to lock and which to leave open before your next issue.