Meta description: Interior elevations construction documents succeed when teams decide early which rooms need them, what vertical information must be shown, and what should be omitted to reduce RFIs and protect fee.
Suggested WordPress category: Construction Coordination & Documentation
Interior elevations are where many CD sets lose discipline. Some teams produce four walls for every room, including storage closets that have nothing on them. Others skip elevations entirely and expect the contractor to piece together heights from plans, schedules, and scattered notes. Both habits create the same problem. The field has to guess.
That guesswork shows up as RFIs, redraws, coordination churn, and fee burn.
The practical issue isn't whether interior elevations are useful. It's deciding which rooms need interior elevations construction documents, what those drawings need to show to be buildable, and what information is just drafting weight. If you can standardize those decisions across a project, your set gets leaner, your team moves faster, and the contractor gets fewer chances to interpret intent incorrectly.
Introduction
In most firms, interior elevations are either over-produced or under-produced. Neither approach is mature. Drawing every wall in every room feels thorough, but it usually creates redundant sheets, duplicated dimensions, and more places for one update to miss another. Skipping elevations in rooms with tile, millwork, or wall-mounted equipment does the opposite. It pushes essential vertical decisions into the field.
That's the production problem this article solves.
The right approach is simple in concept and difficult in execution. Produce interior elevations only where vertical information drives construction, then make those elevations complete enough to build from. That means being selective about room types, disciplined about annotation, and ruthless about leaving off information that belongs elsewhere in the set.
For project architects and Revit production staff, that discipline protects more than drawing quality. It protects schedule predictability, coordination effort, and project margin.
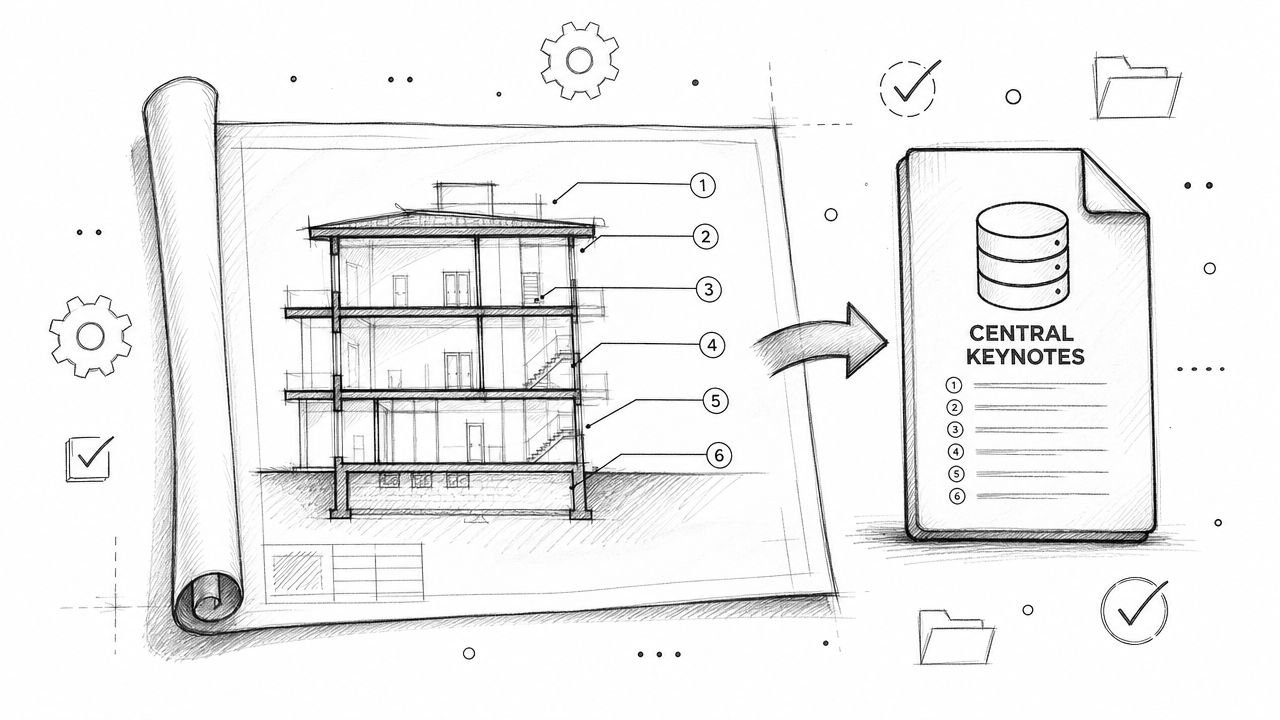
The Core Purpose of Interior Elevations in a CD Set
An interior elevation exists to communicate vertical information that a floor plan can't carry clearly.
A plan tells the contractor where something sits horizontally. An elevation tells the contractor how high it is, how it aligns with adjacent elements, and where finishes start and stop on the wall. If your team loses that distinction, you'll either draw too much or too little.
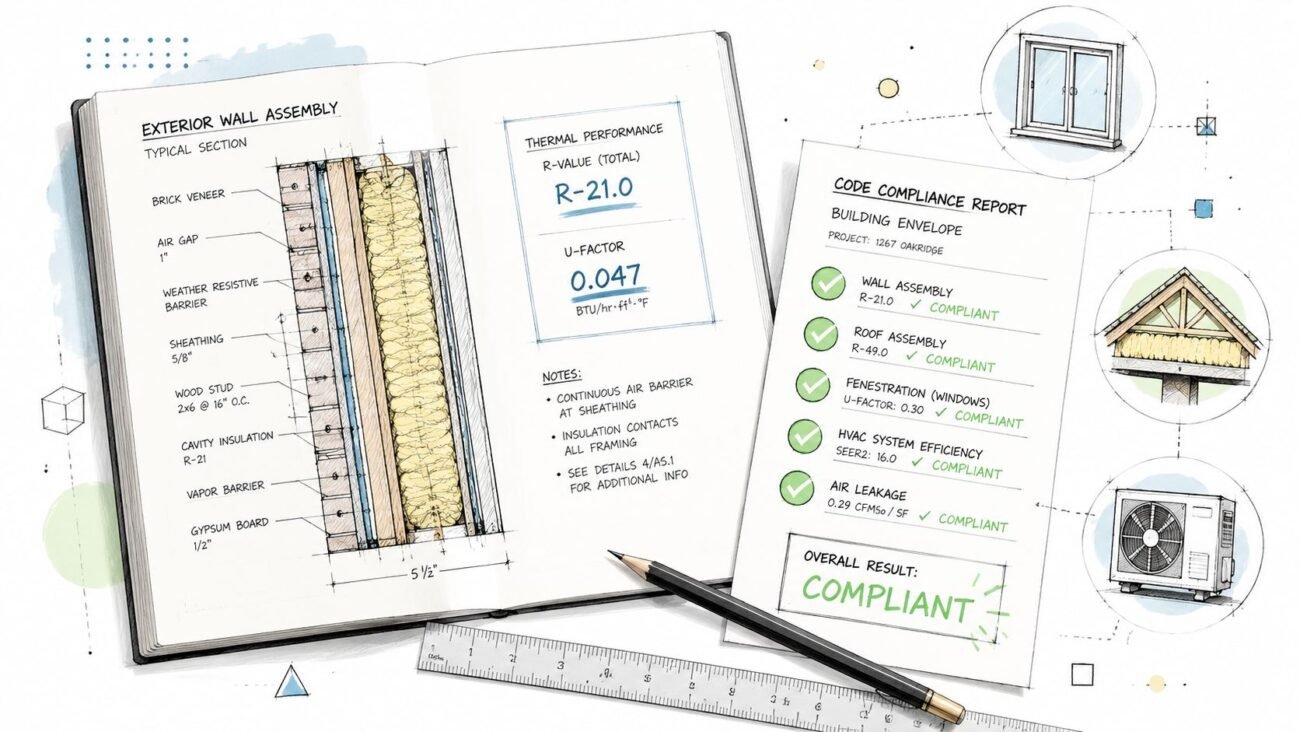
According to Vectorworks' guidance on elevation drawings, interior elevations are best treated as orthographic, wall-specific drawings. The workflow starts from an accurately scaled floor plan, then identifies each wall face and annotates heights, openings, cabinetry or millwork, fixtures, and finish transitions. That matters because those are the dimensions most likely to be misread or missed in plan alone.
The vertical information test
Use one question before creating any elevation view:
Does this wall contain information that cannot be built confidently from the floor plan, schedules, and reflected ceiling plan alone?
If the answer is no, skip it.
If the answer is yes, the elevation becomes a primary construction document, not just a presentation aid.
A painted gypsum board office with a standard door, standard ceiling, and no built-ins usually doesn't need an elevation. The plan, finish schedule, door schedule, and RCP already tell the story. A restroom with grab bars, mirrors, dispensers, tile extents, and partition conditions is different. The plan may locate those elements, but it doesn't communicate the wall as a buildable vertical assembly.
Practical rule: If the contractor has to ask “how high,” “where does it stop,” or “what aligns with what,” you probably need an interior elevation.
What good teams standardize
Production maturity starts when everyone in the office applies the same logic. Junior staff shouldn't be deciding room by room based on personal drafting habits. The PM, PA, and production lead should align early on a room-type matrix.
That matrix doesn't have to be complicated. It just needs to classify spaces by vertical complexity, not by whether the room sounds important architecturally.
Which Spaces Demand Interior Elevations
Without interior elevations, some rooms consistently generate on-site questions. These are the spaces where interior elevations construction documents are indispensable because the work depends on vertical coordination.
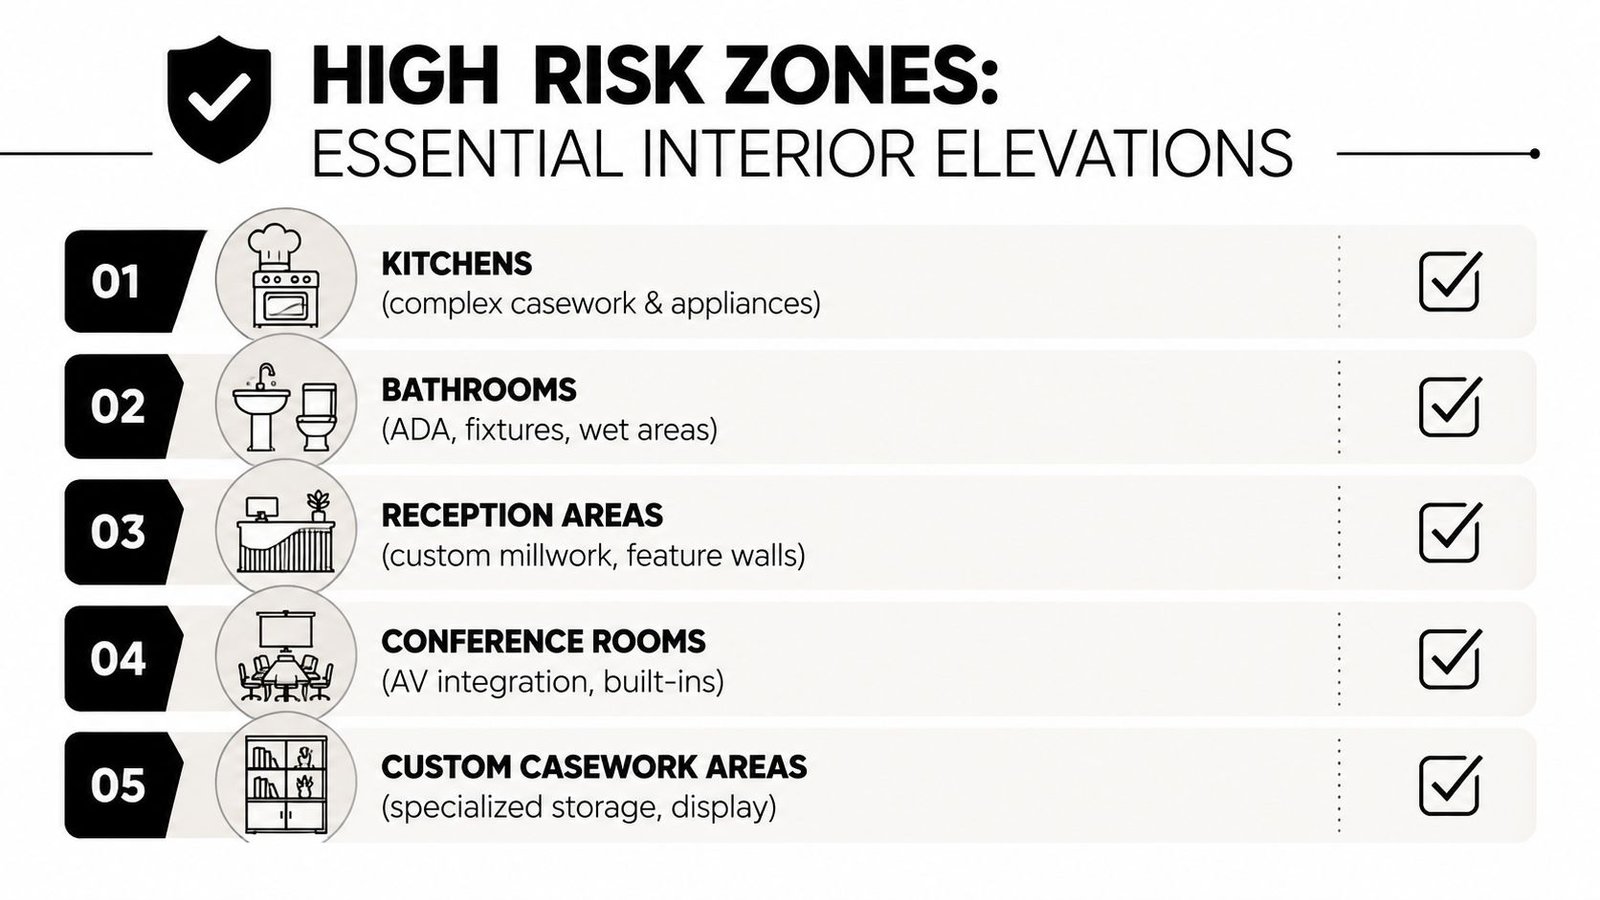
Kitchens and break rooms
Commercial kitchens, pantry walls, and tenant break rooms almost always need elevations. The issue isn't just casework quantity. It's the relationship between lower cabinets, upper cabinets, appliances, backsplashes, countertop heights, and rough-in expectations.
A floor plan can show where the sink base sits. It won't reliably show top-of-cabinet height, backsplash termination, appliance alignment, or the vertical relationship between cabinet runs and soffits.
If someone says the casework schedule is enough, it usually isn't. Schedules list components. Contractors build walls.
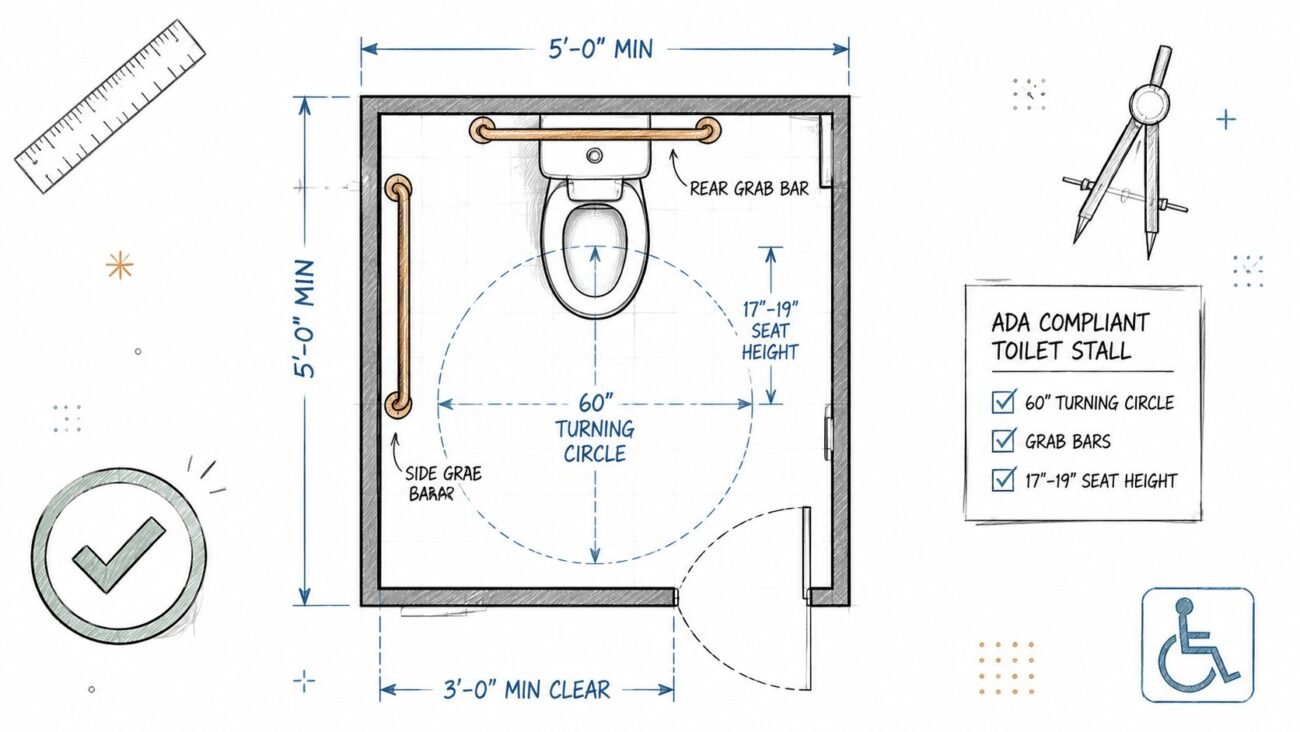
Restrooms and toilet rooms
Restrooms are the clearest example of what to show interior elevation decisions affecting buildability. Grab bars, mirrors, dispensers, toilet accessories, tile, and partition conditions all depend on wall-specific heights and locations. Accessible compliance also becomes hard to verify from plan alone.
In permit and construction sets, restroom elevations do real work. They tell the framer where backing is needed, the tile installer where finish transitions occur, and the GC which wall conditions are intentional versus assumed.
Lobbies and reception areas
Reception zones often look simple in plan and become complicated in elevation. A feature wall, custom desk, signage zone, stone or wood paneling, and integrated lighting can all occupy a single wall face. If that information isn't shown vertically, installers end up coordinating from partial fragments.
Here, commercial interior elevations permit set discipline matters. If a reception wall drives finish alignment or millwork fabrication, it needs to be presented clearly and dimensioned from finished floor.
Specialty and equipment-driven rooms
Server rooms, mail rooms, copier alcoves, package rooms, and similar spaces often get missed because they're not visually prominent. That's a mistake. If a wall has mounting heights, equipment clearances, shelving systems, access panels, or coordinated blocking, it deserves an elevation.
The trigger isn't design prestige. It's whether field crews need a wall-specific instruction set.
Rooms with repetitive vertical conditions rarely generate trouble. Rooms with one or two unusual wall-mounted requirements often do.
When to Skip Interior Elevations and Protect Margins
Knowing when not to draft an elevation is a production skill.
A lot of teams treat every omitted drawing like a risk. In practice, redundant drawings create a different risk. They take time to produce, time to check, time to revise, and time to reconcile when the model changes. If they don't add buildable information, they dilute the set.
Low-risk rooms that usually don't need them
The following spaces often don't justify interior elevations:
- Private offices: Standard painted walls, standard doors, and no built-ins usually mean the plan and schedules already cover the work.
- Open office areas: If there's no custom millwork, no feature finish, and no wall-mounted equipment that needs exact vertical placement, don't draft generic perimeter walls.
- Storage rooms: Simple shelving by vendor or no built-in components usually doesn't warrant an architectural elevation.
- Janitor closets: A mop sink and standard finishes are typically handled by plumbing and finish information elsewhere in the set.
- Plain corridors: If there's no wainscot, signage band, equipment wall, or finish transition, corridor elevations are usually wasted effort.
The margin test
The cleanest rule is this: if the vertical information is fully captured by the RCP, finish schedule, door schedule, and plan notes, the elevation is probably redundant.
That's not under-documenting. That's controlled documentation.
Firms that produce tighter sets usually have a defined room-type standard for this. Firms that don't often let each team member decide independently. One person includes interior elevations for every room. Another omits half of them. The result is inconsistency inside the same package, which is exactly what creates QA misses and review churn.
The Non-Negotiable Information Every Elevation Must Show
Once you decide a room needs an elevation, that drawing has to earn its place in the set. An incomplete elevation is often worse than no elevation because it suggests the wall has been fully coordinated when it hasn't.
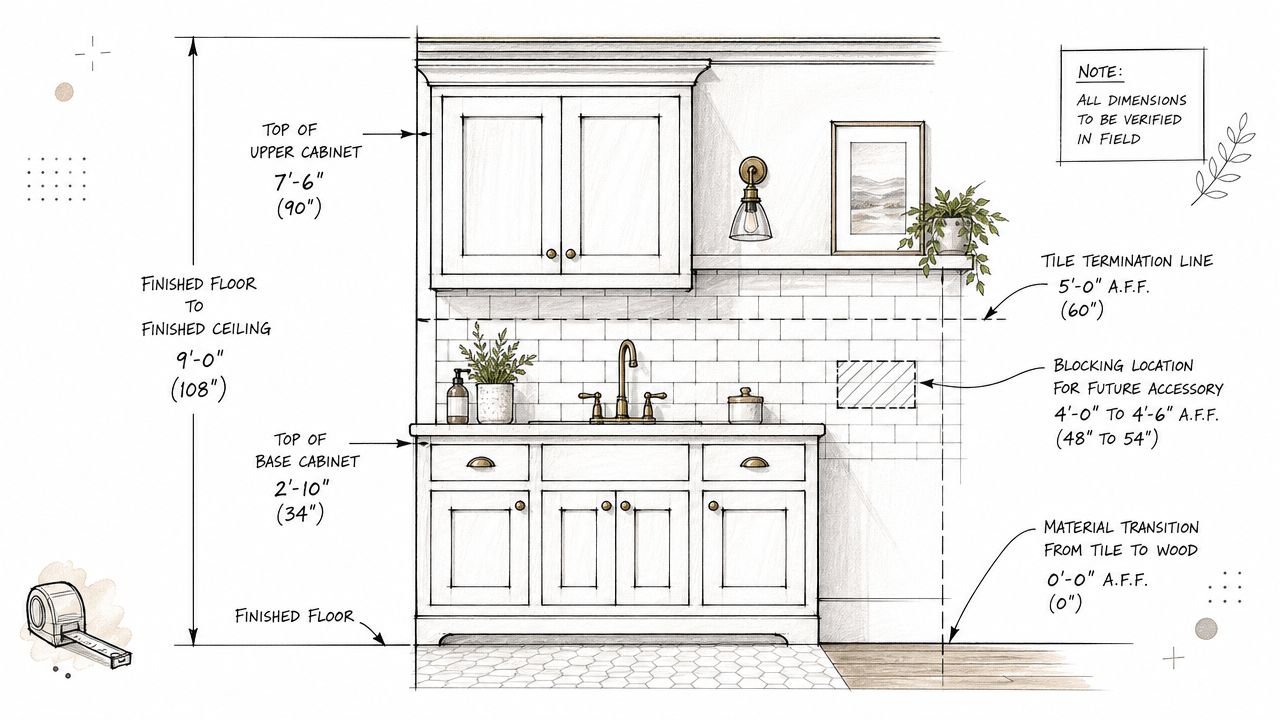
Start with wall control dimensions
Every elevation should show the overall wall condition clearly enough for someone in the field to orient themselves.
That includes:
- Finished floor to finished ceiling height
- Opening heights in non-standard conditions
- Control dimensions to major horizontal lines, such as soffits, cabinet tops, or finish terminations
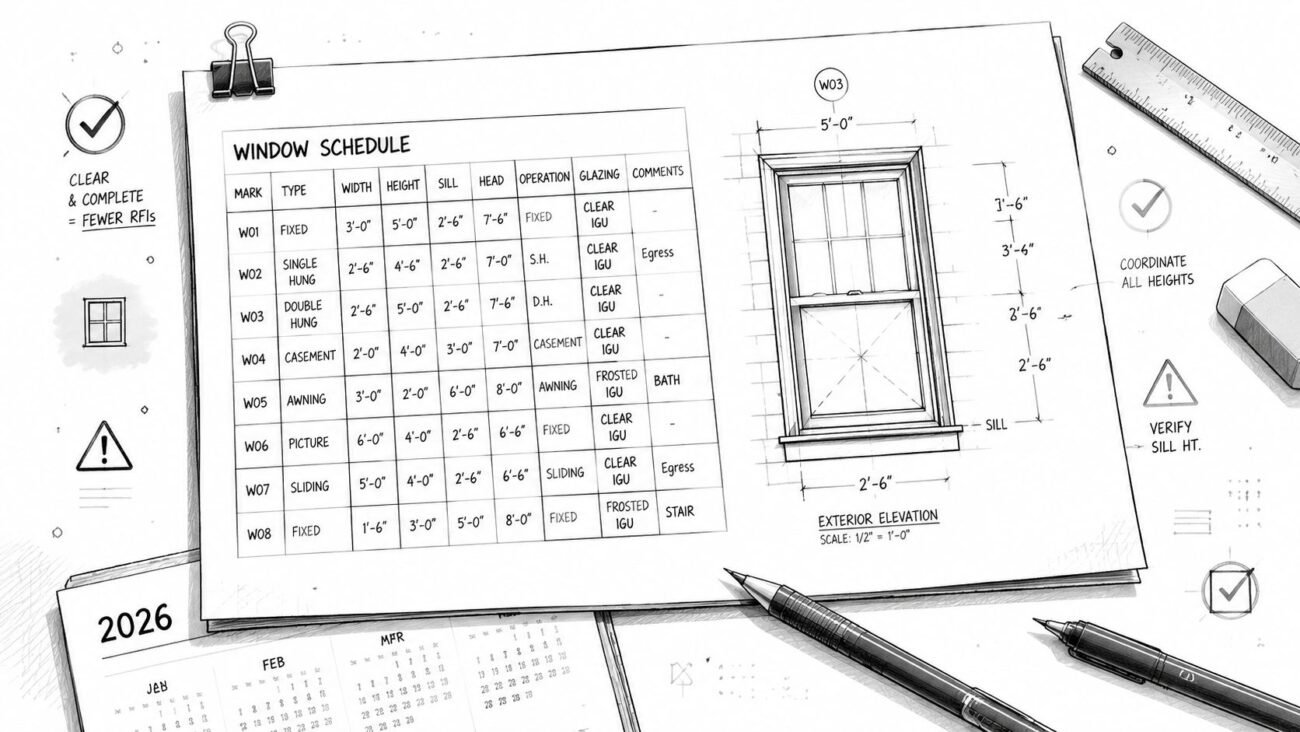
The Historic American Buildings Survey manual reinforces that elevations are precision documents, not casual sketches. It lists 3/8 inch as the minimum scale for simple interior wall elevations and 3/4 inch as the recommended scale for doors, doorways, stairways, and interior elevations. That's a useful reminder for teams that treat these views as secondary. They aren't secondary when the wall is being built from them.
Dimension from finished floor
This is one of the most common field-facing failures in an interior elevation drawing standards workflow.
If dimensions float off a countertop, a window sill, a random note, or a generic level line, the drawing becomes harder to trust. Vertical dimensions should reference finished floor as the datum for buildable elements.
That includes:
- top of base cabinets
- bottom and top of wall cabinets
- centerlines for accessories
- top of wainscot
- tile extent
- signage bands
- wall-mounted equipment
If floor finishes vary between rooms, the annotation still needs to account for the actual finished floor condition.
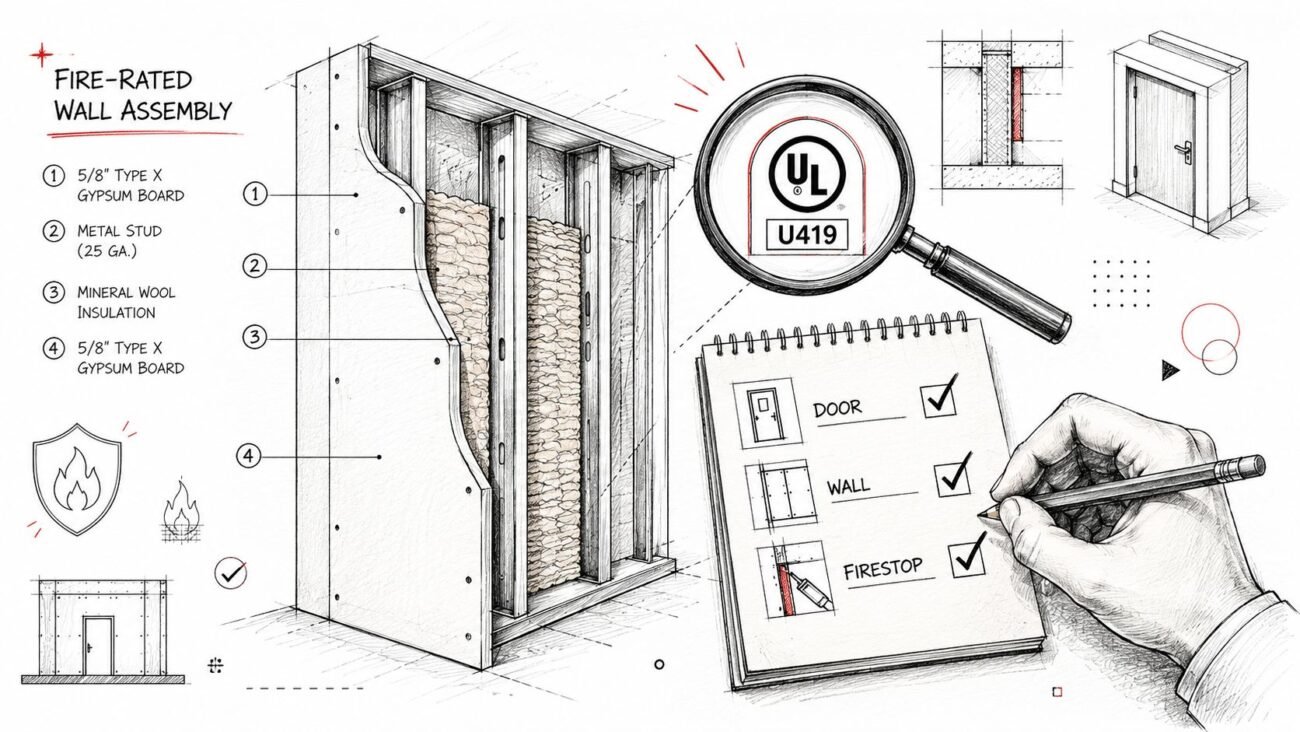
Show what must be framed before finishes
The elevation isn't just for finish installers. It also helps framing crews and subcontractors coordinate early work.
Show blocking or backing requirements for items such as:
- Grab bars
- Wall-mounted TVs
- Handrails
- Heavy accessories
- Millwork support zones
If your project includes custom casework, align the elevation package with your millwork shop drawing coordination process. That handoff is where many teams discover the CD elevation didn't communicate enough to fabricate from cleanly.
If an installer needs backing and the wall closes before anyone catches it, the issue didn't start in the field. It started in documentation.
What to Omit from Elevations to Improve Clarity
The best interior elevation isn't the one with the most notes. It's the one that tells the right trade the right thing without forcing them to sort through noise.
Over-annotated elevations create contradiction risk. They also invite teams to maintain the same information in multiple places, which is exactly how mismatches creep into a CD issue.
Keep horizontal plan information on the plan
If the floor plan already controls wall length and horizontal spacing, don't repeat it unless the dimension is essential to understanding the vertical condition. Repeating plan dimensions on the elevation gives your team two places to update if the wall moves.
That's not efficiency. It's version-control debt.
Leave structural and MEP where they belong
Structural elements belong on structural sheets unless they directly affect a finish condition or built-in relationship. If a beam drops into a millwork condition, note the impact. Don't turn the architectural elevation into a structural diagram.
The same goes for MEP rough-ins. Exact outlet heights, device placement, and plumbing rough-in dimensions belong on the engineering sheets. The architectural elevation can indicate coordination intent, but it shouldn't compete with consultant drawings.
A clean note such as “power and data by E drawings” is often enough when the architectural issue is reserving space or identifying a coordination zone.
Omit loose furniture
Loose furniture usually doesn't belong on permit-level interior elevations. It clutters the view and implies a level of procurement certainty that may not exist. Include furniture only when it is built-in, owner-furnished equipment requiring rough-in, or something that drives backing or utility locations.
That's especially important in tenant improvement work, where furniture packages often shift after permit.
A Production-Ready Revit Workflow for Elevations
Most problems in an interior elevation Revit CD set don't come from drafting skill. They come from workflow inconsistency. Different staff create views differently, crop them differently, annotate them differently, and then the sheet set becomes harder to maintain.
A better approach is to make the workflow repeatable.

Build views from plan and control the extents
A standard Revit method is to place the elevation marker in plan, switch it to interior elevation, select the target walls, then clean the view with masking regions and dimension from finish floor to control points like cabinet tops or ceiling lines, as shown in this interior elevation Revit workflow example. The reason this matters is practical. Incomplete crop boundaries and missing annotation are common causes of field confusion.
That's why crop discipline matters so much. The crop should show the intended wall face and only the adjacent geometry needed for context. If the view reaches into neighboring rooms or catches unrelated model elements, sheet readability drops fast.
Standardize templates and detail level
Interior elevations should not be manually styled from scratch by each user. They need a locked production setup.
Use view templates for:
- Detail level
- Visibility and graphics
- annotation categories
- lineweight behavior
- phase and filter control
- crop and scope conventions
If your office is still letting each drafter tune these settings manually, it's worth tightening the process with a defined Revit view template standard.
For CD work, Fine detail level is usually the safe baseline. If you leave views at Medium, critical millwork or fixture geometry may not display the way the set needs.
Renovation adds one more layer
Renovation projects require more judgment. Model-generated elevations don't remove uncertainty. They can hide it if the model looks cleaner than the field condition.
When existing conditions are uneven, walls are out of plumb, or ceiling planes are irregular, the elevation should communicate what was verified versus what was inferred. Don't let the model imply certainty that the site data doesn't support.
Model-derived views are fast. Trusted construction information still depends on human checking.
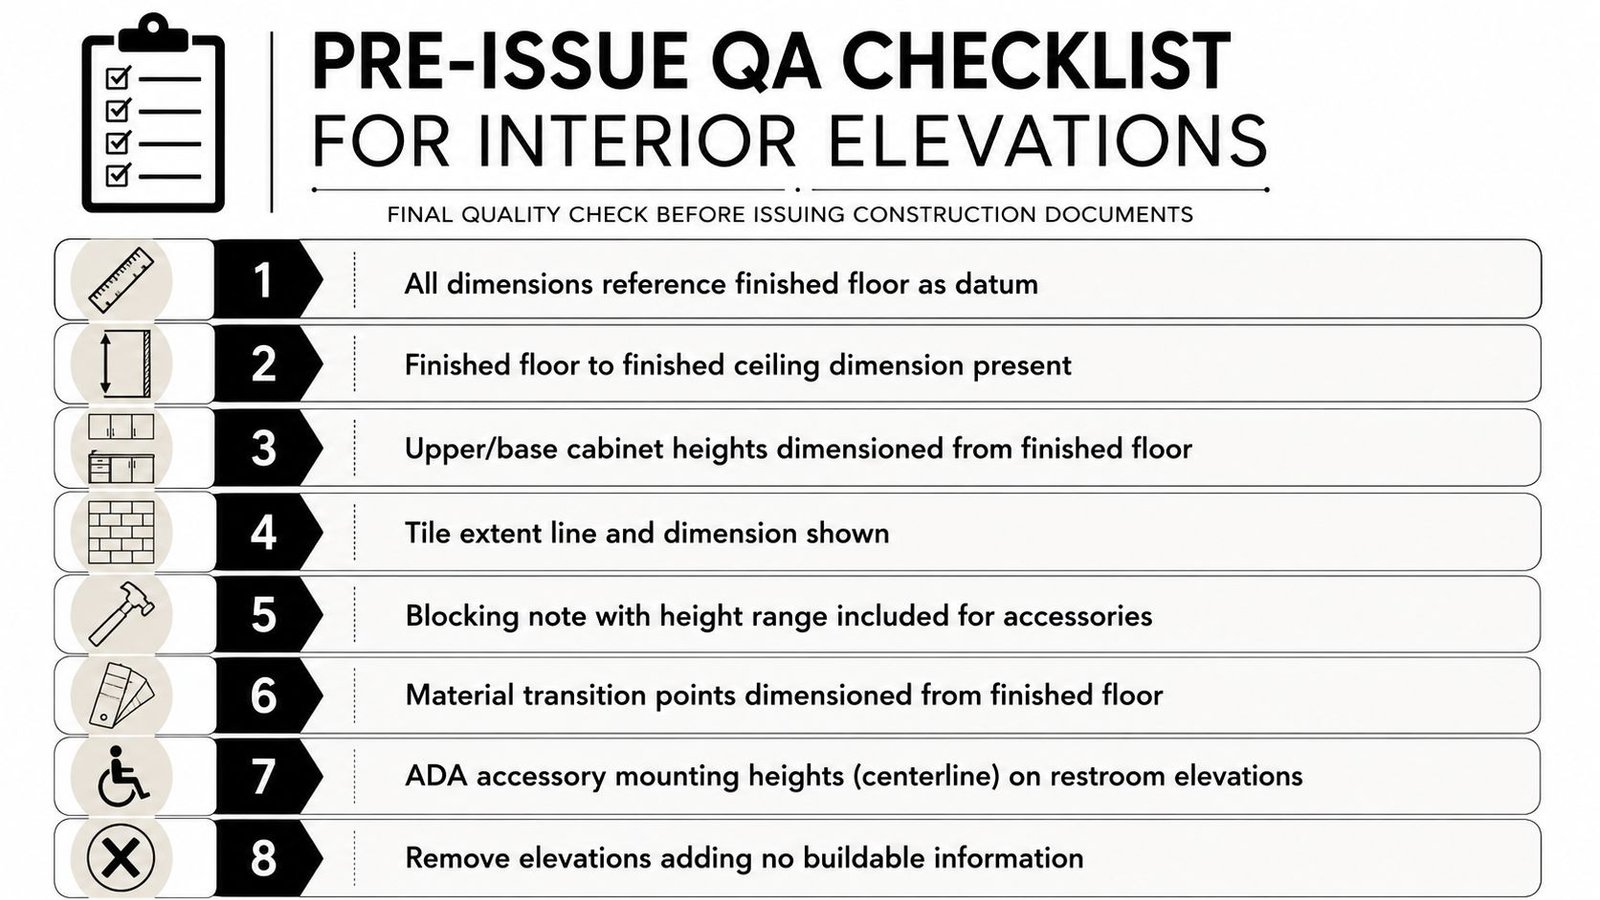
Your Pre-Issue QA Checklist for Interior Elevations
The final quality gate for interior elevations shouldn't be aesthetic. It should be buildability.
A lot of corrections are predictable. The same omissions show up issue after issue: wall height missing, tile extent missing, accessory heights not dimensioned, or a full page spent on a room that never needed an elevation in the first place.
The bigger issue is judgment. As discussed in Existing Conditions' article on interior elevations, the recurring business question isn't what an interior elevation is. It's what minimum information reduces RFIs and change orders. It also notes that overly detailed elevations can slow coordination if conditions change late in the project. That's exactly the QA lens teams should use before issue.
Pre-issue check items
Run every interior elevation through this short review:
- Datum check: Are vertical dimensions taken from finished floor?
- Wall height check: Is finished floor to finished ceiling shown?
- Casework check: Are upper and base cabinet heights dimensioned clearly?
- Finish extent check: Are tile, wainscot, and partial-height finishes terminated and dimensioned?
- Blocking check: Is backing shown for heavy or code-driven wall-mounted elements?
- ADA check: Are accessory mounting heights shown where required?
- Scope check: Does this elevation add buildable information, or is it redundant?
For teams building repeatable QA, a formal drawing quality check workflow makes this easier to enforce across multiple pods or project teams.
The standard worth teaching junior staff
Junior architects often think complete means all-encompassing. In production, complete means the drawing contains what construction needs and nothing that competes with it.
That distinction is where reliable documentation starts. It's also where project margins stop leaking through avoidable drafting effort and avoidable field questions.
If your team is wrestling with room-by-room elevation standards, inconsistent Revit output, or CD packages that keep growing without getting clearer, it may be time for stronger production support. BIM Heroes helps firms build reliable Revit documentation systems for commercial CD sets, with a focus on consistency, QA discipline, and scalable delivery. If that would help your current workload, you can reach out through their architectural production support resources.