Meta description: Learn how to document fire-rated wall assemblies in commercial permit sets using UL assembly numbers, IBC references, Revit workflows, and QA checks that reduce plan check corrections.
A permit set is nearly out the door. The plan says 1-HR RATED CONSTRUCTION at the corridor wall, everyone assumes it's covered, and then the correction comes back. No assembly listing. No detail showing the layer build-up. No fire rating in the door schedule for the opening in that wall. What looked complete on the sheet set turns out to be unverifiable.
That kind of miss is common, and it's expensive because it triggers avoidable back-and-forth at the worst point in the schedule.
Good documentation for fire-rated wall assemblies isn't about adding more notes. It's about making the assembly traceable from code requirement to wall type, from wall type to detail, and from detail to every opening, penetration, and schedule entry that affects the rating. If that chain is broken anywhere, plan check will find it, and if they don't, the inspector or contractor will.
Introduction
The correction usually reads like this: identify the rated wall assembly, provide listing reference, clarify rated opening protection, and show compliant detail. In other words, the reviewer is telling you the drawings claim a rating but don't prove it.
That distinction matters. A wall isn't approved because the plans call it rated. It's approved because the documents identify a code-required condition and tie it to a verifiable assembly, then carry that requirement consistently through plans, details, and schedules.
For project architects and production teams, that's where the essential work sits. The challenge isn't understanding that a corridor needs a rating. The challenge is documenting fire rated assembly construction documents cleanly enough that the reviewer doesn't have to guess what you mean.
The Code Foundation for Fire-Rated Wall Assemblies
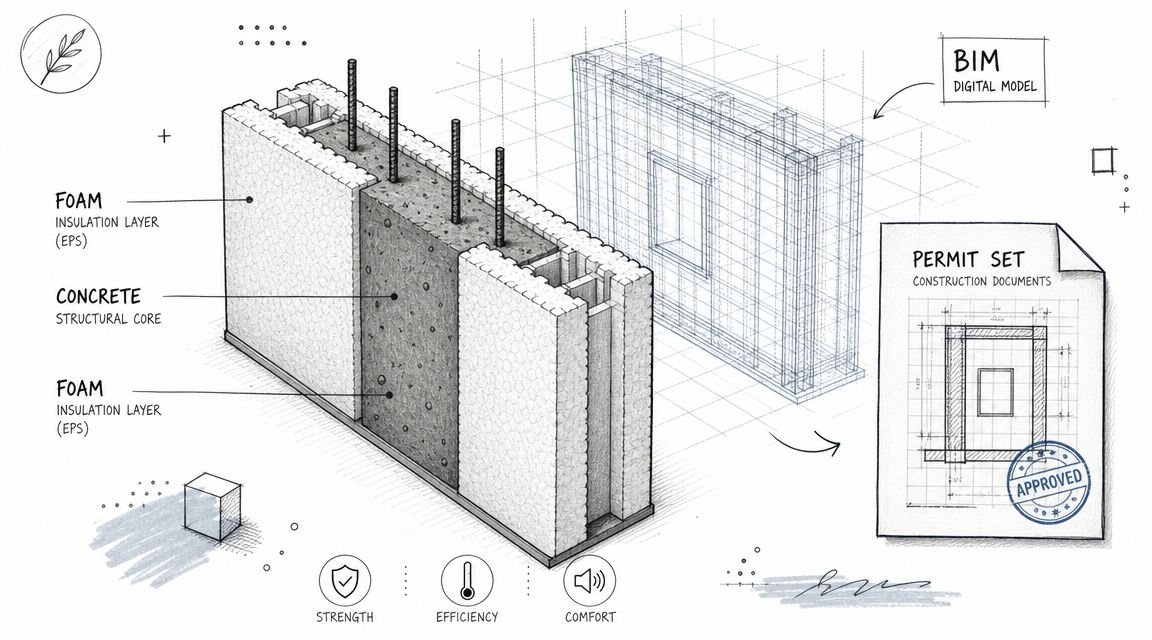
IBC Chapter 7 governs fire-resistive construction, and the first production lesson is simple. The rating belongs to the assembly, not to one material. If the drawings only say Type X gypsum board or one-hour rated construction, they're incomplete.
The code framework expects a tested and listed construction system, or a code-recognized prescriptive assembly where allowed. That's why generic notes fail review. The reviewer needs a specific combination of framing, membranes, fasteners, joints, insulation, and related components that can be checked against an accepted reference.
Why generic notes fail
The underlying logic is well established. Modern rating practice is based on full-assembly fire testing, not gypsum board alone. The Canadian Wood Council notes that the code approach ties fire-resistance ratings to standardized fire endurance testing, with performance assessed as the total contribution of the complete wall system. It also notes that a single layer of 5/8-inch Type X gypsum board on each side of a properly constructed stud wall is typically associated with a 1-hour rating, while a second layer on each side is commonly used for 2 hours in tested assemblies (overview of fire-rated wall testing and assembly-based ratings).
That matters in commercial CDs because the sheet set has to document the system that was tested, not a shorthand description of the finish.
Practical rule: If the inspector can't connect your wall tag to a tested or prescriptive assembly without interpretation, the documents aren't ready.
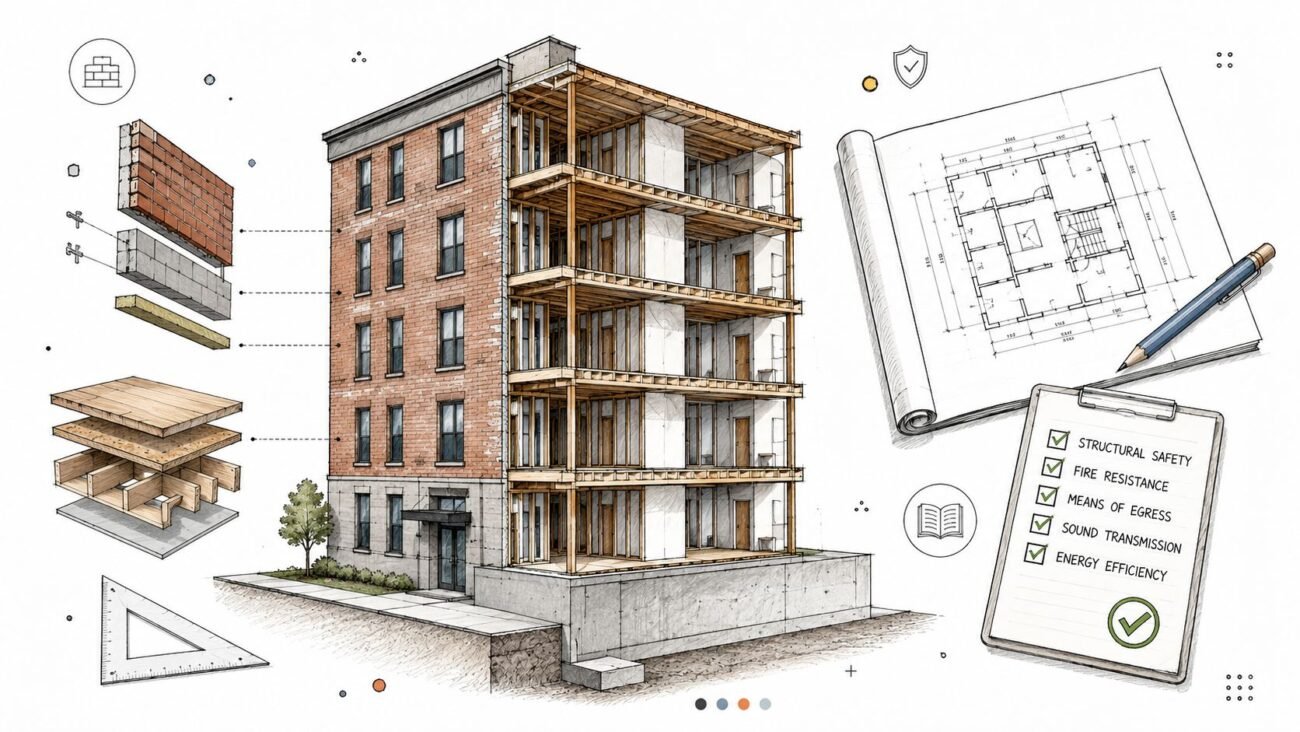
Where rated assemblies show up
In practice, the recurring triggers are familiar:
- Corridor walls: Often tied to rated corridor requirements under IBC Section 1020.
- Occupancy separations: Driven by occupancy relationships under IBC Table 508.4.
- Shaft enclosures: Controlled by IBC Section 713 and usually reviewed closely.
- Exterior walls: Dependent on fire separation distance under IBC Table 602.
- Exit enclosures: Governed by IBC Section 1023 and rarely forgiven when under-documented.
Each condition can carry different opening protection requirements. That's why one note in a partition legend won't carry the set. The documents must identify where the rating is required, what the required rating is, and which assembly satisfies that exact condition.
Decoding Assembly Listings UL Numbers and IBC Tables
There are two practical paths for identifying rated construction in a commercial set. One path is more commonly utilized than the other, but both need to be understood because plan review doesn't care which route you prefer. It cares whether the route is verifiable.
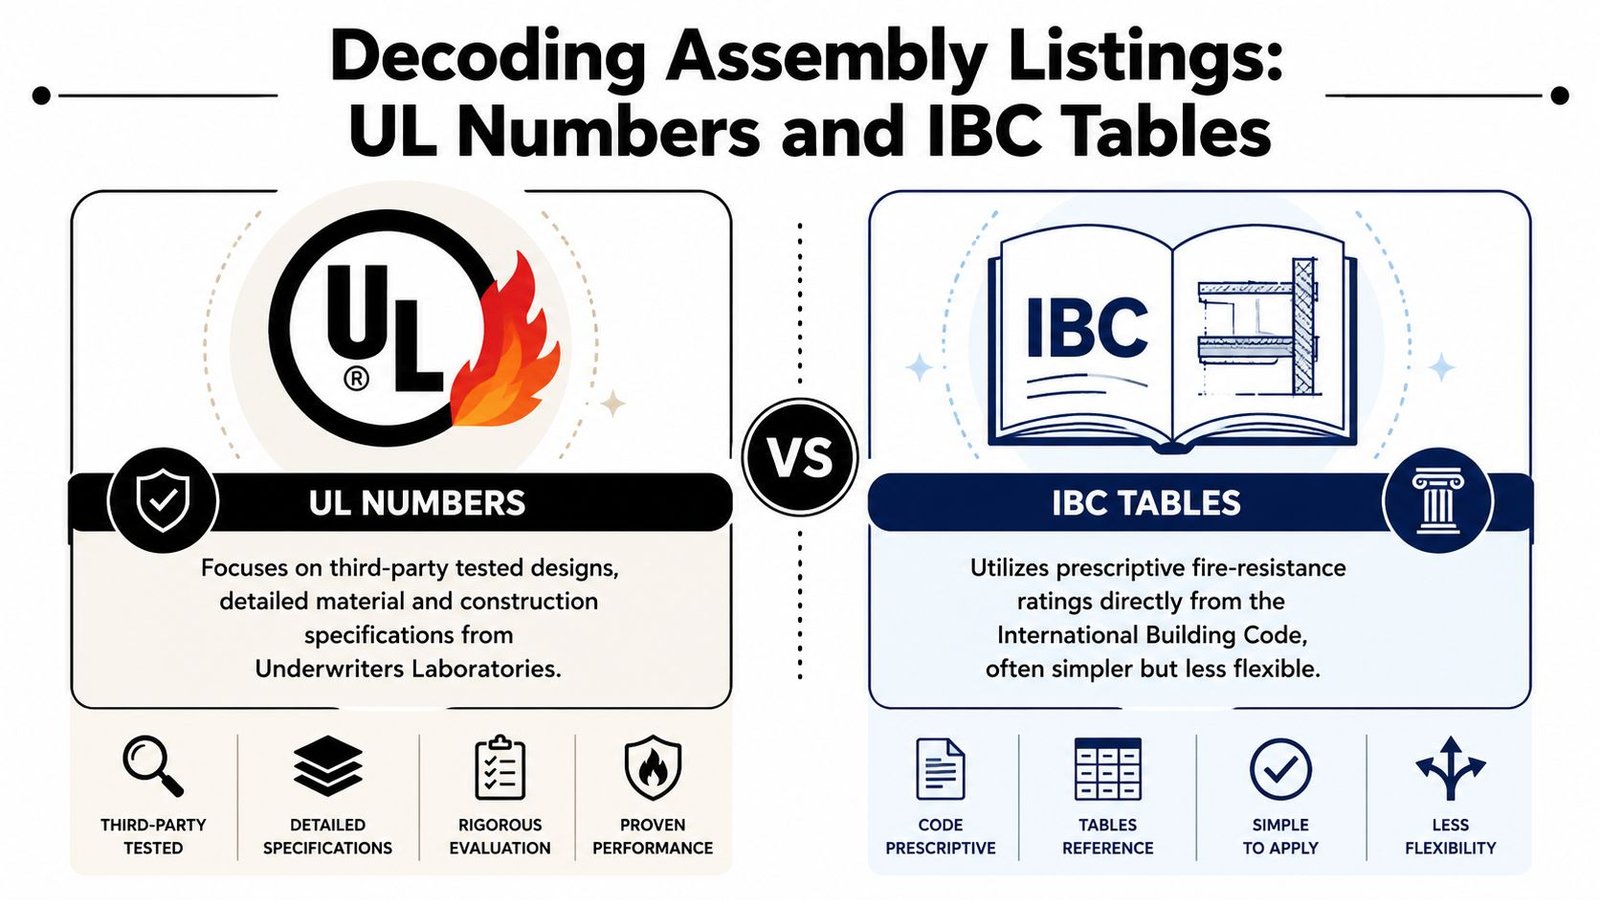
UL listings
The first path is the one most architects mean when they talk about UL assembly number drawings. Underwriters Laboratories publishes tested designs for walls, floor-ceiling systems, roof-ceiling systems, and other fire-resistive assemblies. Each listing has a unique designation that lets the reviewer, contractor, and inspector confirm what was intended.
For wall systems, that designation needs to show up in the wall type legend, in the detail where the condition is complex, and anywhere else the assembly must be verified against the design intent. If you're producing permit drawing packages for commercial reviews, this is one of the fastest ways to show the set was built by a disciplined production process rather than patched together late.
IBC prescriptive references
The second path is a prescriptive code reference. Some assemblies can be documented directly through IBC Chapter 7 tables where the code provides a recognized construction method without requiring a separate listed test design for that exact condition. This is more common with materials like concrete or masonry than with framed gypsum partitions.
A short comparison helps:
| Method | Best use | What must appear on drawings |
|---|---|---|
| UL assembly number | Framed tested systems and common commercial partitions | Specific UL designation, rating, and matching build-up |
| IBC prescriptive reference | Code-recognized assemblies such as certain masonry or concrete conditions | Exact IBC table reference and enough information to confirm compliance |
The most common plan check miss is also the easiest one to avoid. A wall note states the rating, but it doesn't state the reference.
“One-hour wall” is not reviewable. A wall note tied to a specific listing or code table is.
A Blueprint for Documenting Fire-Rated Walls in a CD Set
The cleanest permit sets treat rated construction as a cross-sheet system. The wall type legend, the plan tags, the details, and the life safety sheet all have to agree. If one of those locations goes off-script, the project team creates ambiguity that usually turns into an RFI or correction.
Start with the wall type legend
Every rated partition in the project should appear in the wall type legend or schedule with four items clearly shown:
- Wall type designation: The tag that appears on the plan.
- Required rating: The fire resistance rating the wall is intended to provide.
- Listing reference: The UL designation or IBC prescriptive table reference.
- Layer composition: Studs, membranes, insulation, and any key construction notes that distinguish the assembly.
That legend becomes the control point for the rest of the set. If the team revises a wall from one assembly to another, the change should flow from there and be coordinated everywhere else.
For firms that maintain standards, the payoff from template discipline is clear. A reusable wall type standard with fields for rating and listing reference catches omissions early. A generic wall legend does the opposite.
Make plans and details carry the same story
The floor plan tag has to match the wall type legend exactly. Not approximately. Not “close enough.” Exactly. If the plan says W-12 and the legend says WT-12, you've already introduced room for interpretation.
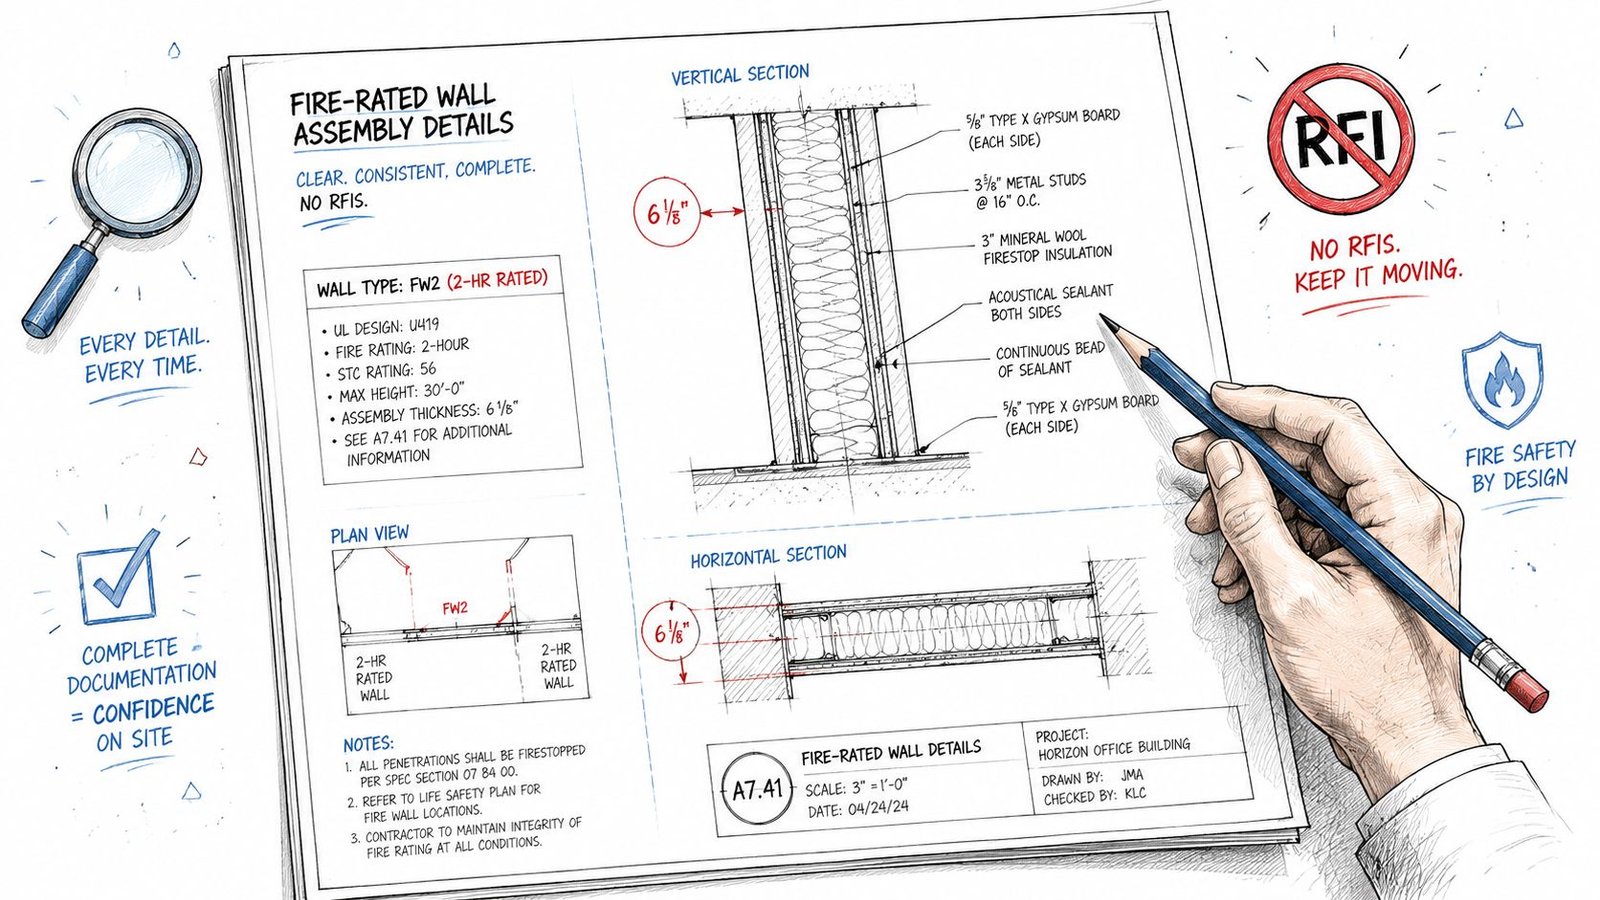
Complex conditions need a dedicated fire rated wall detail commercial reviewers can use. Shaft walls, corridor intersections, head-of-wall conditions, abutments at structure, and exterior wall conditions near property lines all deserve explicit detailing when the condition isn't obvious from the legend alone.
A good rated wall detail shows:
- Framing type and spacing
- Layer sequence on each side
- Continuity at deck or structure above
- Joint treatment and relevant sealants
- Penetration or closure requirements where applicable
For limited-access retrofit work, one-sided upgrades can be valid, but only when they match a specific tested assembly. National Gypsum documents that a 1-hour wall can be upgraded to 2 hours by adding two layers of 5/8-inch Type X gypsum board to one side in a tested asymmetric configuration (tested one-sided fire-rated wall assemblies for retrofit conditions). That's useful in the field, but it's also where production teams get sloppy if they treat the condition as a generic wall type instead of a listed system.
If your office builds standardized wall type documentation workflows, this is the category that benefits most from exact naming, exact parameters, and exact detail matching.
Use the life safety sheet as an audit sheet
The life safety or code compliance sheet shouldn't just recite occupancy and egress data. It should include a rated assembly summary that lets the reviewer scan all rated wall conditions in one place.
A strong code sheet saves time twice. It helps the reviewer find the assembly quickly, and it helps your team verify that every rated condition made it into the set before issue.
At minimum, that summary should list the wall type, required rating, assembly reference, and where it is used. It becomes a simple internal checkpoint before submission and a practical review tool after submission.
Protecting Openings and Penetrations in Rated Assemblies
A rated partition can be documented perfectly at the wall legend and still fail review if the openings and penetrations don't maintain the assembly. Often, permit sets fail due to such discrepancies. The wall carries a rating, but the door schedule doesn't. The glazing is shown, but not listed as rated. The MEP penetrations are implied, but the firestopping requirement isn't stated anywhere.
Doors and glazing
For doors, the rating has to appear in the door schedule. Not buried in a keynote. Not implied by hardware. If the wall condition requires opening protection, the schedule needs to say so directly.
Typical production misses include:
- Door rating omitted: The schedule shows size, leaf type, and hardware group, but no fire rating.
- Rated wall not cross-checked: A door sits in a rated partition and still carries a nonrated type mark.
- Frame and glazing not coordinated: The opening is called out as rated, but the frame or glazing designation is incomplete.
Rated glazing needs the same discipline. If a window or borrowed lite occurs in a rated wall, the window schedule or detail needs to identify the listed rated glazing and frame condition, not just the glass type.
Penetrations and structural interfaces
Penetrations by pipe, conduit, ductwork, and cable trays need a note requiring listed firestop systems at all penetrations of rated assemblies. The exact field-selected system can be finalized during construction, but the permit set has to establish the requirement.
One of the most overlooked conditions sits at structural interfaces. UL notes that major codes do not permit fire-resistance-rated joints between a wall assembly and an unprotected steel beam, and that unprotected steel can transfer heat in a way that causes the assembly to fail test criteria on the unexposed side (UL guidance on rated walls adjoining unprotected steel beams).
That has direct consequences for detailing. If a rated wall runs into unprotected steel, don't assume a generic head-of-wall joint note solves it. The wall continuity and supporting condition need to be reviewed with the structural set and detailed accordingly.
The wall doesn't stop being your problem when it touches structure. That's often where the real coordination problem starts.
Mastering Fire-Rated Assembly Documentation in Revit
Revit can either make this easy or hide mistakes at scale. The difference comes down to whether the model carries rated assembly data as structured information or whether the team is still relying on manual notes and last-minute drafting.
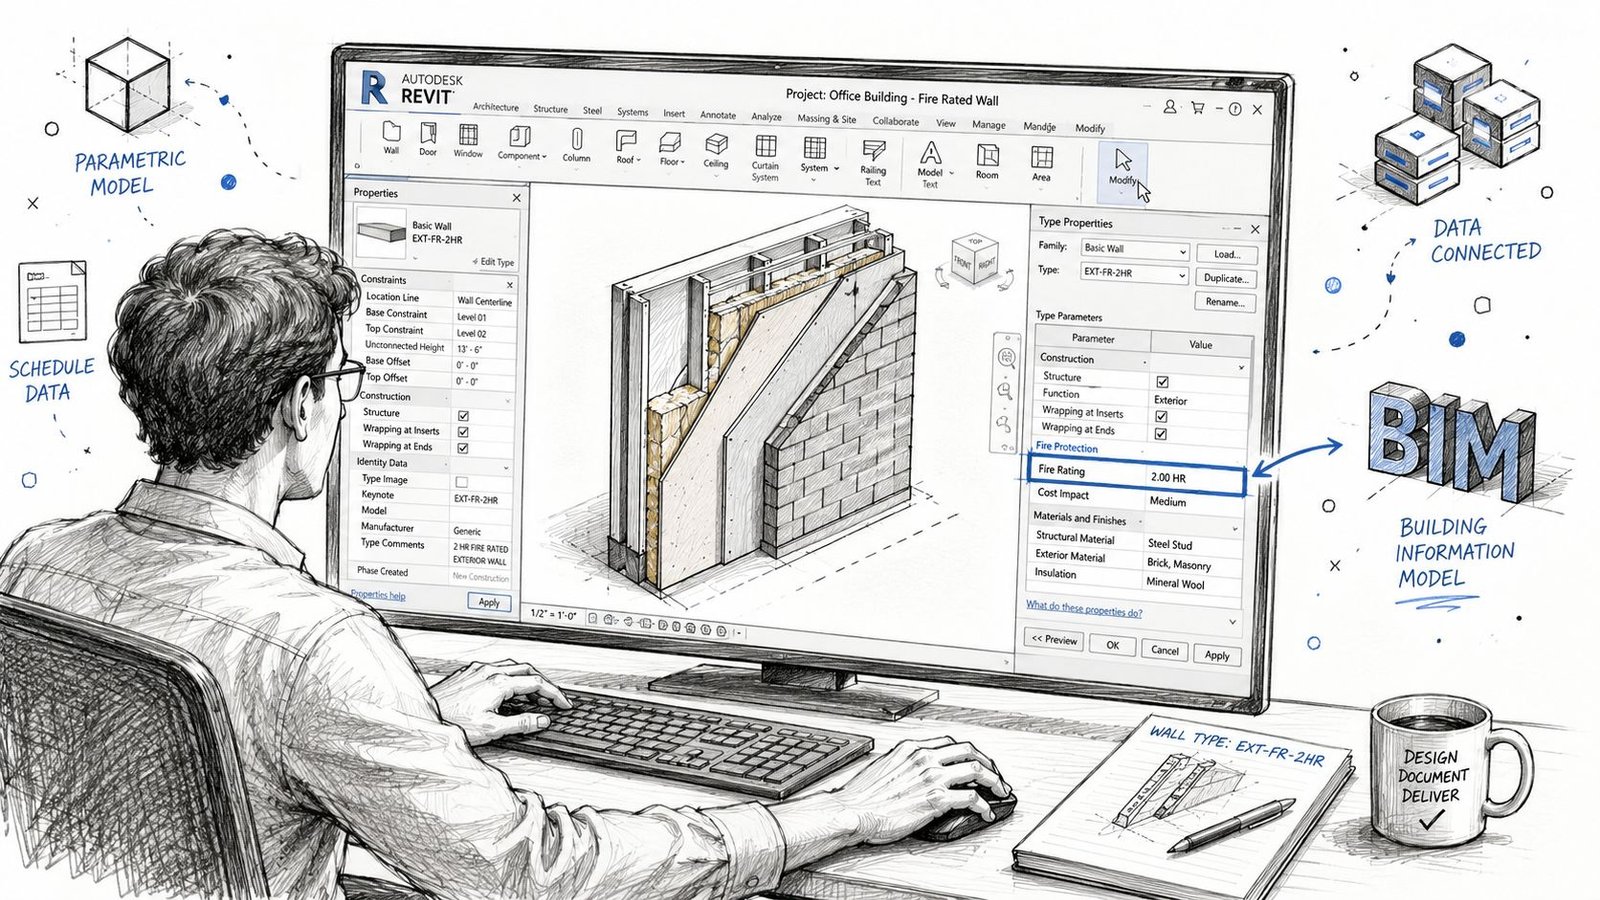
Build the data into wall types
For rated walls, add type parameters that support direct scheduling and tagging. At minimum, use fields for the wall type name, fire rating, and assembly reference. Some teams also add a text field for a concise assembly description to help with legend output.
That approach does two things. First, it keeps the legend tied to model data instead of detached drafting. Second, it gives QA staff a way to filter, sort, and audit all rated wall types before issue.
A practical setup often includes:
- Fire_Rating: The intended rating shown in schedules and tags
- Assembly_Reference: UL designation or IBC table reference
- Rated_Wall_Yes_No: Useful for view filters and QA views
- Legend_Description: Controlled text for concise wall type legends
Coordinate schedules, tags, and families
The wall type legend can be built from a schedule or from drafted content, but if you draft it manually, someone has to own the sync problem. In high-volume production, that's where errors multiply.
Doors need the same treatment. Revit doesn't automatically assign fire ratings to door types just because the host wall is rated. The door family needs a rating parameter, and the team has to populate it deliberately. The schedule then becomes a real QA tool instead of a decorative sheet element.
The same logic applies to windows and rated glazing conditions. If the family and schedule don't carry the data, the set can't prove the opening protection requirement.
If your standards team is working on Revit family structure and parameter consistency, rated openings are one of the best places to tighten the system because the review failure is so predictable when that data is missing.
Add a visual QA pass
Before issue, create a dedicated QA plan view with filters that highlight rated walls by type or rating. Color coding isn't a code analysis tool, but it is an efficient production check.
A good internal review asks:
| QA check in Revit | What it catches |
|---|---|
| Filtered rated wall plan | Missing or incorrect wall type assignments |
| Wall schedule with assembly reference | Blank UL or IBC reference fields |
| Door schedule with fire rating column | Unrated doors in rated walls |
| Window schedule review | Missing rated glazing notes |
| Dependent details audit | Details that don't match current wall types |
Scalable delivery teams achieve better outcomes. They don't depend on memory. They build repeatable checkpoints into the model and sheet set.
A QA Checklist to Prevent Common Plan Check Corrections
By the time a set reaches permit issue, the code analysis should already be resolved. The last review is about consistency, not discovery. If the team is still figuring out rated wall conditions at that stage, the project is already absorbing avoidable risk.
Use a short pre-flight audit before every submission.
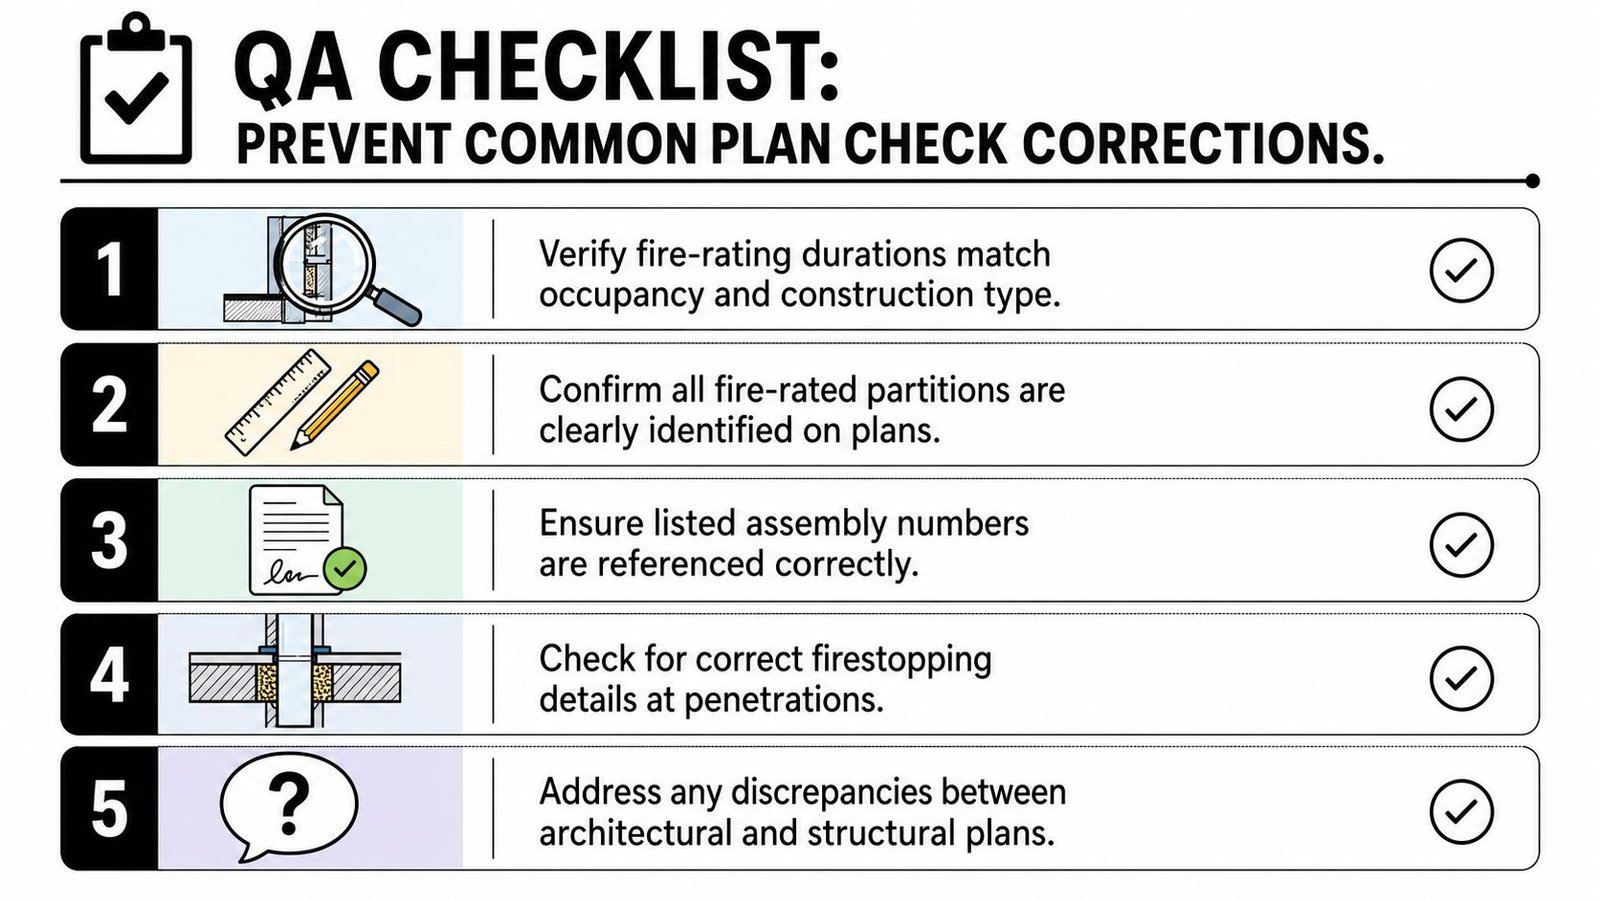
The permit set audit
Check wall type references: Every rated wall type in the legend should include its listing reference or prescriptive code reference. If any rated wall says only one-hour or two-hour without a verifiable source, fix it before issue.
Review plan tags against the legend: Floor plan tags should match the wall legend exactly. This is a simple comparison, but it catches a surprising number of sheet-set mismatches.
Audit the door schedule: Add a fire-rating column and confirm every door in a rated wall has the correct entry. If the schedule has blanks, the plan reviewer will treat the set as incomplete.
Confirm rated glazing identification: Window schedule entries and details should identify rated glazing and frame requirements wherever they occur in rated walls.
Require firestopping at penetrations: Include a general note for listed firestop systems at all penetrations of rated assemblies, then confirm the architectural, structural, and MEP sheets don't undermine that note with conflicting conditions.
Verify occupancy separations carefully: Check each occupancy pair against the required rating and confirm the wall type assigned on the plans matches that requirement.
A final coordination habit that protects margins
The most useful review isn't done by the person who built the wall types. It's done by someone else on the project team who can read the set cold and ask whether the rated condition is provable from the documents alone.
If a fresh reviewer has to infer the assembly, the contractor will too.
That standard is what prevents late clarifications, avoidable RFIs, and permit comments that shouldn't have made it past internal QA. It also signals production maturity. The set reads like it was coordinated on purpose.
If your team needs help tightening Revit standards, legends, schedules, and permit-level coordination for commercial CD sets, contact BIM Heroes for Revit production support. If you want a cleaner handoff before plan check, they can help build the templates, QA workflows, and documentation systems that make rated assemblies easier to document correctly the first time.
Category: Construction Coordination & Documentation