Meta description: A production-focused guide to egress path documentation in commercial CD sets, with practical standards for occupant loads, travel distance, width coordination, and plan review readiness.
A permit set comes back with egress comments, and the frustrating part is that the design usually isn't the problem itself. The problem is that the drawings don't let the reviewer verify what the team already believes is true.
That's why egress path documentation needs to be treated like a proof set, not a design afterthought. If the route works in your head but the reviewer can't trace it on the sheets, the project stalls anyway. Most of the avoidable corrections happen in that gap between compliant design intent and auditable documentation.
For production teams building permit sets, the fix is rarely more code study. It's better sheet logic, cleaner overlays, coordinated schedules, and a QA pass that treats egress the way reviewers do. If your team is refining permit drawing standards for commercial submissions, this is one of the highest-value places to tighten the set.
Introduction
Commercial plan review has a pattern. A set gets marked up for missing occupant loads, unclear travel distances, undocumented common path, corridor widths that aren't dimensioned, or exit discharge that disappears once the plan leaves the building line. None of that means the building is unsafe. It means the jurisdiction couldn't audit the drawings fast enough to approve them.
That distinction matters. Reviewers don't approve intent. They approve what the sheets demonstrate.
Good egress path documentation removes interpretation. It shows the route, the calculations behind it, the controlling widths, and the coordination points that often break between plans, schedules, and details. Production architects who understand that tend to get cleaner first-pass reviews because the set answers the reviewer's questions before they're asked.
What IBC Requires Egress Documentation to Show
The first mistake is treating egress as a door and a stair. Under the IBC, it's a three-part system: exit access, exit, and exit discharge. The exit access is the interior route to the exit. The exit is the protected portion such as an enclosed stair or horizontal exit. The exit discharge is the route from the exit to a public way. A compliant route has to remain continuous and unobstructed from occupied space all the way outside, as outlined in this means of egress overview based on IBC concepts.
That code structure should drive what appears on the drawings. If one segment is missing from the permit set, the reviewer can't verify the full path.
What has to be visible on the sheets
At minimum, the architectural set should let a reviewer confirm these items without hunting through separate files:
- Occupant loads on the drawings. Not in a standalone narrative nobody opens during first review.
- Travel distances shown graphically or tabulated clearly so the path is measurable from the plan.
- Widths of corridors and similar egress components dimensioned where the route depends on them.
- Exit discharge outside the building shown as part of the route, not assumed.
- References for signage and emergency lighting coordination when the jurisdiction expects them to be acknowledged in the architectural package.
Practical rule: If a reviewer has to infer a code conclusion from your floor plan, expect a correction.
What reviewers are really checking
They're not only checking whether the building likely complies. They're checking whether the documents support approval. That's a different exercise.
A life safety review is an audit. The egress path must be traceable, measurable, and coordinated from plan to schedule to detail. If the route disappears at a door tag, if the stair dimensions are buried in a section with weak annotation, or if the discharge path never makes it to the site plan, the set reads as incomplete. That's enough to trigger comments even when the design team did the hard thinking already.
Organizing Egress Data in Your Commercial CD Set
A messy set creates avoidable doubt. Reviewers usually look for the code story in one place first, then test whether the plans and schedules support it. When the information is scattered, duplicated inconsistently, or half-shown in three locations, the review slows down and comments multiply.
The most reliable structure is simple. Start with a dedicated life safety or code sheet, then back it up with floor plans, schedules, and details that say the same thing.

Where each piece belongs
| Sheet area | What should live there | What often goes wrong |
|---|---|---|
| Life safety or code sheet | Occupancy classification, construction type, allowable area summary, sprinkler status, egress summary | Missing entirely, or too abstract to audit |
| Floor plans with egress overlay | Routed path lines, travel distances, common path notes where required | Team assumes corridor layout is self-evident |
| Occupant load table | Space-by-space load data and egress-related calculations | Table exists but isn't on the main permit sheets |
| Door schedule | Exit door identification, swing, hardware group, ratings as applicable | Exit doors not clearly flagged |
| Stair plans and sections | Stair width, landings, headroom, key dimensional criteria | Critical information buried in under-annotated details |
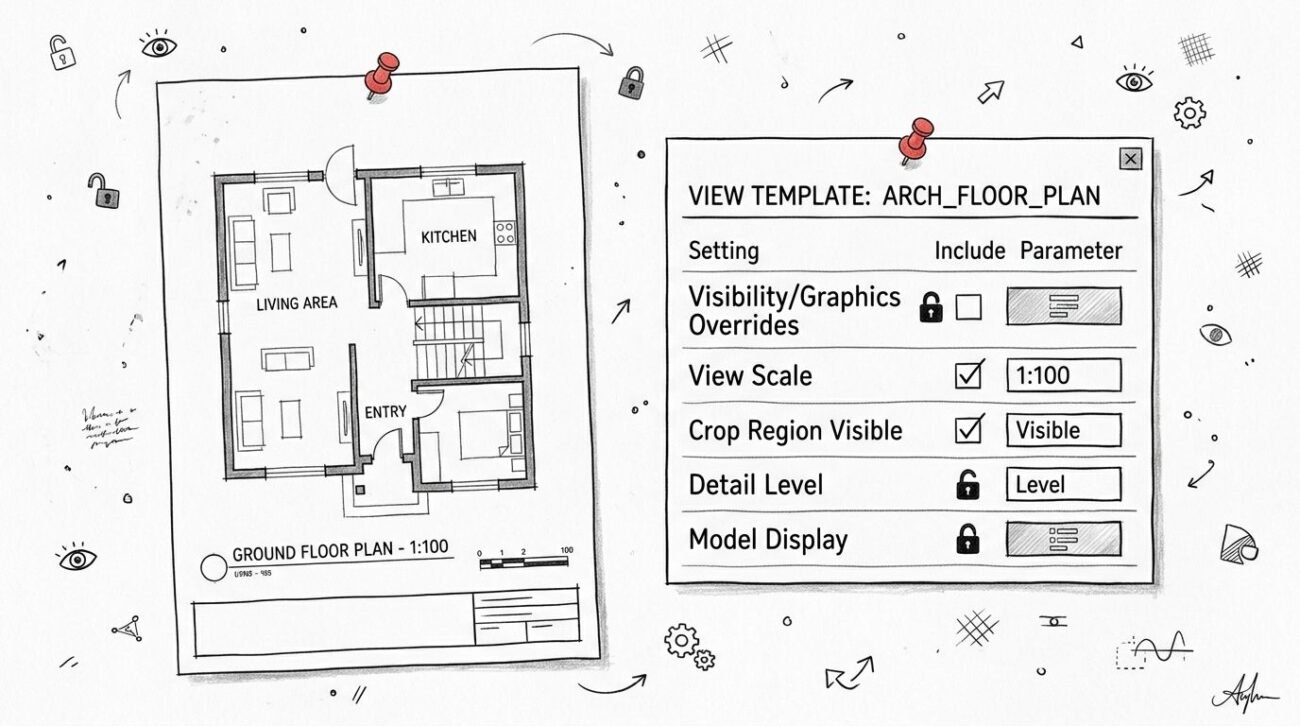
The sheet that gets checked first
The life safety sheet is usually the first stop. If that sheet is thin, reviewers assume the rest of the package will require interpretation. That's why mature teams build it as a control sheet, not a decorative code summary.
Keep the language plain. Use labels that match the plans and room names. If your floor plans call a space “Leasing,” don't let the code sheet rename it “Office Support” unless there's a clear reason and a cross-reference.
Coordination failures that look small but cost time
Three production misses show up constantly:
- Overlay omitted. Teams rely on the floor plan alone and skip a distinct egress graphic layer.
- Door schedule drift. The life safety sheet identifies exits one way, while the schedule and tags use another convention.
- Stair data buried. The information exists, but it's trapped in details that don't read as permit-facing documentation.
Reviewers don't reward elegant internal logic if they can't see it in under a minute.
If you want predictable review outcomes, build the package so someone outside the project can follow the route without asking the team what was intended.
Nailing Occupant Load Calculations on the Drawings
If one item deserves a dedicated QA gate, it's the occupant load table. More corrections come from bad or missing occupant load documentation than from any dramatic life safety failure. The math may be straightforward, but the presentation often isn't.
The table needs to be on the permit sheets. If your office keeps a separate code workbook, that's fine for internal control. It doesn't replace the drawing set. Teams working through occupancy load setup in early code studies already know that the issue is not just calculation. It's whether the reviewer can verify the calculation quickly.
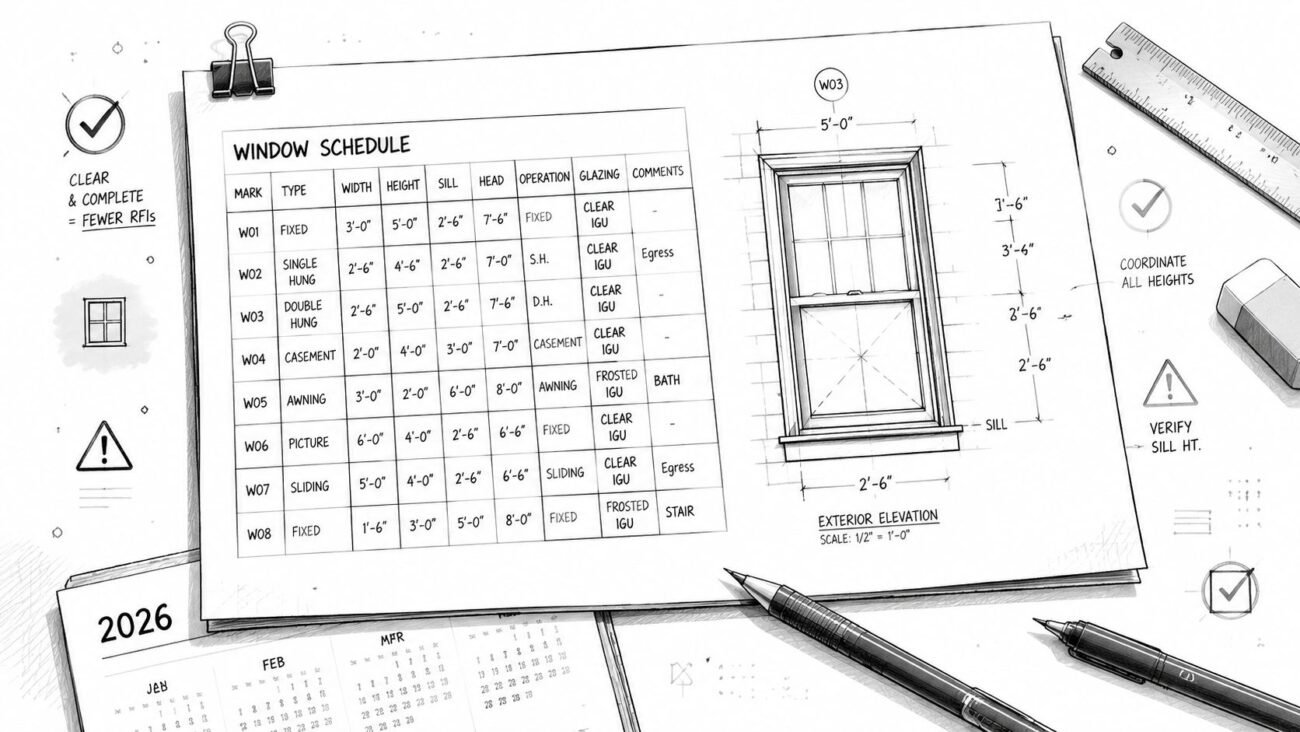
What the table should include
A useful table reads like a checked worksheet, not a summary slogan. Include these columns:
- Space name or number
- Occupancy classification
- Floor area
- Load factor used
- Calculated occupant load
For larger buildings, add floor subtotals and a building total if the jurisdiction expects that level of roll-up. Keep room names consistent with the plans and door schedule so the reviewer doesn't have to translate between naming systems.
Common errors that trigger comments
The repeat offenders are familiar:
- Wrong load factor for a mixed-use condition
- Gross area used where net is required, or the reverse
- Accessory spaces folded into a larger room without separate treatment
- Math that works internally but doesn't reconcile to the floor plan labels
- Sprinkler assumptions stated vaguely while travel distances are drawn as if the allowance is settled
The last one is a production issue more than a code issue. If the set claims sprinkler-related allowances, sprinkler status has to be stated clearly in the code data, and the egress graphics have to reflect the same assumption. Don't leave one consultant package saying one thing and the architectural sheet implying another.
How to make the review easy
Use a table format that reads top to bottom by floor or by plan zone. Avoid forcing the reviewer to jump across multiple sheets to reconstruct the load story.
Field lesson: The best occupant load table isn't the most detailed one. It's the one that matches the plans exactly and leaves no arithmetic mystery.
That's the standard. Clean labels. Visible assumptions. No orphan calculations sitting outside the permit set.
Documenting Travel Distance and Common Path of Egress
Travel distance is where many sets stop being disciplined. Teams know the route, but they don't draw it carefully enough to survive review. The measurement has to follow the natural path of travel, not the convenient line between two points.
That means the path should track corridors, aisles, doorways, and real circulation logic. It shouldn't cut through walls, clip furniture layouts that aren't passable, or move through rooms that aren't part of the route.

Show the path, don't imply it
A reviewer should be able to see the path line and the resulting measurement directly on the plan, or find it in a keyed table that clearly references plan locations. Teams that skip this and assume the corridor geometry “speaks for itself” are inviting comments.
Use a routed dashed polyline and a visible dimension label. If the plan is dense, key the route and place the full measurement in a nearby schedule. What matters is that the route is auditable.
For teams refining travel distance graphics in permit-ready floor plans, consistency matters more than graphic style. Pick one office standard and keep it across all levels.
Don't miss the common path segment
Many otherwise solid sets often receive flags concerning the common path of egress travel, which is the portion from the most remote point in a room or space until occupants have separate access to two exits or exit access doorways. In one manufacturing example cited in a code discussion, the maximum common path was 75 ft in that condition, and the article explains why that limit matters to life-safety planning in layout decisions within this common path of egress discussion.
Architects often show total travel distance to the exit, but they don't isolate the common path portion separately. Reviewers do notice that.
A practical review sequence
When checking your own plans, verify travel in this order:
- Start at the most remote point the occupant would reasonably occupy.
- Trace the actual walking route along the plan's circulation pattern.
- Identify where the occupant gains a choice between two exit options.
- Dimension that common path separately from the total travel route.
- Continue the route to the exit and confirm the graphic matches the code assumptions stated elsewhere.
The route that passes review is the route a stranger can trace without coaching.
That's the benchmark. Not elegance. Not confidence. Traceability.
Exit and Corridor Width Documentation
Width comments are usually self-inflicted. The design team may know the corridor works, but a generic note such as “corridors per code” tells the reviewer almost nothing. Width has to be visible where the path depends on it.
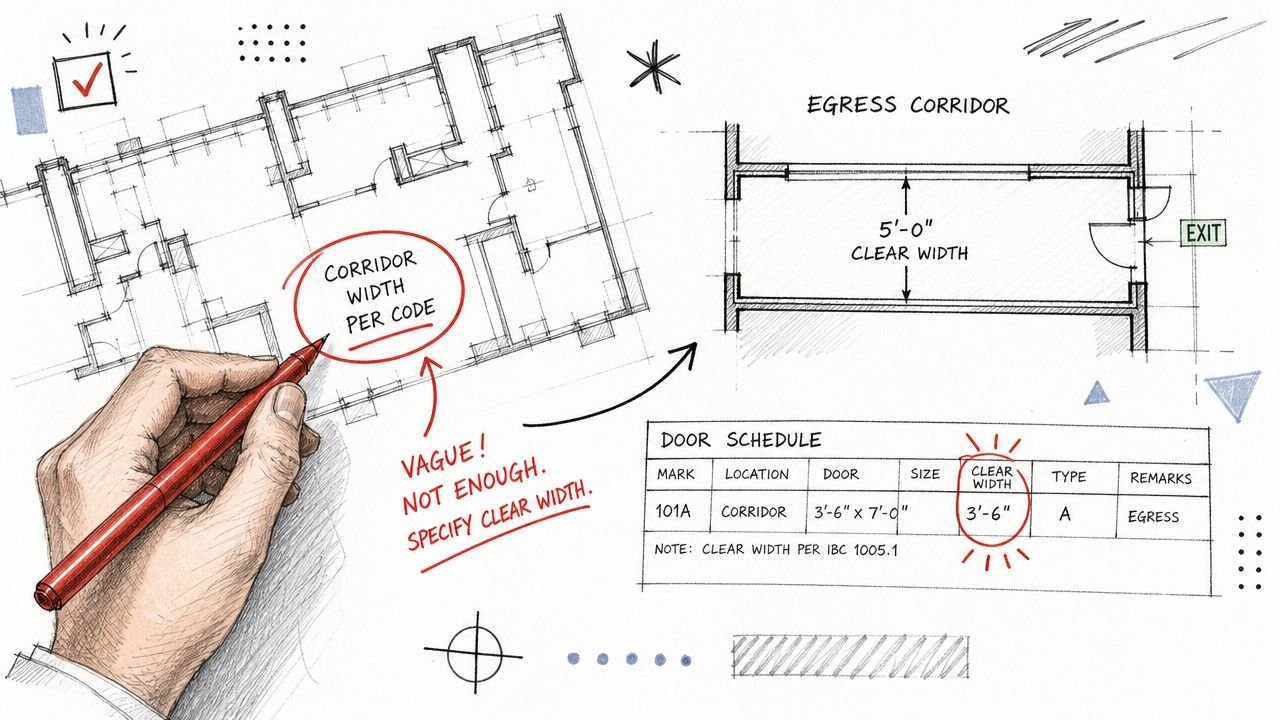
In code-based life-safety design, the means of egress is a continuous sequence of exit access, exit, and exit discharge, and width requirements apply by component. In many new-construction contexts, the general minimum means-of-egress width is 36 inches, while exit access in older buildings may be allowed down to 28 inches in limited cases, as summarized in this code text discussion of means-of-egress continuity and width.
What to show on the plans
At a minimum, document these items directly:
- Corridor widths on the floor plan
- Door clear widths in the schedule, not just nominal leaf size
- Width continuity at pinch points near millwork, security devices, and door swings
- Exit discharge width outside on the site or enlarged plan where the route continues to the public way
Where teams usually get caught
Door schedules are a common trap. A nominal door size doesn't automatically communicate clear opening. If the egress calculation depends on clear width, schedule language has to reflect that clearly enough for review.
The other miss is outside the building. Teams document everything up to the exit door, then stop. But the discharge route is still part of the egress path. If landscaping walls, gates, site furnishings, or grade transitions narrow that path and the plans don't show the width, expect a comment.
How Different Jurisdictions Enforce Egress Rules
The code framework may be familiar, but enforcement is local. That's why a set that passes smoothly in one jurisdiction may come back marked up in another, even when the underlying design logic is sound.
High-volume urban departments usually want explicit, consolidated documentation. Smaller jurisdictions may be less prescriptive about sheet naming, but they still respond better to direct, review-friendly drawings than to implied compliance.
Large jurisdictions usually want a dedicated proof set
In dense review environments, reviewers often expect an actual egress plan sheet or a very clear life safety package. That typically means occupant loads, path graphics, widths, and related notes are all easy to locate and internally coordinated.
If the project is in a place with stricter accessibility scrutiny, the accessible means of egress needs equal attention. The Access Board guidance states that where more than one means of egress is required from an accessible space, each accessible portion must be served by at least two accessible means of egress, and on floors above or below exit discharge, accessible means of egress must lead to exit stairways, horizontal exits, or elevators with standby power, as described in the Access Board guide to accessible means of egress.
That requirement often changes what reviewers expect to see on upper floors, roofs, and mixed-use buildings.
Smaller jurisdictions still need clarity
A smaller department may not have a dedicated life-safety reviewer. That doesn't make egress comments less likely. It usually means the general plan reviewer is checking directly against the code and wants the most literal possible documentation.
For those jurisdictions, simpler is better:
- Use plain naming conventions
- Avoid splitting core egress data across too many sheets
- Make path graphics obvious
- Show accessible egress decisions explicitly when they apply
The practical move before submittal
Call the building department before the set is locked. Ask what they want to see for egress overlays, occupant load tables, and accessible means of egress notation. That's not overcautious. It's production discipline.
A short call can save a full review cycle if it tells you whether the jurisdiction wants a separate sheet, a combined life safety plan, or additional notation around accessible vertical egress.
A QA Checklist to Prevent Common Egress Corrections
The best way to control egress comments is to treat them as a final documentation audit, not a late design scramble. Mature teams don't rely on memory here. They use a repeatable checklist and run it before issue.

Pre-permit egress QA
Run these checks in order before the set goes out:
- Confirm the life safety sheet is complete. It should carry the project's code story clearly enough that a reviewer knows where to look next.
- Verify the occupant load table is on the drawings. Not attached separately, not sitting in an internal workbook.
- Check every room label against the table. If names drift, the reviewer loses confidence quickly.
- Trace all travel distances as routed paths. No straight-line shortcuts.
- Document common path separately wherever the layout requires that distinction.
- Dimension corridor widths directly on plan. Generic notes don't count as proof.
- Review the door schedule for exit identification. Make sure exit doors are flagged and coordinated with plan notation.
- Check clear width assumptions at doors. Don't let nominal size stand in for usable opening.
- Follow the route outside. Exit discharge to the public way should be documented as deliberately as the interior path.
What this checklist protects
This kind of QA doesn't just reduce comments. It protects schedule predictability. It also protects fee, because the cheapest egress correction is the one you catch before first submission.
QA lens: A permit set is ready when a reviewer can verify the egress path without calling the architect.
That's the standard worth building templates around. Once your office has a consistent sheet structure, an overlay standard, and a coordinated review checklist, egress stops being a recurring surprise and becomes a controllable production task.
If your commercial CD sets need tighter Revit production support, BIM standards, or permit-ready coordination, BIM Heroes can help. Their team supports architecture firms with scalable production workflows and can assist with architectural production services for commercial documentation when you need cleaner, more predictable delivery.