Meta description: Learn a faster, cleaner approach to space planning in Revit for schematic design. Practical workflows for lean model setup, room and area tracking, design options, view templates, and clean SD-to-DD handoff.
A schematic model usually starts with good intentions. The team wants one source of truth, clean area tracking, and presentation views that don’t need to be rebuilt later.
Then week two hits.
Someone is refining wall assemblies. Someone else is debating exact ceiling conditions. A third person has already loaded furniture families that belong in design development, not early planning. The model gets heavier, the conversations get narrower, and architectural space planning turns into model maintenance.
That’s the trap.
The issue usually isn’t Revit itself. It’s that many teams approach space planning in Revit with DD habits. They build too much too early, lock in decisions that should stay flexible, and make schematic design carry production detail before the program is stable. Once that happens, every option feels expensive. Every change feels like rework. The model starts driving the process instead of supporting it.
Used well, Revit is strong at schematic design. It can support live program checks, clear option management, and model-based presentations that keep everyone aligned. But only if the model is lean enough for the phase.
The All-Too-Common Revit Schematic Design Trap
A familiar pattern shows up in small and mid-sized firms transitioning from 2D SD workflows into Revit.
The team opens a solid office template. It already includes loaded families, view templates, sheets, annotation standards, and worksharing conventions. That feels efficient. It also creates pressure to behave like the project is further along than it is.
By the time the first client review is near, the model has walls, doors, furniture, reflected ceiling ideas, and early grid assumptions. On paper, that looks like progress. In practice, it often means the team is discussing the wrong things.
When the model outruns the decisions
At schematic design, key questions are usually simple:
- Program fit. Does the layout support the room list and adjacency priorities?
- Area control. Are gross and net allocations staying within target?
- Circulation logic. Is movement clear, efficient, and code-aware?
- Option clarity. Can the client compare meaningful alternatives without visual noise?
When the model gets overbuilt, those questions get buried.
A cluttered SD model also weakens one of BIM’s biggest advantages. BIM integration allows teams to detect spatial conflicts 30-50% earlier than traditional 2D CAD workflows, but only if the model is built with the right level of detail for the project phase (Archivinci on space planning and BIM workflow). If the model is overloaded with premature detail, the primary schematic conflicts are harder to see.
Practical rule: At SD, if the model is making basic layout changes feel slow, the model is too detailed for the phase.
What the trap looks like in practice
You can usually spot it fast:
- Wall type arguments start too early instead of basic blocking and fit.
- Families drive decisions because loaded content makes the layout look more fixed than it should.
- Grids become sacred before room relationships have settled.
- Presentation views become cluttered and invite construction questions during a planning meeting.
That isn’t a software problem. It’s a production maturity problem.
Why Your Schematic Design Workflow Is Slowing You Down
Schematic design gets slow when teams try to make Revit behave like both a sketch tool and a production model at the same time.
That sounds efficient. It usually isn’t.
The cost of poor early workflow discipline is often underestimated. Design decisions made during schematic design can influence up to 80% of a project’s final cost, and rework caused by poorly defined scope in this phase can add 12-20% to total construction cost (Autodesk BIM for owners ebook). If SD is fuzzy, the downstream model is unstable.
Problem one with starting too “ready”
A production-level template can help later. Early on, it often does the opposite.
When a file opens with every standard already loaded, teams tend to use what’s there. That means detailed wall categories, presentation-ready families, annotation systems, and view structures that belong to later deliverables. The software isn’t forcing that behavior. The template is inviting it.
A lean SD setup does less. That’s why it works better.
Problem two with detailed families at the wrong time
Many Revit schematic design workflow issues originate here.
Detailed doors, furniture, plumbing fixtures, and custom families create visual confidence that the design hasn’t earned yet. The client sees specificity. The team starts defending decisions that should still be flexible.
That creates three kinds of drag:
- Model weight increases
- Option studies become harder to compare
- Cleanup multiplies when the layout shifts
A placeholder family is not a compromise. In SD, it’s control.
Over-modeled schematic files don’t just slow the machine. They slow the conversation.
Problem three with locking structure too early
Grids are useful. They’re also dangerous if the space plan is still moving.
Once the structural logic is visible in plan, many teams become reluctant to change room sizes, shift circulation, or reorganize adjacencies. That’s understandable. Nobody wants to redo layout work. But freezing the structure early usually creates a false sense of certainty.
When the room arrangement changes later, the model absorbs the cost. Grids move, columns move, views break, dimensions fail, and trust in the model drops.
What works instead
Firms with stronger SD output usually make different decisions up front:
- They separate spatial planning from detailed modeling
- They keep the model phase-appropriate
- They treat flexibility as a production asset, not indecision
- They use the model to validate program, not decorate it
That shift is what makes BIM space planning useful during schematic design.
Setting Up Your Revit Model for Schematic Speed
The fastest schematic files are usually the most disciplined, not the most complex.
A good SD model should answer planning questions quickly, survive option changes, and convert cleanly into a stronger DD model. That means making intentional choices about what belongs in the file on day one.
Firms that standardize Revit setup with effective templates and placeholder families for schematic design report up to a 30% reduction in model setup time and a 50% decrease in RFIs related to spatial coordination during the CD phase (Autodesk forum discussion on schematic design templates).
Start with massing when the envelope is still moving
If the footprint, floor plate, or building envelope is still under discussion, wall-based modeling is often premature.
Use conceptual massing when you need to test:
- Overall floor area
- Building depth
- Core placement
- Basic circulation routes
- Site response and volume
Masses are fast to edit. They don’t carry the same implied permanence as walls. That matters during client reviews.
Shift into wall-based modeling once the building geometry and major planning assumptions are stable enough that room-by-room refinement will stick. If you convert too early, you rebuild. If you stay in massing too long, you lose useful room-based intelligence. The line is different on every project, but the principle is constant. Don’t harden geometry before the plan deserves it.
Lock levels early and hold grids loosely
Levels are foundational. Set them early.
Even at SD, levels help coordinate vertical logic, floor-to-floor assumptions, and view organization. They don’t usually create the same downstream pain that early grids do.
Grids are different. Use them only when the space plan has enough stability to justify structure reacting to planning, not the other way around.
A practical approach:
- Set levels immediately for each known story and roof control point.
- Use reference planes or temporary control geometry if structural rhythm is still exploratory.
- Promote to real grids later when room groupings and circulation have stopped drifting.
Use placeholder families on purpose
The use of generic content at SD is widely understood. Fewer teams build a reusable system for it.
That’s where speed is won.
Keep a dedicated SD content set with:
- Generic wall types based on planning intent, not assembly complexity
- Generic door families sized for fit and swing, not specification
- Furniture blocks that show occupation and clearance without visual noise
- Simple casework and plumbing placeholders only where adjacency matters
If your team needs a reminder on when model detail stops helping and starts costing time, this guide on the right level of detail and when to stop modeling is worth keeping in your standards library.
Field lesson: If a family exists mainly to make the view look finished, it probably doesn’t belong in SD.
Set up worksharing and file structure before the project gets busy
Teams often postpone file structure because the early file feels “too small” to justify it.
That delay usually backfires.
If the project is likely to become collaborative, establish the basic project container early:
| Setup choice | Better SD approach | What to avoid |
|---|---|---|
| Central model | Enable worksharing once collaboration is likely | Waiting until multiple users are already stepping on each other |
| Worksets | Keep them simple and role-based | Overbuilding a workset matrix at SD |
| Linked files | Separate major consultant or context references cleanly | Embedding everything in one authoring file |
| Naming | Use consistent view, level, and option naming from the start | Renaming later after sheets and schedules depend on it |
A lean SD file isn’t a temporary mess. It’s the first controlled version of the project.
Using Rooms and Areas for Live Program Validation
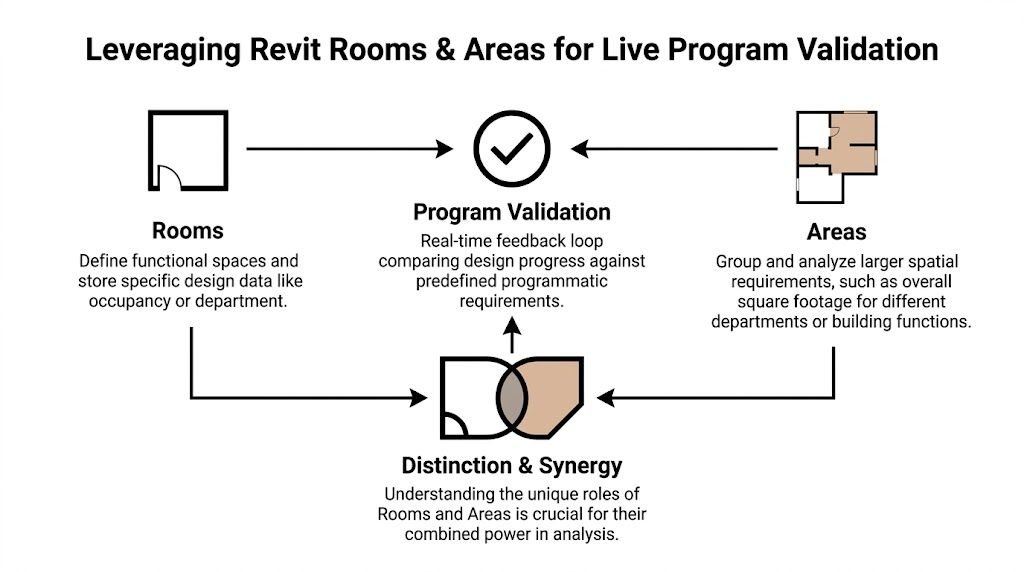
Most firms underuse the most practical part of architectural space planning BIM in Revit. They model spaces, but they don’t turn the model into a live program check.
That’s where Rooms and Areas matter.
Professional space planning relies on Room Data Sheets and target net-to-gross ratios, often 65-75% for commercial projects. Using Revit’s Area and Room tools lets teams track these metrics live so the design stays aligned with programming requirements from the start (First In Architecture on space planning basics).
Know when to use Area Plans and when to use Room Objects
These tools overlap, but they are not the same.
Area Plans are stronger earlier, especially when you’re still blocking departments, assigning gross allowances, or working before all room boundaries are fully modeled. Room Objects become more useful once walls exist and you need room-by-room net tracking, occupancy notes, and scheduling logic.
Here’s the practical split.
| Task | Use Area Plans | Use Room Objects |
|---|---|---|
| Test department blocking | Yes | No |
| Track gross area early | Yes | No |
| Validate room-by-room net area | No | Yes |
| Build live room schedules | No | Yes |
| Present adjacency with color logic | Yes | Yes |
| Support detailed room data later | Limited | Yes |
Make color fill do real work
Color schemes are one of the most underused schematic design Revit tools.
At SD, they help in three ways:
- Program grouping by department, function, or occupancy logic
- Client communication because non-technical reviewers read color faster than linework
- Internal review by exposing planning drift immediately
A black-and-white plan can hide imbalance. A color fill plan exposes it fast.
Use one color scheme for program categories and a separate one for review conditions if needed. Don’t overload a single view with too many messages. SD graphics should answer one question per view.
Build a live schedule before the first serious review
If the program exists outside the model in a spreadsheet and nobody compares it regularly, overages and shortfalls will slip through.
Set up a room schedule early with fields that support decision-making, not documentation theater. Typical SD fields include room name, department, target area, actual area, variance notes, and planning status. If your office uses Room Data Sheets later, align those naming fields now so the schedule doesn’t need to be rebuilt.
A room schedule in SD should act like a warning system, not a reporting tool.
Tie the model to the brief
At this stage, Revit room and area planning becomes operational rather than cosmetic.
Good teams do three simple things:
- Create area plans first for high-level blocking and gross control.
- Introduce rooms once boundaries are real enough to support reliable net area tracking.
- Review schedule variance as part of design meetings, not after them.
When that habit is in place, scope drift gets caught while changes are still cheap.
Managing Design Options Without Losing Model Control
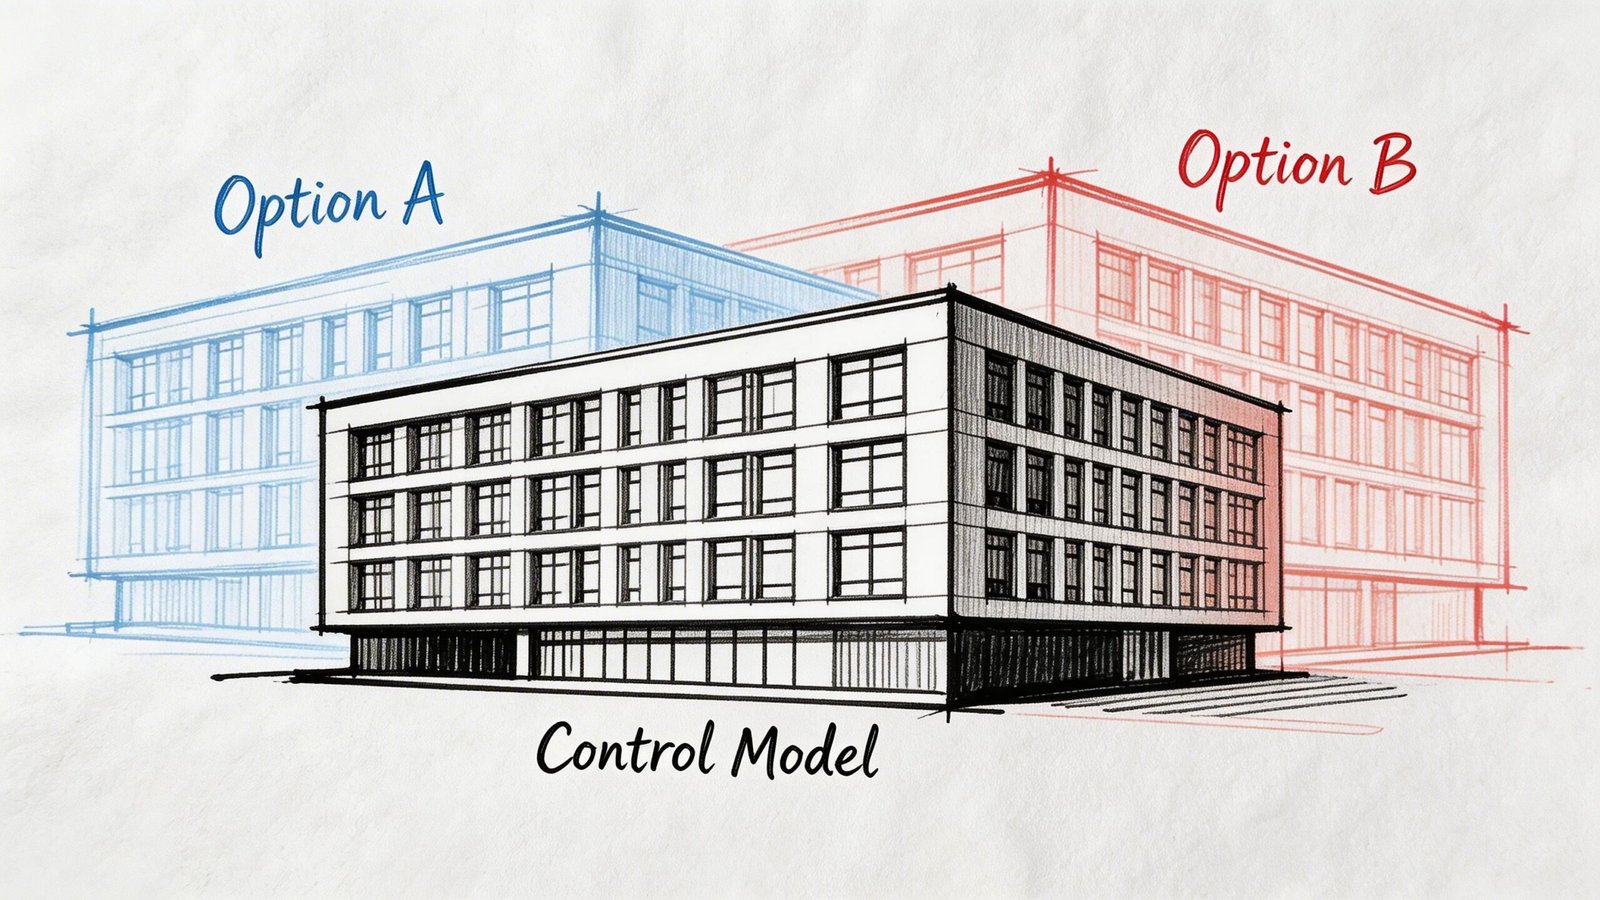
Schematic design is iterative by nature. The issue isn’t that there are options. The issue is how teams store them.
Some teams duplicate files for every direction. Others force everything into Design Options, including content that should stay in the main model. Both habits create cleanup work.
Use the right container for the kind of change
Not every variation belongs in Revit Design Options.
Use this decision logic:
- Design Options work best when the core project is the same and you’re comparing alternate layouts, planning arrangements, facade moves, or contained geometry swaps.
- Separate models make more sense when options diverge so much that they no longer share enough core logic to justify one file.
- Phasing is not an options tool. It’s for time-based conditions, not parallel design ideas.
A lot of model confusion starts when teams use phasing to represent alternatives. That usually creates category visibility problems and annotation noise that aren’t worth the trouble.
If your office needs a cleaner framework, this primer on design options in Revit is a useful reference for standards discussions.
Keep the main model clean
The main model should hold elements that don’t change between options.
That usually includes:
- Levels
- Shared reference geometry
- Core context
- Elements common to every option
- View and schedule framework
Option sets should contain only the geometry under comparison.
That sounds obvious, but many teams put too much into the options environment. Once that happens, tagging, scheduling, view control, and visibility management become harder than the option study itself.
Production note: If a model element will survive no matter which option gets approved, keep it out of the option set.
Present multiple options without duplicating your workload
A single controlled model can produce clean client-facing comparisons if the views are set up intentionally.
Use duplicated presentation views tied to option visibility settings. Keep annotation minimal and consistent across all option views so the comparison is fair. If Option A has richer entourage, heavier tags, or cleaner graphics than Option B, the model is biasing the review.
For internal reviews, add a few working views that are not presentation views. Teams often confuse those two purposes. One set is for decision-making inside the project team. The other is for explaining choices to the client. They should not look identical.
Know when to collapse the options
Once an option is approved, accept that decision and clean the file.
Leaving old option sets in place “just in case” makes the model heavier and less trustworthy. Archive what matters, document the decision, and move on.
SD speed depends on controlled iteration, not permanent indecision.
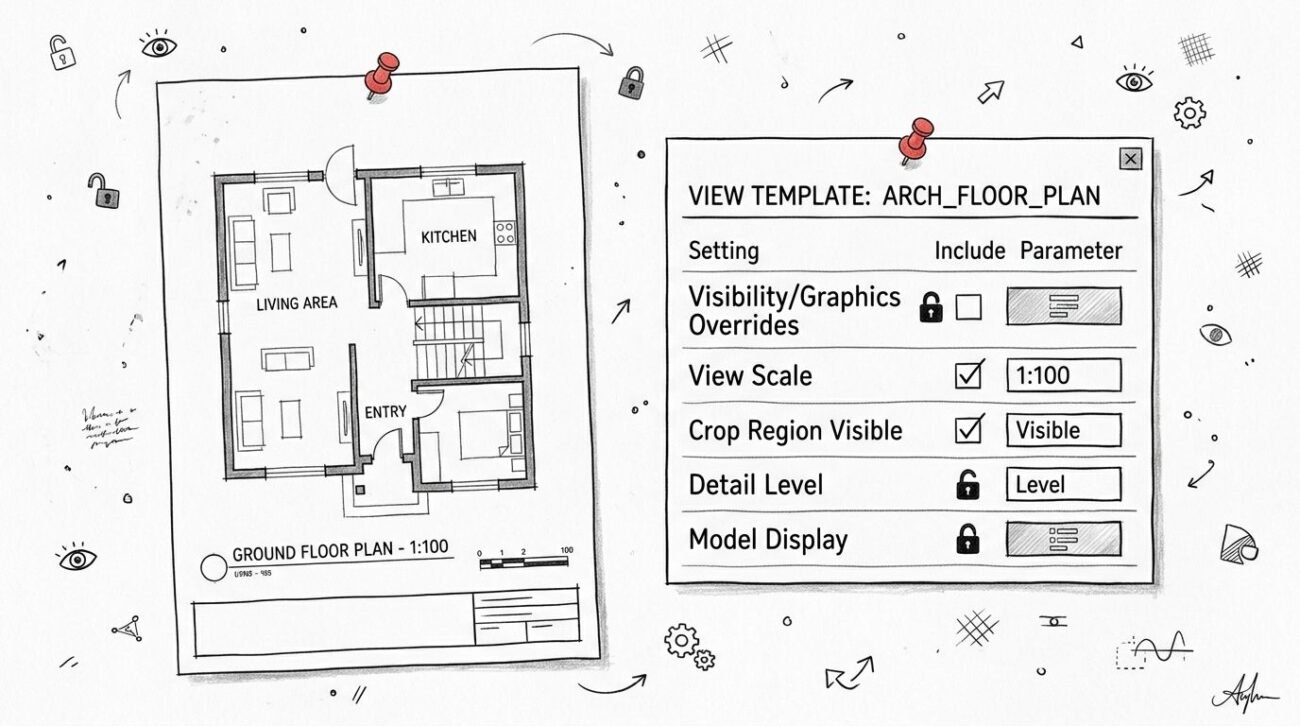
Calibrating View Templates for Schematic Clarity
A lean model still fails if the views are noisy.
Many SD meetings go sideways because the drawings invite questions the team isn’t ready to answer. Tags, detailed dimensions, finish notes, and layered graphics make a schematic plan look more resolved than it is. Reviewers respond accordingly.
Build SD templates that remove temptation
Create view templates specifically for schematic review, not watered-down versions of DD templates.
An effective SD template usually strips out:
- Detail items
- Finish annotations
- Complex wall tags
- Excess dimensions
- Unnecessary categories that distract from space and circulation
It should preserve what matters for space planning in Revit:
- Room or area labels
- Clear poche or line hierarchy
- Openings and basic furniture where fit matters
- Circulation readability
- Simple graphic cues for option comparison
This is less about aesthetics than meeting control. A cluttered plan invites low-value comments. A clean plan keeps the room focused on layout, adjacency, and scale.
Let Revit produce the presentation view
Too many teams still treat Revit as the technical back end and another graphics tool as the “real” presentation environment.
That split costs time.
For SD, your best presentation views should come directly from the model whenever possible. If a client-facing plan needs major post-processing to be understandable, the model view isn’t doing enough work.
Use controlled lineweights, simple fills, restrained shadows where appropriate, and view-specific filters only when they support the planning story. Don’t stack effects just because you can.
A good SD view should be legible in a design meeting and reusable in internal reviews without rebuilding it.
Tune sections and elevations to the phase
Sections and elevations at SD should communicate volume, spatial hierarchy, daylight intent, and major relationships.
They should not trigger a debate about every assembly intersection.
Use section boxes, coarse display settings, and simplified poche strategy to show mass and spatial organization. If the section reads like a permit drawing, it’s too early.
For teams standardizing output, this resource on Revit view templates is a good benchmark for building phase-specific display systems.
Ensuring a Clean Handoff from Schematic to Design Development
A schematic workflow is only as good as its handoff.
If DD starts with renaming, remodeling, or guessing what the SD team meant, then the SD process didn’t save time. It deferred confusion.
One of the clearest handoff issues in architectural space planning is circulation. Effective circulation typically accounts for 25-35% of the total area in a commercial layout, and documenting the approved circulation strategy and net area calculations from the SD model is critical so the DD model can meet program and code requirements without major change (The Space Place on how much space you really need).
Make generic walls map cleanly into DD assemblies
Generic SD walls are good practice. Generic walls with no strategy are not.
The trick is to use a controlled placeholder system that can later map into real assemblies without forcing a rebuild. That means your generic wall types should reflect planning intent in a way that can be translated later.
A simple example:
- Interior partition generic
- Core/service enclosure generic
- Exterior envelope generic
- Demising wall generic
Those are planning categories. They’re not product claims. That keeps SD flexible while giving DD a clean replacement path.
Set naming conventions early and keep them stable
Room names, level names, and view names shouldn’t be treated as cleanup items for later.
Once schedules, sheets, filters, dependent views, and consultant references start using those names, retroactive changes become expensive. This is one of the quietest sources of rework in Revit production.
Use a naming standard at SD that can survive the whole project. It doesn’t need to be elaborate. It does need to be consistent.
Document decisions outside the model
Approved decisions that exist only in model geometry are fragile.
Before DD begins, capture at least the following in a simple decision log or handoff sheet:
- Approved program summary
- Current gross and net area position
- Circulation assumptions
- Key structural assumptions still subject to coordination
- Option decisions already closed
- Known client approvals and open questions
Models show geometry. Teams still need written decisions.
That small discipline protects margins because it prevents the DD team from reconstructing intent through detective work.
Treat SD as the first production checkpoint
The strongest teams don’t view schematic design as loose exploration that gets cleaned up later.
They treat it as the first governed checkpoint in a delivery pipeline. The model is light, but the decisions are traceable. The views are simple, but the outputs are consistent. The handoff is not heroic because the standards were in place from the beginning.
That’s what makes SD faster without making DD messy.
Revit Is Not Slow You Are
Revit gets blamed for a lot of schematic design pain that comes from bad model habits.
If the file is heavy, if every option takes too long, if client reviews spiral into low-value detail comments, and if DD starts by rebuilding SD work, the software probably isn’t the first problem to fix.
Workflow discipline is.
The teams that move well in schematic design usually do a few things consistently:
They treat SD like its own phase
They don’t run DD standards at schematic speed and hope for the best.
They use a separate mindset for early modeling, early graphics, and early decisions. That means lean families, simpler views, controlled option structure, and active area validation.
They use Revit for analysis, not just drawing
This is the part many firms miss.
A schematic model should help the team test fit, compare options, review adjacencies, and monitor area performance as decisions change. If the model is only producing prettier plans, it’s underperforming.
They protect handoff quality while the model is still light
A fast SD process is not one that skips discipline. It’s one that applies the right discipline early.
That includes naming standards, placeholder logic, schedule setup, circulation tracking, and basic decision logging. None of that is glamorous. All of it protects margins.
The goal isn’t to model less forever. The goal is to model only what the phase can support.
That’s the key shift in space planning in Revit. When teams stop treating schematic design like a rough draft of DD and start treating it as a distinct production phase, the software gets faster, the presentations get clearer, and the downstream model gets more reliable.
If you’re refining your own standards, build a checklist around the moments where teams usually lose control. Template setup. placeholder content. room and area logic. option rules. view templates. SD handoff notes. Those are the pressure points.
If you want a practical benchmark for tightening your SD production process, BIM Heroes shares the kind of workflows, checklists, and Revit standards that help teams build cleaner models earlier and carry them forward with less rework.