Meta description: Practical guide to accessible parking requirements for permit sets. Learn how to document counts, stall dimensions, van spaces, routes, and QA checks that reduce plan review corrections.
Category: BIM Technology & Workflows
The redline usually looks simple at first. The site plan shows the parking count, a generic note says accessible spaces are provided per ADA, and everyone assumes the issue is covered. Then the reviewer marks it up anyway. The accessible space count isn't verified against the total. Van-accessible spaces aren't identified. The access aisle width isn't dimensioned. The accessible route from parking to the entry isn't shown.
That comment set can stall permit progress fast. It also exposes a production problem, not just a code problem. If the drawings force the reviewer to interpret, calculate, or guess, the set isn't doing its job.
For project architects and production teams, accessible parking requirements need to be visible, checkable, and coordinated across site plan, grading, and building entry sheets. The work isn't just knowing what ADA and IBC require. It's documenting those requirements in a way that survives plan check, limits RFIs, and keeps commercial CD sets predictable.
Your Site Plan Just Got Flagged for Accessible Parking
This is a familiar permit correction because the mistake is baked into how many teams annotate site plans. A note says accessible parking is provided. The layout looks plausible. But nothing on the sheet lets the reviewer verify compliance without doing extra work.
That's where drawings start to lose credibility. If the accessible stall count is implied instead of shown, if the van spaces are mixed into the striping plan without labels, or if the route to the entrance disappears into a drive aisle, the reviewer sees risk. Risk leads to comments. Comments lead to another round of markups, consultant coordination, and fee erosion.
Practical rule: If a reviewer has to do the math, trace the route, or infer the dimensions, expect a correction.
The production answer is straightforward. Treat accessible parking permit drawings as a coordinated system. The site plan should show the count logic. The plan geometry should show stall and aisle dimensions. The grading plan should prove compliant slopes. The entry plan should connect the route all the way to an accessible entrance.
That level of clarity is what keeps ADA parking requirements site plan documentation from turning into a redline magnet.
Decoding the Accessible Parking Count Requirements
Plan check comments often start here because the count is easy for reviewers to test and easy for drawing sets to obscure. If the site plan shows 137 spaces and the accessible total is buried in a note, the reviewer will do the math, compare it to the plan, and mark the sheet the moment those numbers do not reconcile.
Under the ADA parking scoping rules on ADA.gov, the required accessible space count is based on the total number of spaces in each parking facility. The table is straightforward. The production risk comes from applying it inconsistently across separate lots, garages, or phased parking areas.
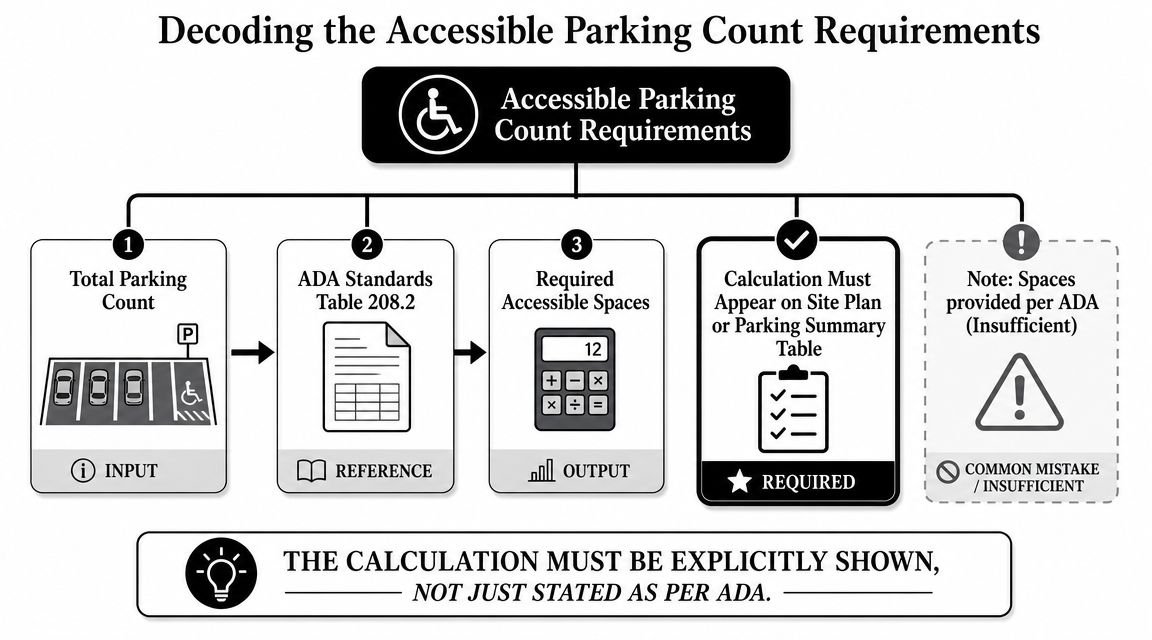
Put the calculation where the reviewer expects it
A parking summary table does more than document compliance. It reduces interpretation. Reviewers should be able to see the total stall count, the required accessible count, the required van count, and the provided spaces in one place without cross-referencing three sheets and a general note.
Use a summary structure like this:
| Parking item | What to show |
|---|---|
| Total spaces in facility | Count for that lot or garage |
| Required accessible spaces | Calculated from ADA scoping table |
| Required van-accessible spaces | Derived from accessible total |
| Provided accessible spaces | Actual count shown on plan |
| Provided van-accessible spaces | Actual identified van stalls |
Then tag the actual stalls on the plan. A clean table without identifiable spaces still invites comments because the reviewer cannot confirm which stalls satisfy the requirement.
Count by parking facility
This is a recurring coordination miss on larger sites. Separate parking lots and garages are typically counted separately for scoping. A team that totals the entire campus parking supply and distributes accessible spaces wherever they fit best can end up short in one facility even if the site-wide number looks adequate.
Van space allocation needs the same discipline. The ADA standards require a portion of accessible spaces in each facility to be van-accessible, and where only one accessible space is required, that space must be van-accessible. If that rule is already embedded in your office template, the drafter does not have to remember it during a deadline push.
Put the accessible parking calculation beside the parking summary and schedule it from model data where possible.
That small workflow choice matters. In Revit, firms can build the parking count, accessibility designation, and van designation into shared parameters or parking families, then drive the summary from the model instead of manual text. That will not replace code review, but it does remove a common source of mismatch between the plan graphics, the notes, and the final count.
For repeat permit work, this should be part of the template, not a one-off drafting exercise. Standardized schedules, yes-no compliance parameters, and a QA check that compares modeled parking counts to the sheet summary will catch undercounts before plan check does.
Nailing Accessible Stall and Access Aisle Dimensions
A site plan can carry the right accessible parking count and still get kicked back because the stall geometry is vague. Plan reviewers do not approve intent. They approve dimensions shown on the sheet.
For accessible parking, that means drawing the stall and access aisle as a defined assembly and dimensioning it where it occurs. The 2010 ADA Standards, Section 502 sets the baseline geometry. Car spaces are 96 inches wide minimum and need a 60-inch access aisle. Van spaces use one of two compliant layouts: a 132-inch stall with a 60-inch aisle, or a 96-inch stall with a 96-inch aisle.
Put the geometry in the plan, not just in the notes
General compliance notes do not protect a permit set. If the reviewer has to infer the widths from striping or count pavement modules by scale, expect a correction.
Show these items directly at the accessible spaces:
- Accessible car stall width: dimension the 96-inch minimum stall.
- Accessible access aisle width: dimension the adjacent 60-inch minimum aisle.
- Van configuration: identify whether the layout uses 132 inches plus 60 inches or 96 inches plus 96 inches.
- Aisle length: show that the access aisle serves the full length of the parking space.
- Pavement marking: call out striping so the aisle is not read as a parking stall or part of the drive aisle.
This is also where BIM standards save time. A parking family should carry type parameters for stall designation, aisle type, and compliant width options. If the family can be placed incorrectly, someone will place it incorrectly during a deadline push. Build the allowable geometry into the family, tag it automatically, and use a view template that makes the dimensions hard to omit.
Tight layouts fail for predictable reasons
On compact retail pads, podium levels, and mixed-use sites with repetitive bay spacing, teams often force accessible stalls into a module that was set before accessibility was coordinated. That is when access aisles get pinched, dimensions get replaced with keynote language, and the sheet stops proving compliance.
The 96-inch stall with a 96-inch aisle often coordinates cleanly with recurring bay logic because the wider aisle is easier to read and protect in the plan. The better choice depends on striping, column spacing, curb placement, and the route out of the stall. The point is to choose one configuration deliberately and standardize it across the set.
Route alignment matters here too, but from a stall-detailing standpoint the production check is simple. The access aisle has to land where a person can enter the accessible route without being pushed into the vehicular lane behind parked cars. If that connection is unclear on the plan, the layout is not fully documented, and review comments usually follow.
In office QA, this section should be easy to verify. One family type, one dimension standard, one checklist item. That is how accessible parking sheets get through review without avoidable corrections.
Critical Details for Van Accessible Parking
Van stalls are where loose coordination shows up on the permit set. A standard accessible space can look correct in plan and still pass casual review. A van space gets checked harder because reviewers know the failures are predictable: overhead clearance is missed in covered parking, the aisle is placed in drainage fall, or the sign callout never clearly identifies the stall as van accessible.
Treat van parking as a multi-discipline detail
The van condition crosses civil, architectural, and structural scope. On garages and covered drop-offs, MEP can affect it too. If the team splits responsibility by sheet and nobody checks the assembled condition, the permit set carries the risk.
The requirements are straightforward. The space, access aisle, and vehicular route serving the van space need clear headroom, and the sign needs to identify the stall correctly. The problem is not reading the rule. The problem is proving it where beams, soffits, sprinkler mains, canopies, and sloped paving all converge. The ADA parking provisions in the 2010 ADA Standards, Section 502 are the right source to cite here, especially for vertical clearance and parking surface criteria.
Clearance needs to appear on the drawings where it can fail
Van-accessible spaces require 98 inches of vertical clearance at the stall, the access aisle, and along the vehicular route to and from that space. In an open surface lot, that usually stays in compliance unless a canopy or portal frame cuts into the path. In podium and structured parking, it needs active coordination.
A general note is rarely enough. Put the clearance requirement on the enlarged parking plan, and repeat it at sections or elevations where the overhead obstruction risk is real. If a garage has transfer beams or a sloped ramp near the accessible bay, call out the controlling underside elevation. That is the level of evidence that prevents a late RFI or a field fix no owner wants to pay for.
Slope is where teams lose the argument with plan check
For parking spaces and access aisles, the surface slope is limited to 1:48. That sounds simple until the accessible row sits inside a grading strategy built to move water fast.
I see the same failure pattern in production:
- The site plan labels the stall accessible, but the grading sheet does not prove the local slope.
- Spot elevations exist, but not at the corners that matter for the stall and aisle.
- The civil file and architectural file drift apart after a late parking count revision.
- The set includes a code note, but no geometry that a reviewer can verify.
Plan checkers are not looking for intent. They are looking for coordinated evidence.
What to standardize in your production set
For van spaces, the set should show three things clearly: the van designation, the required headroom, and grading information that demonstrates compliant slope at the space and aisle. On firms with mature BIM standards, this is worth turning into a repeatable detail package rather than redrafting on every project.
A good office standard includes a dedicated van-accessible family type, a tag that distinguishes van spaces from standard accessible stalls, and a QA checkpoint that compares parking layout against reflected overhead conditions in covered areas. If your template can flag a van stall placed under insufficient clearance, you catch the problem before permit and protect fee on every similar project.
That is the trade-off. Spending an extra hour building the rule into families, view templates, and checklists is cheaper than burning half a day on corrections, consultant coordination, and sheet reissue.
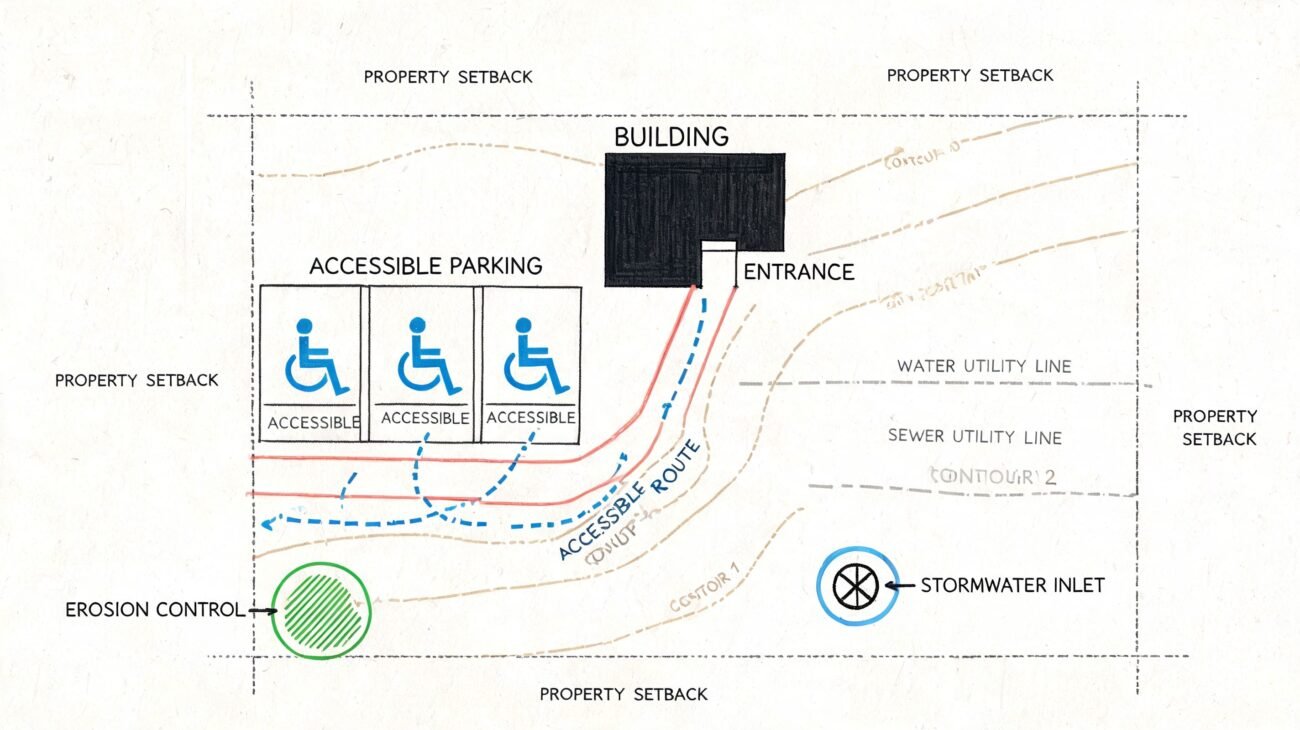
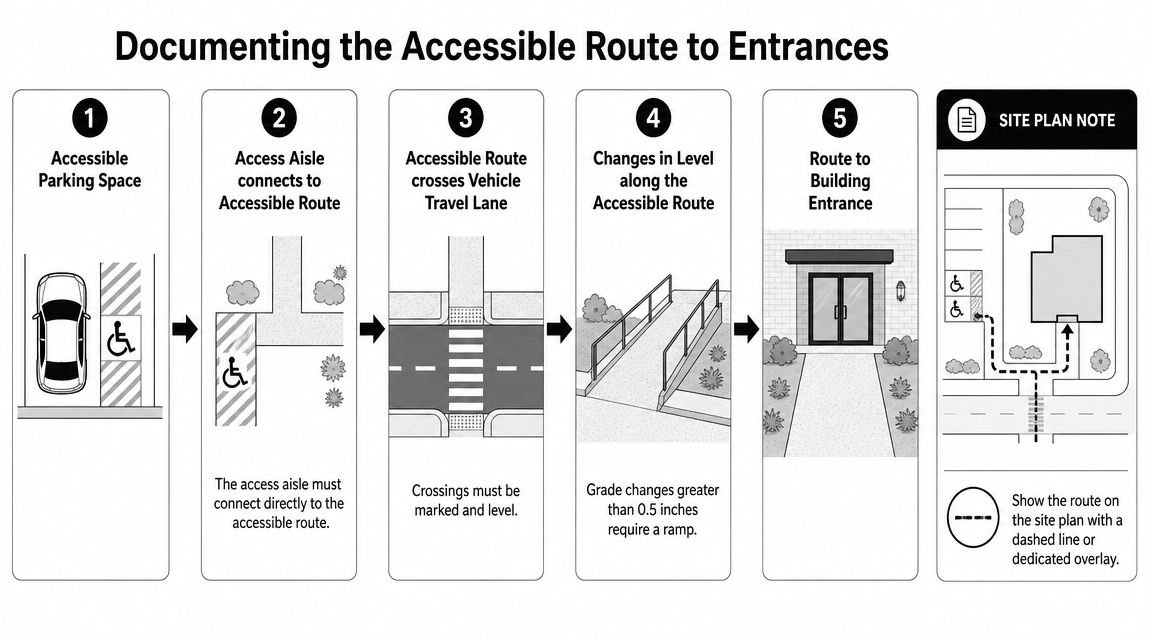
Documenting the Accessible Route to Entrances
Accessible stalls are only one half of the condition. The other half is the path from the access aisle to an accessible entrance. If that route isn't shown, the parking layout is incomplete.
Treat the route like a designed element
On permit sets, the route should be graphically obvious. A dashed overlay, dedicated linetype, or separate accessibility diagram works well as long as it is continuous and legible. If your office already uses a site plan overlay standard, that's the right place to embed it. Teams refining their documentation standards can look at broader site plans for permit guidance and adapt that discipline to accessibility-specific overlays.
The route itself needs to be checked for several conditions identified in the author brief and typical permit review workflows:
- Clear width: Minimum 44 inches, or 36 inches where the route does not serve as a means of egress.
- Running slope: Maximum 1:20 along the direction of travel.
- Cross slope: Maximum 1:48.
- Surface condition: Firm, stable, and slip-resistant.
- Level changes: Changes over one-half inch require a ramp.
Show conflict points, not just the ideal path
The route is most vulnerable where it crosses a drive aisle or shifts grade near curbs and entries. Those are the exact places where a dashed line without supporting detail becomes a liability. If the route crosses a vehicle travel lane, mark the crossing clearly and keep the crossing surface level. If there's a lip or grade change, show the ramped solution rather than assuming the field will sort it out.
A useful office standard is to require three confirmations before issuing permit:
- The route starts at the access aisle, not somewhere nearby.
- The route stays continuous to an accessible entrance.
- The route is coordinated with grading and curb conditions on the relevant sheets.
A parking plan that shows compliant stalls but no credible route is only half documented.
That's why the route belongs in your accessibility QA checklist, not as an afterthought during sheet cleanup.
Beyond ADA The IBC and State Code Overlays
Federal ADA establishes the baseline, but permit review rarely stops there. Most projects are reviewed under the adopted building code, local amendments, and state accessibility rules. That overlay is where teams get tripped up, especially on rollout work across multiple jurisdictions.
IBC adds documentation consequences
The author brief correctly flags IBC Section 1106 as an important overlay. One common example is the passenger loading zone. If the project includes one, the set needs to document an accessible condition with a 60-inch wide by 20-foot long access aisle adjacent to the vehicle pull-up space. If the loading zone appears on the site plan but the accessible condition does not, the omission is easy for a reviewer to flag.
Residential and institutional projects also need extra care because assigned parking, transient use, and specialty occupancies can shift which requirements apply. The wrong assumption at schematic or DD phase usually shows up later as rework in CDs.
Urban curbside work is a different animal
On mixed-use, campus, or urban infill projects, don't assume off-street logic covers curbside conditions. The Northeast ADA Center summary of PROWAG on accessible on-street parking notes that where on-street parking is marked or metered, accessible spaces are required on block perimeters at a rate of one space per 25 spaces up to 100, and the access aisle must be at least 5 feet wide and cannot encroach on the vehicular travel lane.
That's a different design problem than a standard parking lot. Sidewalk width, curb condition, and right-of-way limits all shape the solution.
For teams toggling between building code and site code questions, a clear internal due diligence step helps. Many firms already use jurisdictional comparison checklists similar to the thinking behind IRC vs IBC code review workflows. The same discipline should apply here. Verify the governing code path at project start. Then carry those decisions into templates, details, and QA.
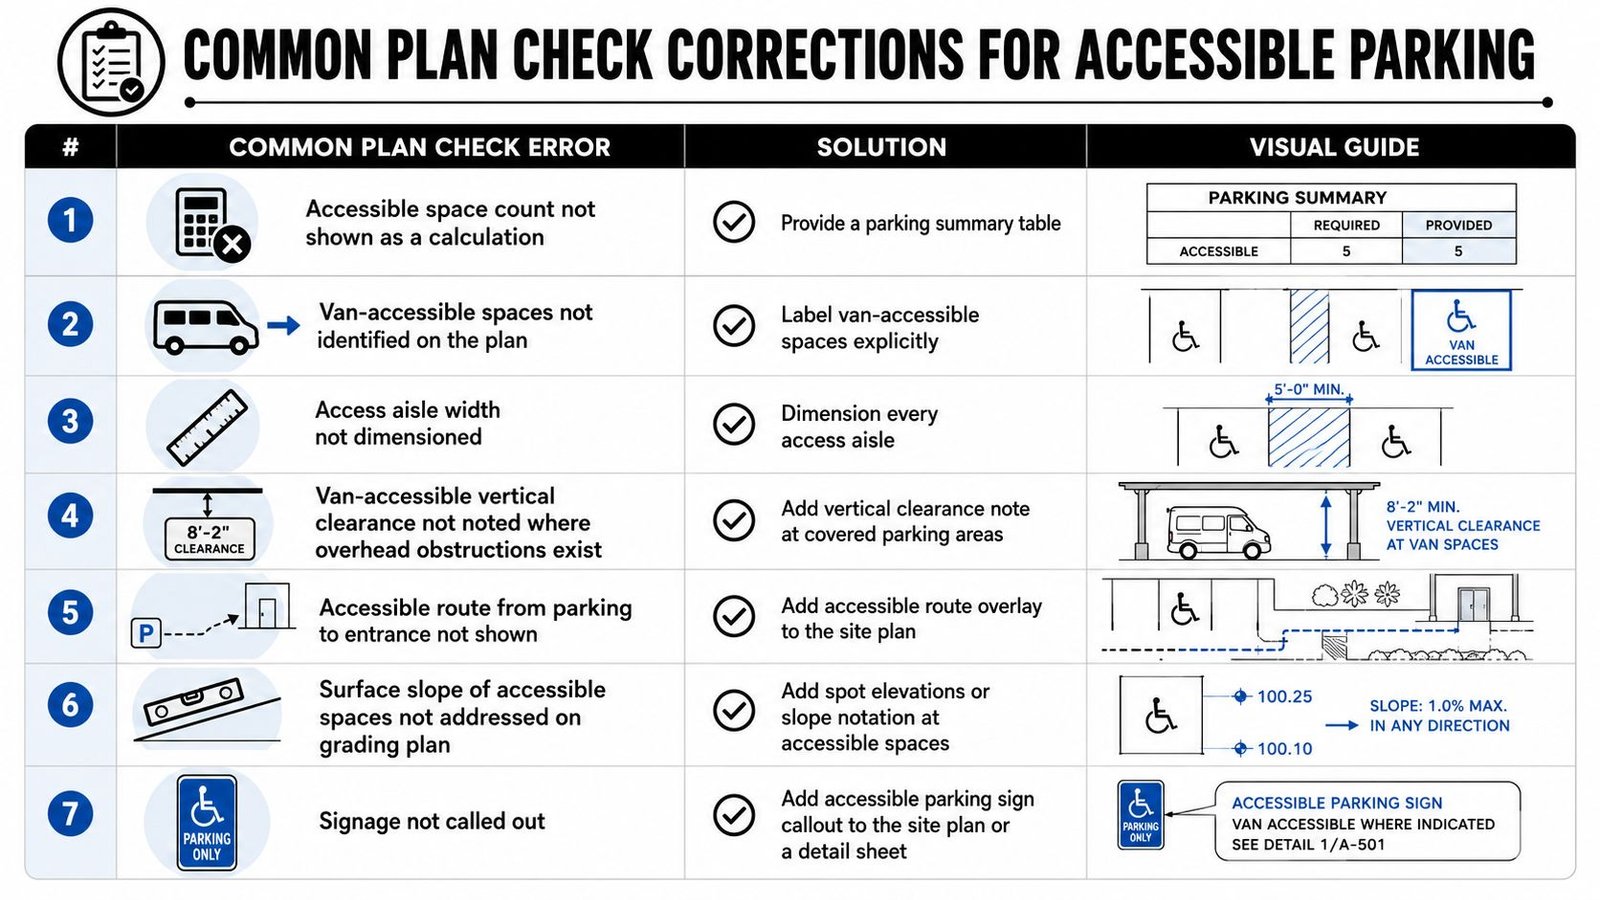
Common Plan Check Corrections for Accessible Parking
Most accessible parking corrections are repetitive. That's good news, because repetitive comments can be designed out of the process.
Red flags that trigger comments
When a plan reviewer marks up accessible parking, the redline usually falls into one of these buckets:
- Missing calculation: The total parking count is shown, but required accessible spaces are not calculated on the sheet.
- Van stalls not labeled: The drawing shows accessible spaces, but the van-accessible spaces aren't distinguished.
- Aisle dimensions omitted: The stall is tagged, but no width is dimensioned for the aisle.
- Clearance omitted at covered parking: The set shows garage or canopy conditions with no vertical clearance note.
- Route not drawn: Accessible spaces appear on plan, but no path to the entry is documented.
- Slope proof missing: The grading plan doesn't verify compliant slopes at accessible stalls and aisles.
- Signage not called out: The sheet lacks a sign reference or detail note.
Production fixes that actually work
Each of those failures has a direct fix. The key is to solve them in a reusable way.
| Common issue | Production fix |
|---|---|
| Calculation missing | Add a parking summary table with required and provided counts |
| Van spaces unclear | Tag van-accessible stalls explicitly on plan |
| Aisle width unshown | Dimension each aisle where used |
| Overhead condition unclear | Place vertical clearance note at the affected parking area |
| Route omitted | Add a dedicated accessible route overlay |
| Slope unresolved | Show spot elevations or slope notation on grading sheets |
| Signage absent | Add sign callout on plan or detail sheet |
Turn comments into a QA checklist
The strongest teams don't wait for plan check to catch these items. They build them into sheet issue checklists, Revit view templates, and internal redline reviews.
Field-tested takeaway: Accessible parking comments usually aren't about obscure code interpretation. They're about incomplete documentation.
That's an important distinction. It means the solution is operational. If your office standard forces every site plan to answer these seven questions before issue, accessible parking requirements become a repeatable production task instead of a recurring permit risk.
BIM Workflows for Bulletproof Parking Compliance
A parking plan can look finished and still be set up to fail at permit. The stalls are drawn, the striping is shown, and the notes are in place, but nobody can verify counts by facility, confirm which spaces are van accessible, or see whether the route data is tied to the same model logic. That gap usually shows up late, after redlines are back and the team is burning hours on preventable cleanup.
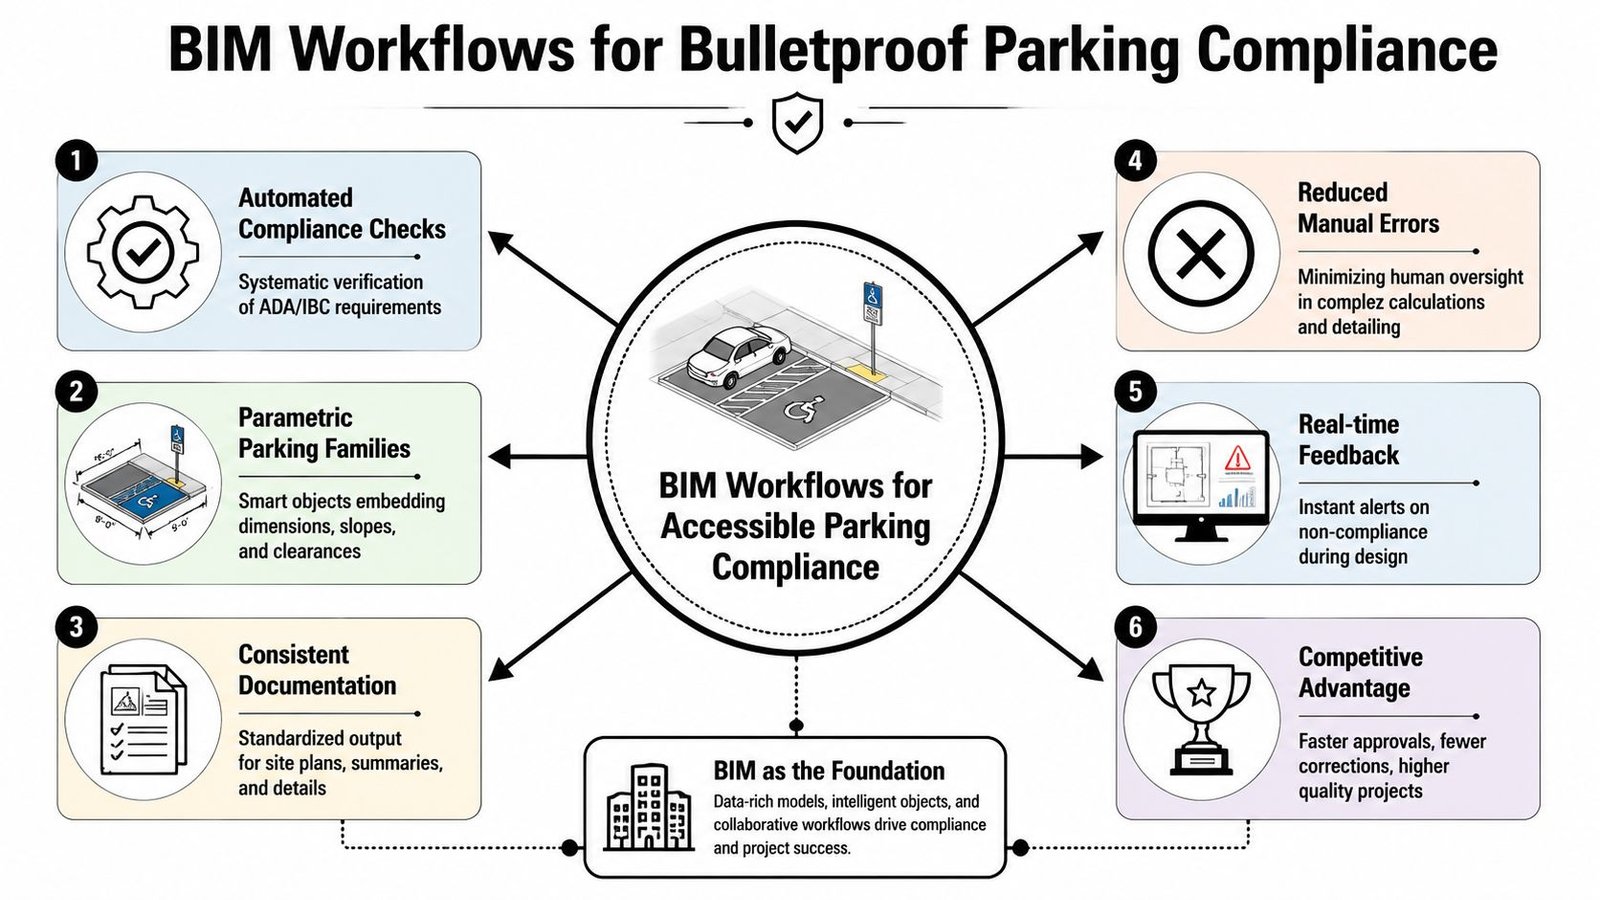
Build intelligence into the family and schedule
The model should do more than draw a stall. It should classify it, schedule it, and expose missing information before issue. For accessible parking, that means treating each lot, garage, or parking area as its own trackable facility in the model, then pushing that data into schedules and tags that can be checked quickly.
A reliable Revit setup usually includes:
- Parking families with shared parameters for accessible type, van designation, and facility ID
- Schedules filtered by facility so each parking area is reviewed on its own
- Tags that clearly separate standard accessible and van-accessible spaces
- View templates that keep striping, signage, route graphics, and annotation consistent across sheets
Production maturity is evident. In a loose workflow, staff count stalls manually, add notes, and hope the sheets stay coordinated. In a controlled workflow, the family carries the designation, the schedule reports the count, and the tag displays the same data on plan. That reduces coordination drift between the model and the sheet set.
Use automation for predictable QA
Good teams do not spend senior time hunting for missing parking parameters one view at a time. They set up checks for the failures that repeat.
A simple Dynamo script, model checker, or schedule-based review can flag stalls with no facility ID, accessible spaces missing a designation, van spaces tagged incorrectly, or parking elements placed in the wrong workset or phase. Review views can isolate accessible stalls, access aisles, signage references, and route graphics before the set goes out.
That approach fits the same logic used in disciplined building permit drawing workflows. Repetitive compliance tasks belong in templates, families, schedules, and pre-issue checks, not in memory.
Why this protects fee and schedule
The benefit is not abstract. It shows up in fewer late-stage edits and fewer cross-discipline coordination breaks. If the architectural model drives a clean parking schedule and clear plan tags, the civil team is not revising striping after permit comments, and the PM is not sorting out conflicting counts across sheets.
There is a trade-off. Setting up shared parameters, schedule filters, and QA views takes time up front. On one small lot, manual drafting can seem faster. On repeat work, mixed-use sites, and multi-lot projects, that shortcut usually costs more than it saves.
Controlled documentation protects margin. Accessible parking compliance becomes a repeatable production task instead of a permit gamble.
Build Compliance into Your Production System
Getting accessible parking right isn't about memorizing isolated code rules. It's about making sure your production system won't let incomplete documentation out the door. When the count is scheduled, the stall geometry is embedded in families, the route is part of the site plan standard, and the grading check is tied to issuance QA, the permit set becomes much more reliable.
That reliability shows up in small ways that matter. Fewer reviewer questions. Fewer internal fire drills. Fewer late-stage sheet edits that ripple into civil, site, and structural coordination. For firms producing repeat commercial, multifamily, and mixed-use work, that consistency is what turns compliance from a recurring risk into a manageable process.
If your team keeps seeing the same accessible parking comments, the issue usually isn't effort. It's the absence of a durable workflow.
If your firm needs help tightening architectural production on commercial CD sets, BIM Heroes supports architecture teams with scalable production systems, BIM workflows, and drawing-set discipline. If useful, reach out through their architectural production services page for support on permit documentation, QA frameworks, and repeatable delivery standards.