Meta description: Rooftop unit replacement in existing buildings rarely stays a simple swap. Learn the coordination steps, BIM workflow, permit drawing requirements, and execution details that keep RTU replacement predictable.
A building owner approves a rooftop unit replacement and treats it like maintenance. Then the submittal lands. The new unit has a different footprint, a different weight, different duct openings, and higher electrical demand. The existing curb no longer works. The structural engineer needs to review the roof framing. The electrician finds the panel doesn't have what the new unit needs. What looked routine becomes a multi-discipline coordination problem.
That scope misread is where projects lose time and margin.
On existing buildings, rooftop unit replacement only looks simple when nobody has checked the interfaces yet. The actual work sits in pre-design diligence, clean handoffs between trades, and drawing packages that answer contractor questions before they become RFIs. If the team scopes the replacement correctly at the start, the job stays controlled. If not, crane day becomes the moment everyone discovers what was missed.
Introduction
Most RTU swaps fail in the same place. Not in procurement. Not in startup. They fail in the gap between “replace existing unit” and the actual field conditions.
Existing buildings don't give you clean assumptions. Curbs have been modified. Roofing layers have changed. Ducts were shifted years ago. Electrical feeders were sized for equipment that no longer matches current replacement options. The design team can either surface those conflicts early or pay for them later in change orders, resubmittals, and schedule drift.
A disciplined approach to rooftop unit replacement keeps the work narrow without pretending it is risk-free. The replacement may not require a full MEP redesign, but it does require real RTU replacement MEP coordination, targeted structural review, and permit documents that show exactly what changes and what stays.
The Hidden Complexities of a Simple RTU Swap
What turns a “like-for-like” swap into a coordination job usually comes down to four variables. Miss any one of them and the project starts reacting instead of executing.
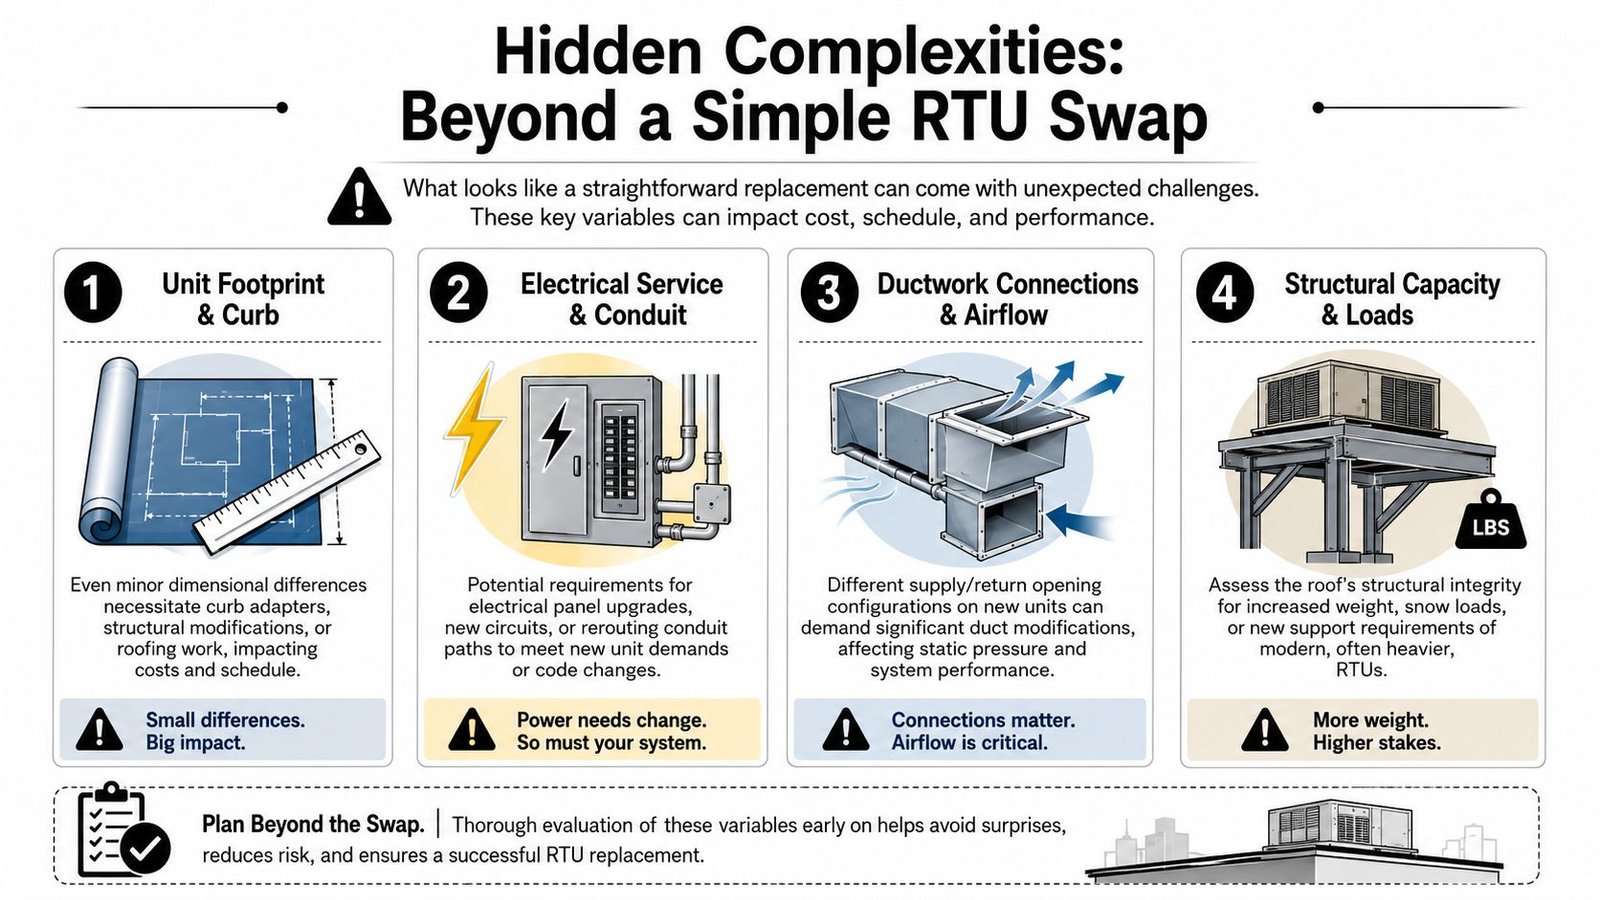
Unit footprint and curb
The replacement unit may be close in nominal tonnage and still fail at the curb. That's common. If the base rail and opening pattern don't align with the existing curb, the team has to decide between an adapter curb and a full curb replacement.
That decision affects more than mechanical scope. A new curb changes roof work, flashing details, sequencing, and often the owner's roof warranty position. The mechanical contractor can't solve that alone.
Weight and structure
Modern replacement units can change loading even when the cooling intent stays the same. The structural review has to compare the operating weight of the new unit against the roof framing at that exact location. If the curb geometry changes, the load path changes too.
Field lesson: Unit selection before structural review is how teams back themselves into expensive rework.
Duct openings and electrical demand
Supply and return openings rarely land exactly where the old ones did. Small offsets are manageable. Big shifts force duct transitions, short-run reroutes, and sometimes deeper below-roof changes than the original scope assumed.
Electrical is the other common miss. A replacement with higher demand can trigger a new circuit, breaker changes, disconnect replacement, or a panel review. The U.S. Department of Energy's 2025 High-Efficiency RTU Toolkit states that 57% of rooftops replaced in 2024 were under-sized or incompatible with next-generation smart controls, resulting in 22% higher operational energy costs over the next decade in the DOE High-Efficiency RTU Toolkit. That's the core problem with “like-for-like” thinking. It narrows first cost while creating avoidable constraints later.
Pre-Design Diligence The Required Site Audit
A profitable RTU replacement is usually decided before the permit set starts. The site audit is where teams either lock down scope or leave enough gaps to burn time in submittals, RFIs, and crane-day changes.
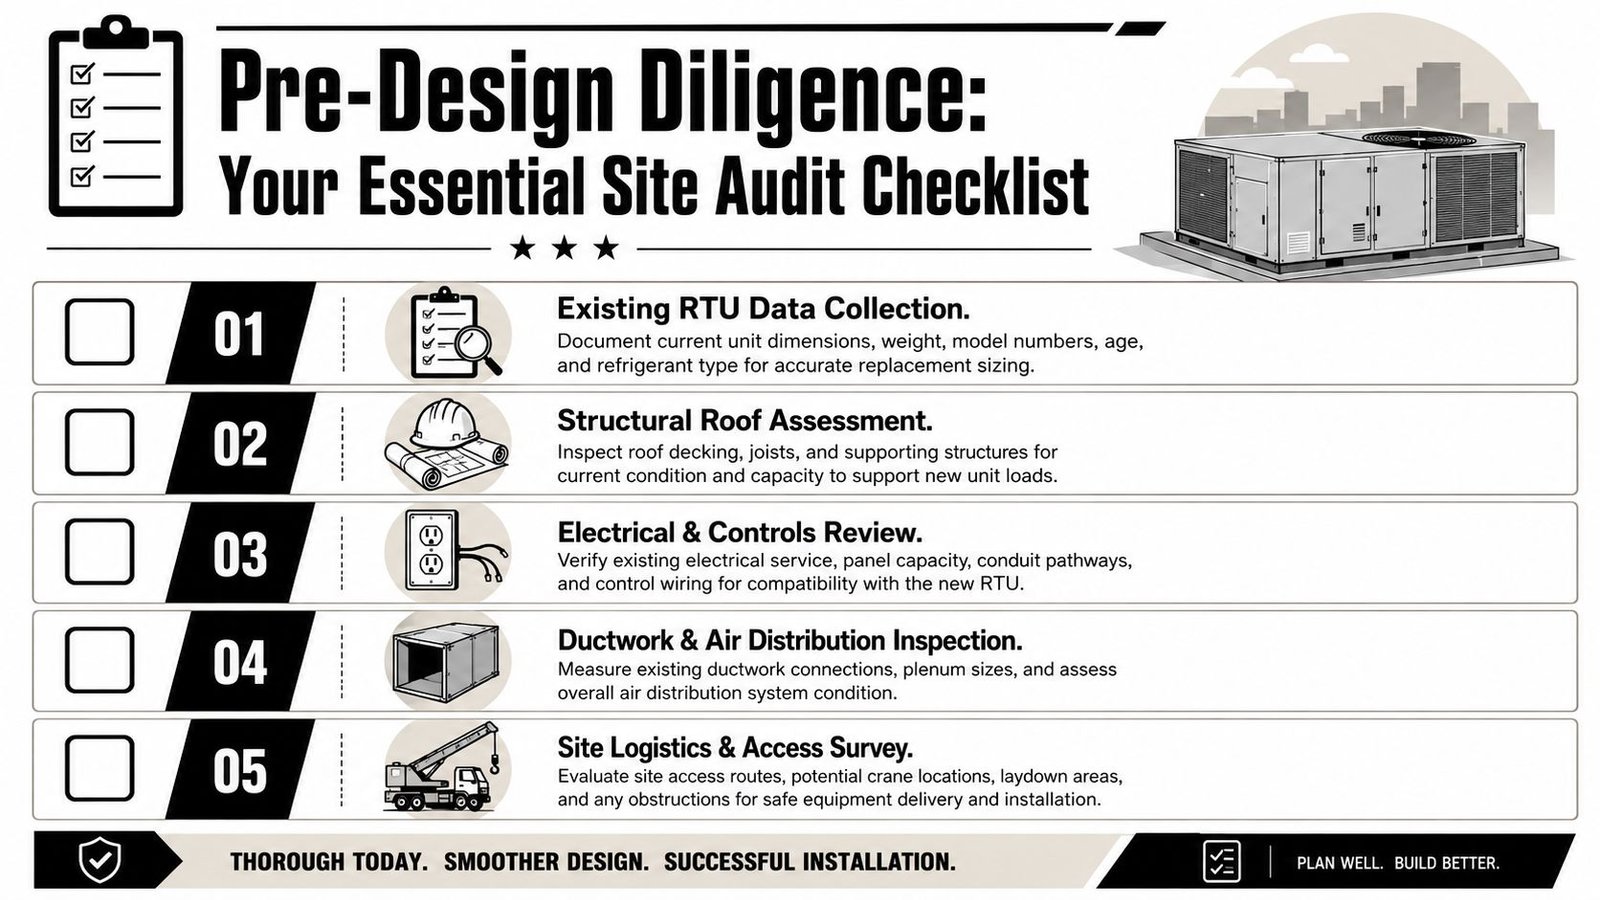
For RTU swaps, the field walk is not a formality. It is the first coordination meeting, and the building always has more accurate answers than the record drawings. If the team does not capture the existing unit, curb, utilities, access, and below-roof conditions with enough precision to model and price the work, the uncertainty shows up later as change exposure.
The audit has to support three decisions at once. Procurement needs reliable equipment and adapter inputs. The design team needs permit-level existing conditions. Operations needs a realistic installation plan with known constraints on access, shutdowns, and sequencing.
What the field team needs to capture
Start with the unit that is physically on the roof, not the one shown on an old schedule. Record the nameplate data, electrical characteristics, refrigerant, service clearances, orientation, and any field modifications that affect replacement selection. Photos matter, but photos without dimensions still create follow-up questions.
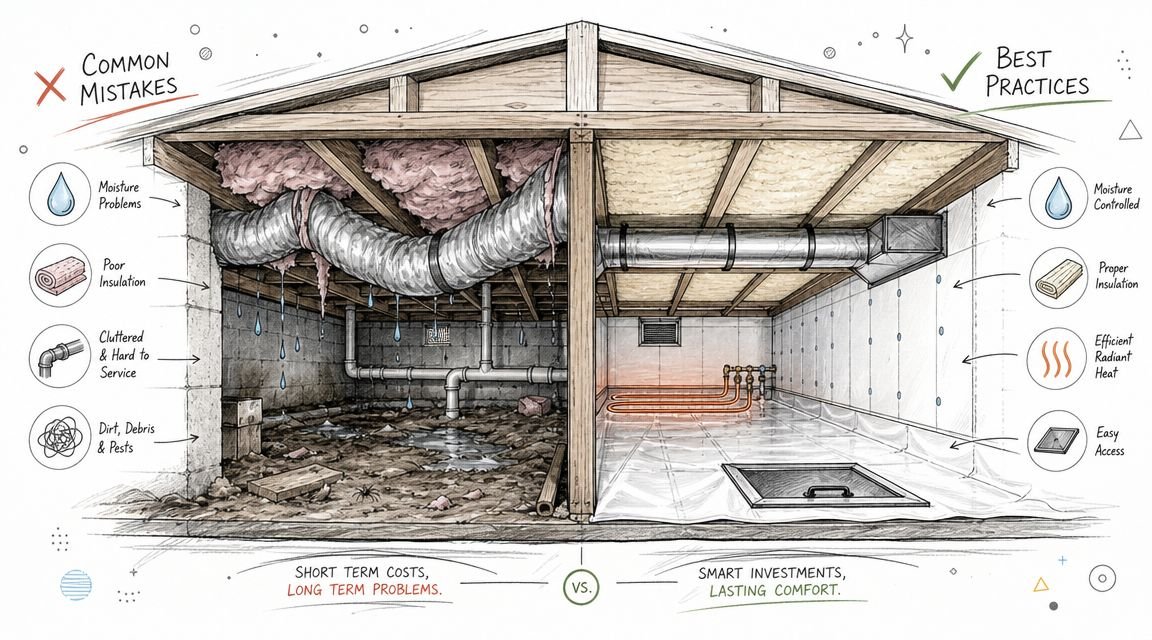
Capture the curb as its own scope item. Measure outside dimensions, opening dimensions, height, orientation, attachment condition, and visible deterioration. Note roof slope, nearby parapets, screens, conduits, gas piping, and anything else that can affect fit, rigging, or service access.
Duct conditions need more than a quick look through the access panel. Field-verify supply, return, outside air, relief, and any existing adapter geometry. If the old installation was adjusted in the field years ago, the replacement design has to reflect that reality or the sheet metal package will carry the mismatch.
Electrical should be traced, not assumed. Confirm panel location, breaker size, disconnect type, conductor routing, available working clearance, and any visible code issues that may get pulled into the permit review once the replacement is filed.
Structural context belongs in the audit package too, but the goal here is existing-condition documentation, not final engineering. Identify what is visible below the unit, what drawings exist, and what still needs investigation so nobody prices the job as if those answers are already known.
Why digital capture improves predictability
A targeted 3D LiDAR scan of existing rooftop and below-roof conditions gives the design and precon team usable geometry instead of marked-up guesses. That matters on occupied buildings where parapet offsets, access limitations, and field-run ductwork can drive coordination time more than the unit itself.
I have seen teams save a week of redesign by catching one bad assumption in the scan model before equipment release. A small mismatch in curb orientation or duct offset can force a different adapter, a different shutdown window, or a different crane pick path. Those are manageable problems during pre-design. They are expensive problems after approvals, fabrication, and mobilization are already in motion.
The site visit should answer installation questions early enough to protect margin. If it does not, the project team is still doing discovery during design, and that is where avoidable RFIs start.
Structural Curb and Roofing Coordination
A replacement turns into a change order fast when the curb detail is vague and the roofer gets pulled in after equipment release. The unit may be a like-for-like selection on paper, but the job still fails if the new bearing condition, flashing scope, or roof warranty path is left to field interpretation.
Structural review has to follow the actual load path
Review the new unit at operating weight and confirm how that load transfers through the curb into the supporting structure below. Total weight alone does not settle the question. A curb adapter can shift reactions to different points, change bearing length, or introduce localized deck reinforcement that was never part of the original installation.
That is where permit sets often get thin. A short email saying the structure is "okay" does not help the reviewer, the GC, or the installer on crane day. Put the structural disposition in the drawings or in a signed calculation package referenced by the drawings, and make the responsibility clear if supplemental framing is required.
Small geometry changes matter. A few inches of curb growth can move the unit closer to a panelboard clearance zone, interfere with a roof drain slope, or force a new relationship with nearby parapet flashing.
Curb scope and roofing scope need one coordinated answer
If the existing curb stays, the documents should say how it is being verified for condition, level, attachment, and compatibility with the new unit or adapter. If the curb is replaced, treat that as roofing work and structural work tied together, not as a miscellaneous field item.
Roofing coordination drives schedule risk because the membrane tie-in, insulation build-up, flashing height, and warranty repair procedure have to be defined before the pick. Once the old unit is off the roof, the team has a short window to inspect the exposed condition, make any deck or curb corrections, dry in the opening, and set the new equipment. Field discovery during that window burns labor and extends shutdowns.
The documents should remove guesswork on four points:
- Curb disposition. Existing curb reused, adapted, raised, or fully replaced.
- Structural modifications. New steel, deck reinforcement, welding, or attachment requirements.
- Roofing responsibilities. Demolition, temporary dry-in, membrane restoration, flashing, and warranty sign-off.
- Envelope interfaces. Drainage, counterflashing, nearby terminations, and any edge condition affected by the new curb geometry.
Parapet and edge conditions deserve their own check when the unit sits near the roof perimeter. Changes to curb height or location can affect termination lines, sheet metal, and water management at the edge. Teams that document those conditions against coordinated parapet detail standards close out fewer RFIs during submittals and avoid last-minute roofing clarifications in the field.
The goal is simple. One coordinated curb and roofing story in the permit set, with no gaps for the contractor to price as an allowance and no surprises after the crane is booked.
Leveraging BIM for MEP and Structural Coordination
A replacement project doesn't need a giant model to benefit from BIM. It needs the right model at the right level of detail.
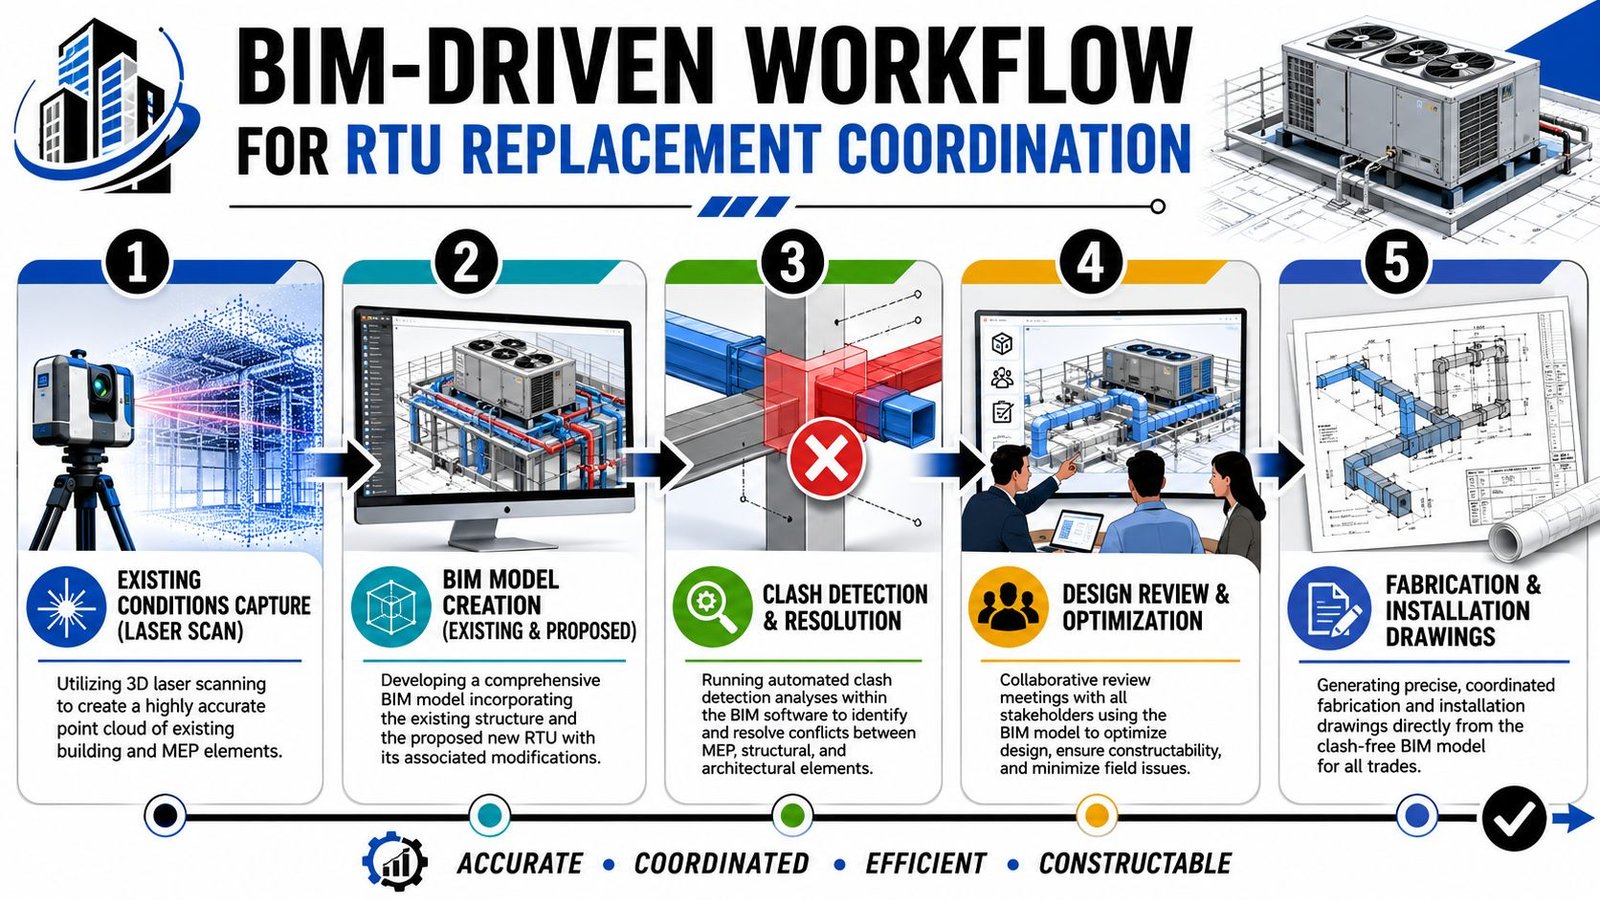
What a useful model includes
For rooftop HVAC replacement BIM, model only what drives coordination risk. That usually means the roof surface, curb, structural members supporting the unit, nearby parapets, access clearances, the existing duct interfaces, and the electrical route to the disconnect. Add the proposed unit, curb adaptation, duct transitions, and any structural framing modifications.
That model should be simple enough to move fast and precise enough to settle decisions.
Data from the National Institute of Building Sciences states that 68% of rooftop replacement delays stem from unanticipated structural load mismatches and curb-to-roof envelope incompatibilities, issues most effectively resolved through precise BIM modeling and 3D laser scanning of the existing roof geometry, as cited in this discussion of rooftop replacement coordination risk.
How BIM protects margin
The reason to model this work isn't presentation. It's conflict removal.
Use Revit to build a lightweight existing-and-proposed coordination model. Use Navisworks to test the curb against structure, the duct transitions against nearby services, and the access path against code and maintenance realities. If the electrical route is changing, model enough of that path to confirm constructability and avoid field improvisation.
Here's where BIM helps most on replacement work:
| Coordination issue | What the model resolves |
|---|---|
| Curb conflicts | Whether the proposed curb lands cleanly over existing structure |
| Duct mismatch | How much transition is needed and where it can physically fit |
| Rooftop access | Whether clear service paths remain after the new unit is set |
| Multi-trade overlap | Which trade owns each interface before the permit set goes out |
A small model built early is worth more than a detailed model built after procurement.
Pod-based production beats heroic coordination
This work is ideal for a repeatable delivery pod. One coordinator, one mechanical modeler, one structural reviewer, and a clear checklist can move faster than a larger team working from assumptions. The value isn't drafting speed. It's decision control.
If your team needs outside help to build that coordination layer, MEP coordination support is one way to handle existing conditions modeling, clash review, and drawing cleanup without expanding the project into a full redesign effort.
Planning for Execution Rigging Sequencing and Temporary HVAC
A coordinated model and a clean permit set still won't save a poorly sequenced install day. Execution planning has to be treated as part of design, not something left to the week before the lift.
Rigging has to be planned on paper first
The crane plan starts with the pick location, lift path, roof access constraints, and any site conditions that affect setup. The team needs one agreed sequence, not three trade-specific versions of the same day.
A practical sequence usually runs like this:
- Isolate and disconnect the existing unit after shutdown procedures are complete.
- Remove the existing RTU and immediately inspect the exposed curb and roof condition.
- Complete curb and roofing corrections before the new unit is lifted.
- Set, anchor, and seal the new unit in final position.
- Tie in duct, controls, and electrical after the unit is physically secured.
- Start up and verify operation only after all trades have signed off on their interfaces.
Temporary HVAC needs an explicit decision
Owners get frustrated when nobody discussed outage planning until the schedule was already fixed. On some buildings, a short shutdown window is acceptable. On others, it isn't.
Occupied offices, healthcare environments, process spaces, and rooms with sensitive loads often need a temporary conditioning plan or an after-hours replacement window. That decision affects labor planning, site logistics, and the owner's operating plan. It should be made while the scope is still being written.
Execution documents should answer field questions
Before crane day, the field team should know:
- Who owns each handoff between mechanical, roofing, electrical, and structural scope.
- What gets inspected before setting the new unit if hidden damage appears after removal.
- What happens if the existing condition deviates from the surveyed condition.
- Which submittal dimensions govern if manufacturer literature conflicts with field measurements.
That level of planning is what keeps a swap from turning into a stoppage.
The Permit Set and Final Construction Documents
The permit set for RTU replacement construction documents should be narrow, specific, and hard to misread. Broad notes create contractor assumptions. Tight drawings create predictable bids.
What the drawing package needs to show
At minimum, the set should include a roof plan with the existing unit location, the new unit location if it moves, the curb outline, and any roof penetration changes. The mechanical schedule should list the replacement unit with full performance data, including cooling and heating capacity, airflow, electrical data, and efficiency ratings.
The mechanical plan should show the extent of duct modifications needed to connect the new unit. Don't stop at “modify duct as required” if the offsets are already known. Draw the transitions. That's what bidders need.
Structural and electrical content can't be implied
The structural engineer's written approval of unit weight and anchorage should be included in or referenced by the permit package where required. If seismic anchorage applies, show the basis clearly enough that the contractor and reviewer see the same requirement.
Electrical drawings should identify the existing circuit, any revisions, and the disconnect arrangement serving the unit. If the replacement changes rooftop access or maintenance clearance, that needs to appear on the roof plan too.
The permit set should remove interpretation, not transfer it to the contractor.
A concise package is fine. An incomplete one isn't. Existing building replacements succeed when the documents define exactly how the new RTU connects to the building that's already there.
Commissioning and Project Closeout
The project isn't done when the unit is on the curb. It's done when the system has been verified, documented, and handed over cleanly.
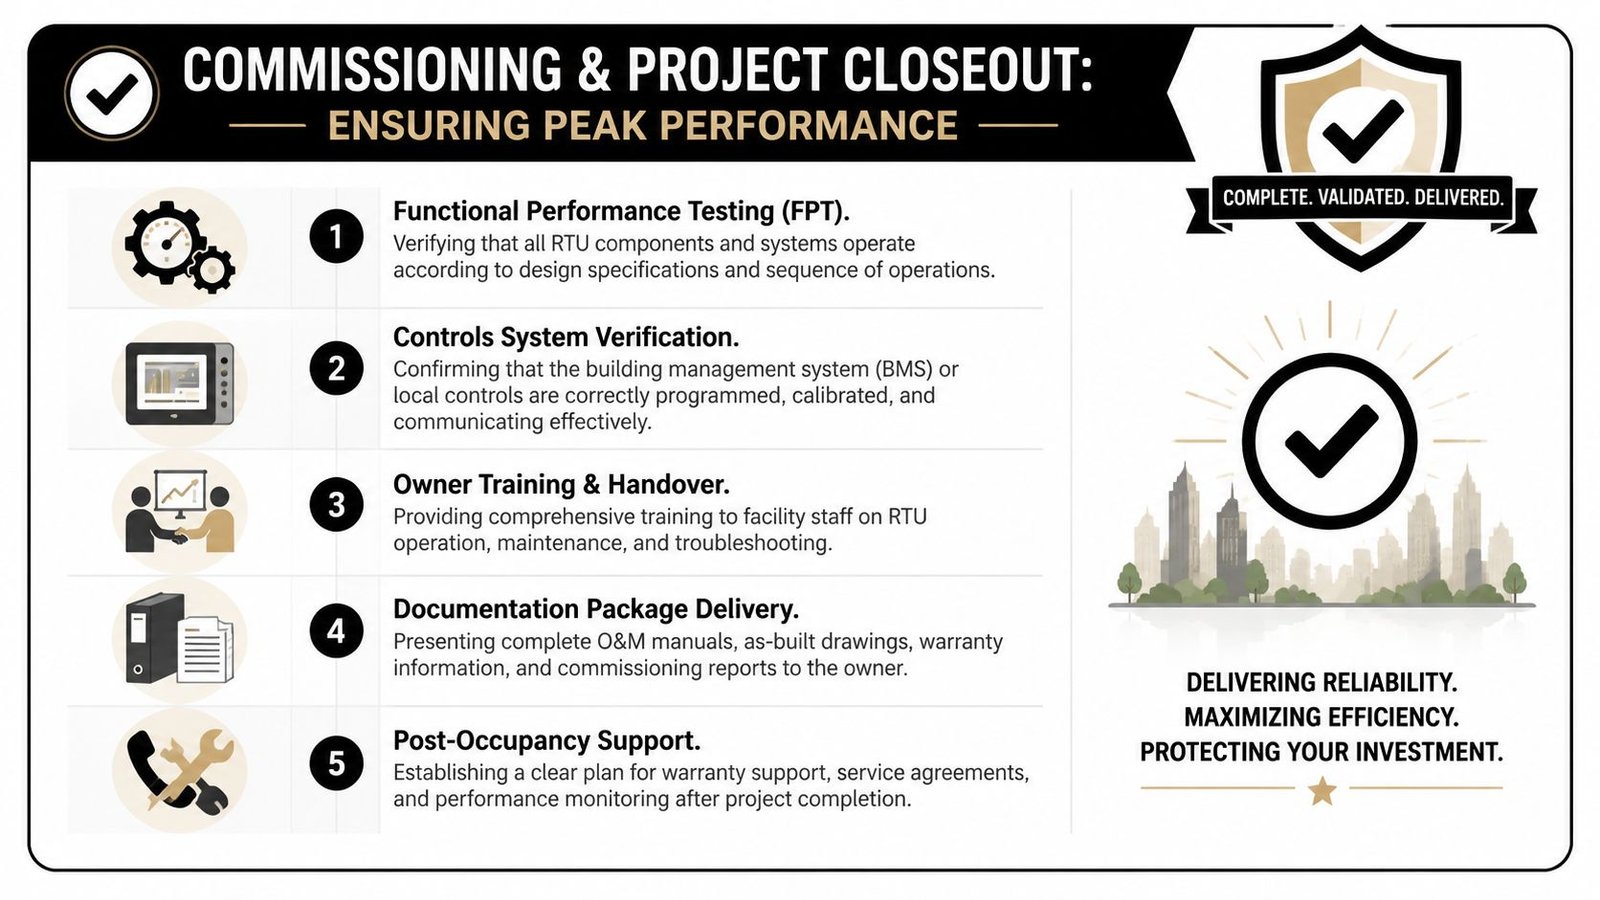
Commissioning should verify electrical phasing and voltage balance, confirm airflow and economizer operation, and validate pressures, temperatures, and refrigerant charge against the manufacturer's requirements. Condensate routing deserves specific attention. Guidance for startup and drainage calls for a minimum 3/4-inch drain diameter and a slope of at least 1/8 inch per foot to avoid backups, standing water, and roof damage, as noted in this commissioning and condensate routing guidance.
Closeout package checklist
- Startup documentation with the final commissioning record and manufacturer verification.
- As-built markups reflecting field changes to duct, curb, electrical, or access conditions.
- Warranty handoff including manufacturer and installer responsibilities.
- Owner operations notes covering filters, access, shutdowns, and service clearances.
For teams managing recurring replacement work across existing buildings, the closeout package should also feed the next project. The best QA systems turn field lessons into reusable checklists, detail libraries, and scoping templates.
If your team is managing a rooftop unit replacement and wants cleaner coordination without expanding the project into a full redesign, BIM Heroes can support MEP coordination and production workflows. A focused delivery approach helps teams sort existing conditions, build permit-ready documentation, and reduce RFIs before the work reaches the roof.
Suggested WordPress category: MEP Engineering